

How to Prepare Basic Garam Masala at Home
January 21, 2014 by admin
Filed under How to make...for beginners
 Garam masala is one of the most essential item in an Indian kitchen .The dishes which demand garam masala are aplenty and the freshly powdered garam masala is the secret to the success of many recipes. The aroma of fresh cardamom, cloves and cinnamom is distinct.
When I started cooking I used to purchase the packs from the market. I looked for ISI brand. Each brand taste different basically due to the addition of the base ingredients. Different parts in India prepare garam masala with various base ingredients and quantities. Preferences of ingredients include Coriander seeds, Black whole Pepper, Dry red chilly, bay leaf, etc.
Today I’m sharing the basic recipe of garam masala which lends great aroma and has received lots of appreciation from family and friends. The idea for this posts triggered when I went shopping for groceries with my new neighbor who is recently married . She was purchasing Garam masala powder.
When I enquired with her she mentioned that she did not know how to prepare garam masala powder at home. I suggested that if she had 15 minutes to spare in a month she can prepare fresh garam masala at home. She was inclined to learn the procedure. We purchased all the base ingredients .
After a cup of hot tea and snacks she prepared we began to make basic garam masala powder. I appreciated the enthusiasm she showed towards cooking even though she is a starter.
Basically it is a matter of convenience. For bachelors and busy working people they opt for ready made packets. Making basic garam masala at home is easy and can be followed by bachelors too.
I preferably buy 10 gm packs as it will be easy. Measuring will not be required.
Ingredients :
Cardamom / Elaichi: 10 gm or 2 tbsn
Cloves / Grambu : 10 gm or 2 tbsn
Cinnamom / Patta: 10 gm or 4 sticks of 1 inch size
Fennel seeds / Soamp : 10 gm or 2 tbspn
Caraway seeds / Shahjeera: 5 gm or 1 tbsn
Star anise: 3 or 4 nos
Accessories: Dry Grinder(small jar), Fine mesh filter ,air tight container
Procedure for preparing Basic Garam masala at home:
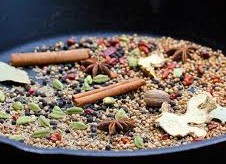
 To make homemade garam masala dispense all the ingredients into a heavy bottomed pan. Break the cinnamom sticks into finer pieces. Keep the flame in medium. Keep stirring to avoid burnt smell. When sufficiently hot put off the flame.You will get a roasted smell of the ingredients. Let it cool. Powder all the ingredients in a dry grinder. The small jar is sufficient for powdering.
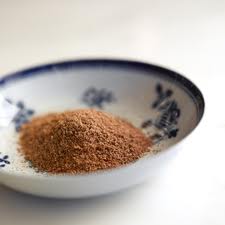
I like the home made garam masala powder to be slightly coarse. Therefore I do not remove the cardamom pods. If you want fine garam masala powder you can filter thru’ a wire mesh. Powder the coarse stuff once again. Transfer to an airtight container. Do not close the lid immediately. Keep a small gap .When the garam masala powder has reached normal temperature close the lid tightly.
This garam masala will last upto 3 months. You can powder homemade garam masala as per your usage at home. Powdering quantity for a month is ideal as the freshness of garam masala powder is retained.
Another option for using the left over cardamom pods are : you can add the cardamom pods in the tea leaf box or directly add 2-3 elaichi pod covers in the boiling tea. Great method for preparing elaichi tea.
You can prepare pickles, wine, various chutneys and sharpen your culinary skills.
Do you prepare garam masala powder differently. Include your comment to let all readers know.
Read the simple way to extract fresh coconut milk at home. and the simple way to prepare fresh moong gram sprouts at home.
SIMPLE WAY TO EXTRACT FRESH COCONUT MILK AT HOME
January 7, 2014 by admin
Filed under How to make...for beginners
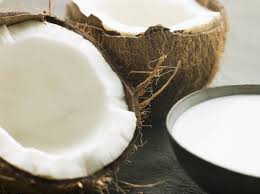 Coconut milk is required for many South Indian dishes. Coconut milk is used for making sweet delicacies like achappam, payasams,ada pradhaman. Coconut milk is lavishly added in appams, stew curry made of egg, chicken, fish or meat. Coconut milk enriches the dish and brings the rich texture to the curry. The gravy thickness is balanced by adding coconut milk to the dish.
In Kerala due to the abundant availability of coconut women prefer to extract fresh coconut milk at home. In the earlier days women used the grinding stone to grind the coconut and extract milk. Thanks to technology we now add coconut to the grinder and with the press of the button we can grind the coconut and extract milk. You can follow this simple way to extract fresh coconut milk at home and enjoy the taste.
Bachelors have one step ahead , they have now shifted to purchase coconut milk powder and add in curries as per the consistency required for the recipe thin / thick.
Whatever the situation may be I enjoy the taste of fresh coconut milk in the dishes and sweets. To avoid surprises like power cut etc…I first extract coconut milk and then start the preparation.
 Coconut milk is extracted in 3 stages. The coconut milk is classifies as 1st milk- Onnam paal, 2nd milk- Randam paal, 3rd milk – Munnam paal. The difference basically is that the 1st milk is the thickest of all. It is the cream of the entire coconut you have extracted. The 2nd milk is a little thinner. It is added in curries and dishes as a replacement of water. The basic ingredients i.e vegetables / meat are basically cooked in this milk. The third milk will have a pale color. It is the final rinse of coconut milk. Do not waste this milk, can be extracted in little amount. 3rd milk is used to rinse the grinder in which masalas have been grinded, jaggery is boiled for sweet dishes.
You can chop the coconut pieces and shred in the grinder prior to grinding for coconut milk extraction. Recommended to use warm water in winter for grinding the coconut. I prefer using lukewarm water all round the year.
Let us understand the simple way to extract fresh Coconut milk at home:
Ingredients :
Fresh coconut: 2 cups (grated)
Water: 3 cups (lukewarm temp.)
Accessories: Grinder, Fine mesh filter or muslin cloth for filtering, 3 utensils for storage of milk extracted.
Procedure for extracting fresh Coconut milk at home:
Method:
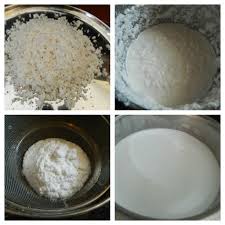
- Add grated coconut and 1 cup of lukewarm water in the grinder. Grind to a fine paste. Empty into a filter and extract milk. Keep this aside carefully.
- For 2nd milk add 1.5 cup of lukewarm water to the coconut shreds. Grind it for 2 minutes. Filter the coconut milk. Keep the second milk aside.
- The final rinse is with ½ glass water. Grind for a minute and filter the shreds. You will get a pale colored water. This is useful to simmer vegetables or meat.
This was not a complicated task. Keep all the accessories close by and start the grinding. Enjoy the freshness of coconut milk and your family will appreciate the effort for natural and homemade coconut milk. The sweet dishes and stew curry will taste different. Go ahead and definitely give a try. There are no preservatives.The dishes look royal and totally different.
You can store this in the refrigerator for 3 days .It will till stay fresh.
 Most recipes mention thick or thin coconut milk. Thick coconut milk is the 1st milk that is added always at the end of the cooking prior to putting off the flame. The precaution taken is because if the 1st coconut milk boils in the curry, the gravy has a split appearance similar to split milk.
Just to update, in the preparation of rose cookies / achappam, the coconut milk is added in reverse order. 1st milk is added first, then second milk and last 3rd milk. This is because the base is mixed first and fried later. The water addition for coconut milk extraction will be in lesser quantities as base consistency has to be adjusted to get crispy and shaped achappams.
I’ve shared my experiences. If you have any further tips for improving the procedure do let us know.
Learn How to Prepare Basic Garam Masala at Home
MIXED VEGETABLE CURRY
December 13, 2013 by admin
Filed under Curries, Curries, Rice & Chutney Varieties
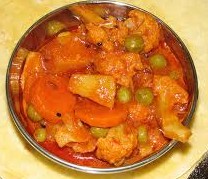 Mixed Vegetable curry is an ideal choice for vegetarians and for people following lent . I usually prepare this mixed veg curry on the days the vegetables are few at home i.e the day prior to market .
We have vegetable markets near our homes called Rythu bazaar . These vegetable markets are basically promoted such that the farmers can bring their products and sell at their price without mediators. They will get correct pricing and the customer is not levied high too. The vegetables are fresh and sold in bulk quantities . You need to purchase 250 gms at a minimum. Rythu bazaars have become a common place to meet all colony people and share news.
Coming back to the preparation of mixed vegetable curry. This is a simple dish with regular ingredients. The uniqueness of this dish is the taste of each vegetable that gets combined as a whole. I cook this in the AMC dish which retains each vegetables taste and aroma too while cooking. Water is not required for cooking.
Ingredients :
Capsicum : 1 no (diced into 1 inch cubes)
Beans: 4 nos (cut into 1 inch length)
Potato:1 no. ( diced into 1 inch cubes)
Carrot: 1 no (cut into 1 inch length)
Tomato:1 no.(cut into small pieces)
Cauli flower:2 to 3 small florets
Green peas:1/2 cup
Onion: 1 medium size(cut into small pieces)
Green chilly:1 no.(slit length wise)
Vegetable oil: 4 tspn
Chilli powder: 1 tspn
Coriander powder: 1 tspn
Turmeric powder: ¼ tspn
Salt: ¾ tspn
Ginger-garlic paste: ½ tspn
Garam masala powder: ¼ tspn
Coriander leaves: few sprigs(for garnishing)
Ingredients for Seasoning:
Mustard – 1/2 tsp
Curry leaves : 1 stem
Procedure for Mixed Vegetable Curry:
Method:
- Wash all vegetables. Cut them into small pieces after water is drained.
- Heat oil in a kadai and add mustard. When it splutters add curry leaves.
- Add green chilly and onions. When onions have become tender add potato, carrot, cauli flower, beans. Sauté it for a minute and close the lid of the kadai. Reduce the flame.
- After 3 to 4 minutes add capsicum and green peas, turmeric powder and salt. Mix well and close the lid.
Closing the lid and cooking the vegetables at low fame will enable cooking with steam. The water in the vegetables with the help of steam will make the vegetables tender and soft.
- Add ginger garlic paste and tomato to it. Mix all the contents thoroughly.
- After around 3 mins you will notice the sizzling of vegetables in the hot kadai. Now add the chilli powder, coriander powder and garam masala to the base. Sauté and close the lid.
- After 5 mins of low heat cooking the curry is ready to serve. Garnish with coriander leaves in the serving container.
- If you require the curry to be wet with a little gravy, add ½ glass of boiled water and allow the curry to boil for 2 minutes prior to serving.
Mixed Vegetable curry is a popular side dish at our home. The curry can be can be prepared with the available vegetables. Brinjal, cucumber, bottle gourd can be included as per your choice. You can include or exclude vegetables as per availability. Mixed Vegetable curry is ideal with phulka, chapathi and puris too. My son loves to take it in his lunch box and his friends have appreciated the taste.
You need to give a try at this side dish and let us know if you enjoyed the taste. Best of luck!!
FISH PICKLE/ MEEN ACHAR
Winter is getting stronger and during this time we yearn to have hot and spicy food. Pickles is an evergreen item on the table that cannot be missed at our home. Our family enjoy pickle and papad, fryums, vadiyalu etc.
In my previous posts I mentioned about the preparation of Mixed Vegetable pickle, also mentioning the various types of pickles we indulge in.
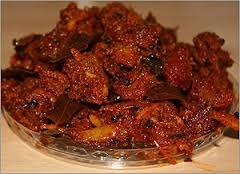 Fish pickle brings up several memories…my mama’s passion in cooking, how we used to empty the bottles within a few days. The kitchen used to be filled with the aroma of frying fish and the seasoning. I didn’t want my children to miss out on these special delicacies and have made it a point to master the recipe.
The first 2 to 3 times the pickle did not match the standard taste, but it has improved in the next few attempts. You can include Fish pickle in your special treat for Christmas.
Fish selection is utmost important . Fish pickle can be made with tuna(choora), sardine(mathi-chaala), butter fish(modha), seer fish(ney meen), prawns (chemeen),Anchovy (Netholi) and Pomphret(Avoli). Do not attempt fish pickle with mackerel (aiyla). Butter fish, Prawns, Tuna and Seer fish are the best options for making Fish pickle at our home.
I used lime juice in the last rinse while washing the fish to remove the strong smell and will help cook better. I prefer using Kashmiri Chilli powder for pickles-kadumanga as the pickle is not spicy, yet the appearance will be hot and spicy.
Ingredients:
Fish: ½ kg (cut into small pieces)
Lime: ½ piece(squeeze in the final rinse of fish wash)
Vegetable oil: 1 cup to fry the fish pieces
Ingredients for Marinating fish:
Red chilli powder- 1.5 tsp ( I use Kashmiri Chilli powder –Eastern Brand)
Turmeric / Haldi powder: ¼ tsp
Pepper powder: ½ tsp
Salt: ¾ tsp or as per taste
Time required for marination: 30 mins
Ingredients for fish pickle gravy:
Green chilly : 3 small( slit into halves)
Red chilli powder- 3.5 tsp ( Kashmiri Chilli powder –Eastern Brand)
Turmeric / Haldi powder: ¼ tsp
Pepper powder: ½ tsp
Ginger: 2 tsp (sliced into thin pieces)
Garlic pods: 4 tsp (sliced into thin pieces)
Salt: ¾ tsp
White Vinegar: ½ cup(boil and cool to room temp)
Vegetable oil: ¼ cup
Curry leaves: 2 stems( cut into small pieces)
Mustard : ½ tsp
Fenugreek / Methi seeds: ½ tsp
Ingredients for powdering:
Mustard : ½ tsp
Cumin seeds / Jeera: ½ tsp
Fenugreek / Methi seeds: ½ tsp
Roast on low flame and powder coarsely.
Procedure for Fish pickle / Meen Achar:
Method:
- Cut fish into small pieces and wash the pieces. Drain water completely.
- In a separate vessel add chilli powder, pepper powder, haldi powder and salt. Mix well and then toss the fish pieces in the vessel, mix all the fish pieces . Let it remain for 30 minutes.
- Heat oil in a kadai, fry fish pieces till they are crisp. Maintain medium flame while frying the fish pieces. This will ensure moisture in the fish is taken off and the pickle can be retained for longer time.
- In another kadai heat oil and add mustard seeds. When it crackle add methi seeds and curry leaves.
- Immediately add chopped ginger and garlic. Keep stirring until they turn brown in color. Lower the flame.
- Add chilli powder, pepper powder, haldi powder and salt. Stir this till the raw smell goes away. Mix the powders to avoid getting burnt at the base.
- Add white vinegar to the powders and mix thoroughly. Add the fried fish pieces and mix the entire masala.
- Add the roasted powders-mustard, jeera and methi seeds. Mix the fish pickle and transfer contents into a clean bottle.
- If handled with care and refrigerated between servings you can retain fish pickle / meen achar upto 9 months.
 Great combination with hot rice, chutney and curd curry too. My children do enjoy with rotis, breads too.
Give a try to your culinary skills and make this Christmas feast an enjoyable one with your favorite wine, fried rice ,chicken dishes and cutlet. Share with family and friends…
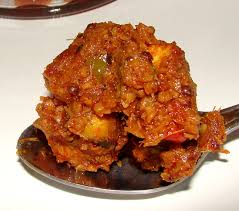
CRUNCHY MIXED VEGETABLE PICKLE
November 21, 2013 by admin
Filed under Curries, Rice & Chutney Varieties, Pickles
Pickles are a favorite combination with meals. Our family enjoys pickle and therefore we make pickle seasonal wise all round the year. Fresh pickles are in great demand. The oily, hot reddish color and the unique flavors of masala and spices makes it a favorite one.
In winters the urge to eat pickles and spicy stuff is high. The taste buds signals for hot, spicy, at times sweet items too. To fulfill needs of all family members I decided to make mixed vegetable pickle this week.
The pickles made seasonal wise at home are: Mango pickle, Lime pickle, Tomato pickle, Amla pickle-Usirikkai, small amla-Gooseberry pickle, Drumstick pickle, Wild lime-Vellanaranga pickle,…the list will continue…. In addition to these we make non-veg pickles like Fish pickle, Mutton pickle, Beef pickle, Prawn pickle, etc
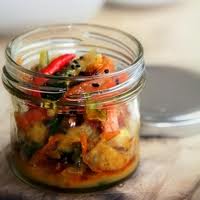 Mixed Vegetable Pickle is the spicy, tangy and crunchy pickle made with the fresh Indian vegetables. A great combination with rice- dal, curd rice and parathas. When soaked in vinegar it leaves the vegetable fresh and retains the crunchy texture.
Mixed Vegetable pickle can be made any time of the year. This is an instant variety and stays good if placed in the refrigerator between servings. It can be stored upto 3 months if handled properly.
Ingredients :
Carrots : 2 nos (equal to ½ cup when chopped)
Beans: 6 nos (equal to ¼ cup when chopped)
Cluster beans: 6 nos (equal to ¼ cup when chopped)
Bitter gourd: ½ piece (equal to ½ cup when chopped)
Beetroot: ¼ piece (equal to ¼ cup when chopped)
Cauli Flower: 3 mini florets (equal to ½ cup when chopped)
Lime : 2 nos ( cut in 1 inch size)
Ginger : 4 inch piece (chop finely)
Green chilly : 3 nos (slit length wise)
Vinegar: ½ cup
I include 5 to 6 Garlic pods (split length wise), this is optional. You can add other vegetables like radish, gherkins (kovakai) as per your choice. Increase masala as per the quantity of vegetables.
Ingredients for Masala:
Red chilli powder- 2 table spoons
Turmeric powder: ½ tspn
Salt: 1.5 tspn
Oil – 1/2 cup
White Vinegar: ¼ cup
Ingredients for Seasoning:
Mustard – 1/2 tsp
Curry leaves : 1 stem
Asafoetida (Hing) : 1/2 tsp
Procedure for Mixed Vegetable Pickle:
 Method:
- Peel external layer of carrot, beetroot, radish. Wash all the vegetables. Drain them completely. Leave it for an hour to dry.
- Chop all vegetable in small pieces. Remove bitter gourd seeds and lime seeds while chopping.
- In a vessel mix all the chopped vegetables- quantity approximately 4.5 cups. Add salt, turmeric powder, chilli powder. Mix well and keep aside for 3 to 4 hours.
- Heat oil in a kadai/pan. When hot add mustard seeds. When the mustard seeds crackle, lower flame add curry leaves and hing. Transfer this hot oil to the vessel containing mixed vegetables.
- Do not mix it immediately. Let the vegetables remain in contact with hot oil till you add the next ingredient- vinegar.
- In the same kadai add vinegar immediately and allow it to boil. Put off flame after 3 minutes of boiling. When cool add this to the mixed vegetable vessel.
- Mix all the contents thoroughly and bottle it.
- The multi color combination looks great. Try this pickle and let us know your feedback. I’m sure your family will enjoy this pickle made at home.
This pickle can be consumed after a day’s time. The bottle should be dry and free of moisture. Place the bottle in the refrigerator always. Use a fresh, dry spoon to dispense the pickle. Remember handling is important for the pickles shelf life.
This crunchy mixed vegetable pickle is an instant variety, typically south Indian preparation and can be stored upto 3 months if handled with care.
HOTEL MASALA DOSA RECIPE
October 1, 2013 by admin
Filed under Breakfast recipes
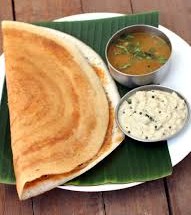 My family loves dosa and specially the masala dosa served at hotels. Many a times I go to veg restaurants only to have masala dosa. I love the crispiness and the taste of dosas. Many of you may be willing to experiment and surprise your family . The ingredients are not new but the proportion is very important to get that crispy texture.
My kids always ask why the masala dosa made at home does not get match this colour and crispiness. I was keen to adapt this preparation and went ahead to master this dosa variety.
As today is October 01, – Elders day. I’ve dedicated this recipe to all the elders at home and in our neighborhood. Happy Elders day…. Let us take this moment to remember all the dedication they had in our upbringing, to place us where we are.
Serves – 6
Ingredients:
Par Boiled rice / Puzhungal ari: 2 cups
Raw rice / Regular cooking rice: ½ cup
Urad dhal (split black gram): ½ cup
Toovar shal (split red gram: ½ tbsp
Chana dhal ( split Bengal gram) : ½ tbsp
Fenugreek (methi): 1 tsp
Sugar: 1tsp
Salt: 1 tbsp
Procedure for Hotel Masala Dosa Recipe:
Method:
- Soak rice, dhals, fenugreek in water for app. 4 hrs. Soak them together ,ensure there is enough water in the container.
- Wash and drain all water. In a mixie ,grind them into a smooth batter. Add little water while grinding to ensure smoothness.
- Transfer the batter into a large vessel to avoid dripping on fermentation. Add salt to the batter.
- Fermentation process will take app. 6 to 8 hrs.
- Prior to making dosa mix the batter well, add sugar to the batter. Mix batter thoroughly.
- Heat the dosa tava / pan. When hot sprinkle few drops of water .The water will sizzle and evaporate indicating the dosa pan is sufficiently hot for the dosa process.
- With the help of a sliced onion or spoon spread the oil on the dosa tava.
- Pour two spoonful of batter on the tava and uniformly spread into a large circle. Pour oil on the sides of the dosa.
- Slowly flip the dosa on the other side. After a few seconds reverse on the first side.
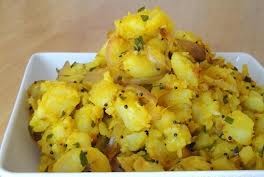
- Dosa is ready. Add 1 large tbsp of masala aloo sabji in the middle of the dosa.
- Fold it from 2 sides. You can opt for triangular shapes or cone shaped dosa.
- Few people like to spread red chilli chutney over the dosa. It is purely personal choice.
- Children may find it too hot.
- Referring to the hotel masala dosa recipe it is served plain with only aloo sabji.
- The dosa is served hot along with coconut chutney and sambhar.
My mouth is watering….umhh…hope you enjoy this family surprise recipe..
You can definitely be innovative and creative in the dosa preparation. Over fermentation will make the dosa batter taste sour. If you want to reserve batter for the next day, do not add salt and sugar. Add salt and sugar prior to making the dosa.
Remember this dosa is best when eaten hot. Hotel masala dosa is golden brown and crispy, you can enjoy eating hot straight from the pan.
RED CHILLI CHUTNEY FOR MASALA DOSA
October 1, 2013 by admin
Filed under Breakfast recipes, Chutney varieties
 Red chilli chutney for dosa is a latest favorite at our home. Even the kids have one or two dosa with a dash of red chutney on one side of the dosa. It is a quick recipe and I’m sure taking less time for preparation.
Other varieties of chutney enjoyed with dosa or masala dosa is coconut chutney, mint leaves chutney or onion tomato chutney
Commonly made in South Indian homes.
Serves – 6
Ingredients:
Red chillies: 8 nos
Garlic : 5 medium cloves
Salt: ¼ tsp
Procedure for Red Chilli chutney for Masala Dosa:
Method:
- Soak chilles in ½ cup of hot water . Close the lid of the vessel.
- After 45 mins to 1 hour time, the red chillies will become soft .
- Grind them with garlic and salt. Do not add water. Paste needs to be thick.
- After the dosa batter is cooked on one side, apply a tsp of red chilli chutney over the dosa as a thin layer.
Steaming dosa and hot spicy chutney is a great combination.
Onion Tomato chutney
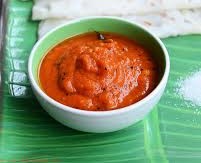 For those who cannot indulge in hot spicy chutney there is a variant for you: Onion Tomato chutney. If you do not have coconut at home you can make this chutney and win the hearts of your family members. All ingredients are available at home and can be made with ease.
Serves – 6
Ingredients:
Tomato: 1 cup chopped
Onion: 1 cup chopped
Red chilly powder : 2.5 tsp
Turmeric powder (Haldi) : ¾ tsp
Tamarind: size of a small lime
Curry leaves: 1 sprig
Salt: to taste
For Seasoning:
Mustard seeds: 1 tsp
Urad dhal(split black gram):1 tsp
Dried red chilly: 1 no
Curry leaves: 1 sprig
Asafoetida (hing): a pinch
Cooking oil: 1 tbsp+1tbsp for sautéing and seasoning
Procedure for Onion Tomato chutney served for Masala Dosa:
Method:
- Heat oil in a pan , add chopped onion and sauté for 2 mins
- To this add chopped tomato and stir for a minute.
- Add red chilli powder, curry leaves, salt, turmeric powder and tamarind.
- Mix well till the aroma of raw smell disappears.
- Put off the flame. Let the contents cool down.
- Gring this in a mixie to a soft paste. Do not add water, chutney needs to be thick.
- In another kadai season and add to the ground paste.
- Onion tomato chutney is ready to be served. It has a wonderful colour and it is not hot and spicy therefore can be relished by kids too.
Hot dosa along with Onion tomato chutney is a great treat for dosa lovers. Ideal replacement for coconut chutney or mint chutney usually served with dosa.
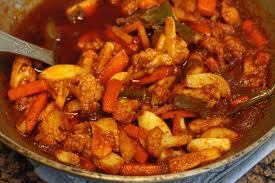
KAJU CURRY
 Kaju curry is very popular in Indian cuisine. Kaju curry is a royal dish and it is prepared during special and festive occasions. Kaju curry is prepared with a lot of variations. You can add paneer, capsicum, green peas. Today I’ve attempted the recipe with potatoes.
During the lent season when non veg dishes are not prepared in Christian homes, they take to preparing kaju curry when they have guest at home.
Serves – 4
Ingredients:
Raw Cashew nuts: 1 cup
Potato : 1 medium size ( peeled and diced)
Onion : 1 small size ( chop it to fine pieces)
Green chilly: 1 no ( slice it into halves- lengthwise )
Coconut milk: 1 cup
Turmeric powder: ½ tsp
Chilli powder: ¼ tsp
Coriander powder: ½ tsp
Ginger – garlic paste: ½ tsp
Garam masala powder: ¼ tsp
Oil: 2 tsp
Salt ![]() to taste)
to taste)
Coriander leaves / Kothmir : 3 tbsp for garnishing
Procedure for Kaju curry:
Method:
- Soak dry kaju in water for 30 mins. Drain water. If you are using tender kaju then you need to sauté it in oil.
- Heat oil in a pan / non stick kadai.
- Fry onions, potato, green chilli. Saute and when it is partially cooked add soaked kaaju / fresh kaju.
- After two minutes add the powders.Lower flame.
- Saute and add the coconut milk. Mix and do not allow it to boil.
- Let it simmer on low flame for 5 mins. Garnish with coriander leaves and roasted kaju
- Delicious kaju curry is ready to be served with Chapathi / Pulka or Hot rice.
Go ahead and try the cooking this recipe.
SABUDHANA UPMA
July 9, 2013 by admin
Filed under Breakfast recipes
 Sabudhana Upma is a popular Maharashtrian dish. Cooked usually for breakfast, evening snack, during fasting and festive occasions. Sabudhana /Sago upma is a quick dish to make , easily digestible and a favorite at home too.
The pearly white appearance is a huge hit among kids. There are several names for eg: pearl upma, sago khichdi etc. In South India the dish has grated coconut and powdered groundnut is excluded. They instead add whole groundnut during tempering.
I tasted this dish from my friends tiffin box. I enjoyed the texture of sabudhana in the upma. I pushed my mom to make it. After 1 or 2 attempts it became a success. I further experimented with addition of grated carrots and fresh peas. Among all the varieties the preferred choice is the Maharashtrian style of making Sabudhana upma.
Another info to share. I always wondered in my childhood as to the source of Sabudhana. I was surprised at the uniformity in shape and the white color of sabudhana balls.We used to see more of the transparent balls in payasam and sweets. I was told that Sabudhana / sago is a product of the South Indian Topiaca.
This is one dish which I can consume at any time of the day. I never hesitate when offered. Try this recipe and I’m sure you will love the flavor and aroma.
Serves – 4
Ingredients:
Sabudhana / Sago : 2 cups
Onion : 1 medium size ( chop it to fine pieces)
Potato : 1 medium size ( boiled- dice into small pieces)
Groundnut : ½ cup ( Roasted, peeled and powder coarsely)
Salt : (to taste)
For tempering:
Mustard seeds: ½ tsp
Cumin seeds: ½ tsp
Urad dhal: 1 tbsp
Curry leaves: 1 sprig
Green chilly: 3 nos ( slice it into halves- lengthwise )
Turmeric powder: 2 pinches
Cooking Oil: 3 tbspn
For garnishing:
Coriander leaves / Kothmir : 2 tbspn
Lime juice – ½ lime
Procedure for Sabudhana Upma:
Pre-work:
- Soak Sabudhana / Sago in water for at least 3 to 4 hrs. The level of water should be such that sabudhana is submerged in water. Do not add excess water, upma will become soggy.
- After soaking for the said duration wash and rinse the sabudhana well. Drain complete water and spread the sabudhana on a plate to avoid becoming lumps.
- Roast peanuts. When cool, remove skin and coarsely powder in mixer.
Method:
- Heat oil in a flat kadai / non stick pan. When hot, add mustard seeds, cumin seeds, Urad dhal, curry leaves, green chilly, diced potato.
- Lower flame. Keep stirring the ingredients for 2 mins. Add turmeric and salt.
- Add soaked sabudhana. Mix well and steam cook the ingredients. The sabudhana will turn transparent by now.
- After 3 to 4 mins toss groundnut powder. Mix well. Switch off flame.
- Garnish the upma with coriander leaves and lime juice.
- Serve hot . You can combine sabudhana upma with pickle or curds.
Tips:
- While soaking sabudhana, water should not float on the surface.
- Option – Heat the sago prior to soaking in water to avoid lumps and mushy feel. Ensure the color does not change.
BREAD SANDWICH
June 26, 2013 by admin
Filed under Breakfast recipes, Snacks & Salads
 Bread sandwich is a popular snack be it home or during an outing. What I like about it is the hygiene part. The sandwiches available at shops are usually covered in a nice cover and it makes it more irresistible.
Children love bread sandwich and is ordered mostly during Interval time during a movie along with chips, popcorn or a cool refreshment drink , etc. It is a filling snack and enjoyed by people of all ages.
Bread sandwich can be packed for school snacks. Convenient during travel too.
Now that the school had started and the rains have commenced. You can give an option for your kids.
You can make tasty bread sandwiches at your home. Just follow this simple recipe and give your family a huge surprise during snack time in the evening.
Serves – 4
Ingredients:
Bread : 12 slices
Cucumber : 1 large and tender( peel and cut into thin slices)
Cheese : 4 slices
Butter : 8 tsp ( as required / optional)
Salt and pepper powder (to taste)
For chutney:
Mint leaves / Pudinah leaves : ¼ cup
Coriander leaves / Kothmir : ½ cup
Lime juice – ½ lime
Green chilli: 2 medium size
Salt: to taste
Water : 2 to 3 tbsp ( for grinding)
Procedure for Bread Sandwich:
- Wash leaves and green chilli. Drain water completely. Chop it to medium pieces. Grind in mixer along with lime juice, water and salt. Divide paste into 8 equal portions.

- Butter 8 slices of bread and place it on a plate with buttered side up.1 tsp per slice of bread.
- Spread chutney on both sides for 4 slices of bread .
- On a plate arrange the bread sandwich in the following sequence.
- Bread slice with butter on top side, spread 4 to 5 cucumber slices.
- Sprinkle some salt and pepper powder.
- Place a cheese slice over it.
- Now place the bread slice with chutney on both sides.
- Place 4 to 5 cucumber slices. Sprinkle some salt and pepper powder.
- Place the bread slice with butter side down. This is the last layer.
- Cut the 4 edges of the bread carefully with a sharp knife.
- Cut the sandwich with a knife into 2 halves-shape of triangles.
The sandwich will look and taste just like the one you buy at your favorite bakery or snack shop. You can bring in variations in chutney by adding sesame seeds/ peanut chutney
Your kids will also enjoy with tomato sauce. Add your creativity , include smiley faces with sauce on the serving plate.
There are various variations to bread and you can experiment by adding tomato slices / onion slices / salad leaves / boiled egg etc.
Make vegetable cutlet with the bread edges known as bread crumbs.
Go ahead and try this popular snack.


