

Ravani Cake Drenched with Sugar Lemony Syrup
February 17, 2015 by admin
Filed under Cakes-Baking, Desserts
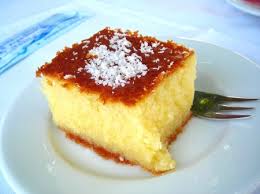
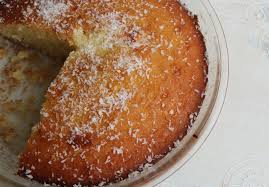 Ravani or Revani is a buttery cake doused with syrup. The recipe I’m sharing with you today attains a texture that is so delicate, it’s so fluffy, it’s so moist, it’s sweet but not overly sweet and there’s a twist. The addition of desiccated coconut to the batter is truly the secret that makes it taste divine and that it gives a different, more luscious texture to the cake.
The syrup is lemon flavored and it permeates the cake giving it a delicious lemony taste that’s prominent but not overpowering. This syrup is so light, “showering” the cake, balancing out its buttery and sugar notes.
Its pale yellow color with golden brown top is a beautiful sight. It’s mouth watering and the aroma of lime zest is awesome and in new gen language ‘ mind blowing’. As you bring a piece of ravani to your mouth you can smell the butter, the lemon and the exotic coconut and when you taste it, it fulfills every expectation.
You can serve it with a dusting of desiccated coconut, with a side of vanilla ice cream, accompanying your coffee or tea and it is guaranteed to satisfy your sugar craving after dinner.
Most versions of Ravani contain semolina flour (rava/ sooji). But for this recipe we have opted for all-purpose flour (maida) which is a far better choice for this cake. Semolina flour is one of the ingredients that make Ravani incredibly heavy.
Ingredients for Ravani Cake drenched with sugar lemony syrup
For Ravani Cake
- 150 g unsalted butter +10 g for greasing the pan
- 250 g sugar
- 3 medium-sized eggs
- 150 ml milk (preferably whole milk)
- 250 g All-purpose flour/Maida
- 1 tsp Baking powder
- 150 g desiccated coconut
For Sugar syrup
- 350 g sugar
- 360 ml water
- 4 tsp lemon juice, freshly squeezed
- Lemon peel from 1 medium-sized lemon
Procedure for preparing Ravani Cake drenched with sugar lemony syrup
Method:
For Ravani Cake
Pre-work:
a)Preheat your oven to 175 degrees Celsius.
b)Grease the bottom and the sides of the spring-form pan/ baking pan with some butter.
c)Powder sugar quantity kept for cake.
d)Need to prepare the sugar syrup too (refer directions below)
e)In a large bowl, mix sugar and butter with a hand blender until it is fluffy. Add the eggs one by one, beating continuously, until they are totally combined into the mixture. Pour in the milk and beat well.
f)Add the flour and baking powder and beat until mixed and then add the desiccated coconut. Keep aside 2 tsp for garnishing the cake. Mix in the coconut with a rubber spatula until the mixture is well blended.
g)Pour the batter in the spring-form pan and place it in the preheated oven. Bake for 35 to 40 mins.
h)After 35 minutes, check if cake is sufficiently baked by inserting a tooth pick or a knife in the middle of the cake and also check if it comes out clean. If it is still sticky, bake for another 5 to 8 mins.
For Syrup:
- Meanwhile prepare the syrup. In a small saucepan, add the sugar, water, lemon juice and lemon peel. Bring to a boil over medium-high heat, stirring until all the sugar is dissolved, then lower the flame and boil uncovered, for 10 minutes. Remove from heat and leave the contents to infuse i.e all the flavors to get incorporated in the sugar syrup. Remove the lemon peel from the saucepan and discard it.
- When the cake has baked well, remove from the oven and place it on a wire rack to cool. The cake will have a golden brown color on top. When it has cooled down a bit, pour the warm syrup over the cake, a spoonful at a time, starting to pour always from the middle of the cake.
- Leave the drenched cake on a wire rack to absorb all the syrup and cool completely. Then remove the interlocking side band of the pan and cut the cake into squares (while still being on the round base of the pan). Remove each square and place it on a cake dish.
 Decorate the cake with desiccated coconut ,sprinkle on top.
- If you have used a regular pan for baking the cake, then you need to separate the cake from the baking pan and when it has sufficiently cooled pour the sugar syrup on the cake as mentioned above.
Also check: Alcohol free Plum cake recipe for Last minute bakers
Note:
1. The cake will be almost stuck at the bottom of the pan and that is why you need to cut it into pieces first so that it doesn’t crack while trying to remove it as a whole.
2. Remember whole milk is preferable as it contains 3.5% milk fat and is the closest to the way it comes from the cow before processing.
Serve the cake and keep in mind that it tastes far better the next day!!
The cake will remain fresh for 4-5 days, covered, at room temperature.
Try this recipe and enjoy easy and healthy cooking. For more healthy and tasty recipes visit our Facebook page and Google+ page.
Make Delicious Dry Orange Rind Candies for your kids
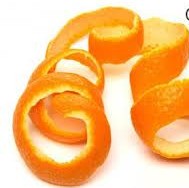
 Orange peels are the thick finely-textured and orange colored skin of oranges. Since ancient times, orange peels have been valued for their curative properties.
Now there is oranges in abundance. You can make dry orange rind candies and use in cakes and other desserts, decorating sweet dishes too. Orange peel candies are made from orange zest, the top layer of the orange peel. This is a simple recipe and can be stored for a full long year.
The unique smell and flavor of orange is felt when you have a cake bite comprising orange rinds. Preferably use organic variety to avoid pesticides. Try this recipe to flavor orange all round the year.
Ingredients for Dry Orange rind Candies
- Orange peel of 3 large oranges
- Sugar: 1 cup
- Water: 6 cups
Procedure for preparing Dry Orange rinds
Method:
- Peel oranges and place in a flat bottomed pan. Add water till the level of peels.
- Boil the orange peels for 10 minutes. Strain the water and add fresh water in the pan.
- Repeat the boiling of orange peels for 2 more times. This will ensure all bitterness is removed. Drain off all water and cool on paper towels.
- Scoop the white pith on the inner side of the orange peel with a spoon till you see only the orange color of peel.
- Use a chopping board to cut the orange peel into ¼” long strips

- Now add 1 cup of water and sugar into a heavy and flat bottomed pan. When the water starts boiling, add the orange strips and reduce the flame.
- Keep the stove in sim for about an hour letting the orange peels boil in sugar syrup. Watch the process at regular intervals, give it a stir to check water level.
- After an hour’s time, put off the flame, take out the orange rinds and place on a flat surface. Store each orange strip without touching each other.
- You can transfer the remaining sugar syrup into a glass bowl and store in the refrigerator, ideal as orange flavoring in sweet dishes.
- It will take approx. 5 to 6 hrs for drying. Once the orange rinds have completely dried store them in an airtight container. Dry orange rind candies can be retained for a year by following this preparation.
Orange rind candies are loved by kids for its sweet and orange flavor. You can use in cakes, decorating ice cream or other fruit desserts. Dry orange rinds can be dipped in hot chocolate and can be consumed as orange chocolate candies.
Health benefits of orange peels are:
- You can prepare a relaxing tea with orange peel extract to soothe your digestive system. Dietary fiber is useful for preventing irritable bowel syndrome including constipation and bloating.
- Orange peels were used as medicine to cure various digestive disorders including indigestion.
- Orange peels can lower the total cholesterol levels in the body.
- An active chemical in orange peels helps relieve heartburn,
- The chemical compounds in orange peels also help inhibit the growth and division of cancerous cells.
- The anti-oxidants in oranges especially vitamin C may help avert numerous respiratory problems
Other uses and benefits of orange peels
Orange peel powder is popularly used as a face mask to help people who have oily skin, blackhead problems, reduce discoloration, reduce pimple scars and blemishes, to lighten their skin tone and smoothen skin. Orange peel paste can be used to whiten yellow-stained teeth.
Wishing you all Merry Christmas!!
Try this recipe and enjoy easy and healthy cooking. For more healthy and tasty recipes visit our Facebook page and Google+ page.
Try other recipes that is ideal for Christmas: Ginger wine , Home made biscuits, caramelized sponge cake, alcohol free cake
Alcohol free Plum cake recipe for Last minute bakers this Christmas!!
December 9, 2014 by admin
Filed under Cakes-Baking
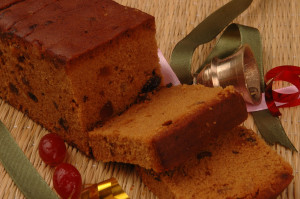 Christmas time is when you get to see a lot of cakes, cake baking and decorated cake varieties in bakeries and malls. Cakes are a delight and the plum cake happens to be very close to heart. Fond memories of all family members gathering during Christmas eve and sharing the occasion with love and togetherness.
This recipe of alcohol free plum cake is planned for last minute bakers who did not get sufficient time to soak the fruits in advance. You can now bake a cake whenever you have the urge to have a bite of plum cake. There is no soaking involved and the recipe is simple and taste similar to a plum cake which is soaked in alcohol i.e rum/ brandy for a long duration.
Ingredients for Alcohol free Plum cake
- All purpose flour / Maida: 100 gm
- Butter: 100 gm
- Sugar: 100 gm +3 tsp
- Eggs: 2 nos ( equivalent to 100 gm weight)
- Baking powder: ½ tsp
- Raisins (Kismis): ½ cup
- Tuttie-Fruitie: ½ cup
- Orange peels (dried): 2 tsp – chopped finely
- Cashew nuts(Kaaju)-1/4 cup
- Vanilla Essence: 1.5 tsp
- Water: ½ cup
- Spice powder: cardamom-2, cinnamon bark-1 small stick, nutmeg-a small pinch
Procedure for preparing Alcohol free Plum cake
Method:
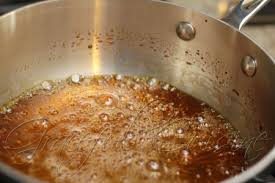
- The first basic step is to caramelize sugar. Boil ½ cup water in a pan. Then heat three tsp of sugar in the center of a flat bottomed pan. Do not touch the pan or mix the sugar. The sugar will start melting and when there is no sugar (white color specks) to be seen add ½ cup boiling water and switch off the flame.
- Now mix sugar and water well and bring it to a boil. It is time to add the raisins, tuttie-fruitie, cashewnuts in the pan. Continue boiling for 5 mins on a medium flame, check if they have become tender. If yes, then put off the flame and allow the fruits to cool down.
- Next major step is to sift maida and baking powder. Keep aside 3 tspn of baking powder and sift the powders 2 to 3 times.
- Keep aside 2 tsp of butter for greasing the baking pan. Butter should be at room temperature, powder sugar and beat the butter and sugar until fluffy and add eggs one by one and beat well. If you are not using a blender to beat the base, you can beat the eggs in a mixer and add it into the butter and sugar mix.
- Add vanilla essence and spice powder and dried orange peels. Mix well. Add the flour powders. Pour the caramelized water and you will see the cake base turning brown in color. Do not add fruits and nuts at this stage.
- Add 3 tsp of maida to the strained fruits and nuts and ensure there is a light coating over all the soaked fruits. By dusting maida on the soaked fruits you will have equal distribution across the cake. Dusting with maida will prevent the fruits and nuts from sinking to the bottom of the cake while baking. Sharing my experiences in the kitchen…
- Add the dusted fruits and nuts to the cake mix. Pour the batter into the greased baking pan and level the top of the cake.
- Bake it in a preheated baking oven at 350 ° F for about 40 to 50 mins. Use a toothpick or a long pin to check baking is enough. If the pin comes out clean the cake is ready. You will also observe a nice dark brown color on the top layer.
- Remove the baking tray and allow the cake to cool. Slice it only when it has cooled down. Watch out for the cake not crumbling when you are making slices.
Tip: You should use a sharp knife to cut the cake. Wipe the knife clean after slicing 2 to 3 pieces. This will avoid crumbling of cake.Use baking cutters if required.
For perfect baking and no breaking it is always recommended to weigh and add quantities. Dispense only the egg white to balance accuracy in addition.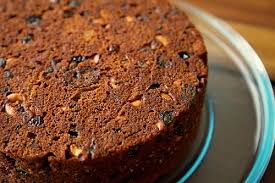
Now with most places going dry and people becoming vegan during 25 days of Christmas (lent- nombu) the alcohol free plum cake will be a huge hit.
Serve plum cake with homemade Ginger wine or Chukka kapi which is a great combination during chilly weathers. You can also serve for carols and your near and dear ones on Christmas eve.
Wishing you all Merry Christmas!!
Try this recipe and enjoy easy and healthy cooking. For more healthy and tasty recipes visit our Facebook page and Google+ page.
Also read:
Bake a Sponge cake with Caramelized sugar
Vattayappam –Steamed rice cake
Vettu Cake – Popular 4 pm Snack available at Bakeries and Tea stall in Kerala
Beef Cutlet recipe -Kerala style
Sukhiyan Popular 4pm snack with High protein
Bake a Sponge cake with Caramelized sugar
August 25, 2014 by admin
Filed under Cakes-Baking, How to make...for beginners
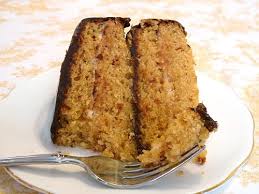 Cakes are universally popular during birthdays and special occasions at home. We have a practice of baking cake additionally from the home made butter. The butter is fresh and ideal for making soft and spongy cakes.
Cake baking is no great skill. The secret of baking cake successfully lies with the proportions of the ingredients. Any mismatch will make the cake become a disaster. Therefore recommend you to go by weight and not measures for basic ingredients.
Cake baking process is no rocket science but basic awareness of the role for each of the ingredients during the basic process needs understanding for the users.
You can bake cakes in various different ways by experimenting with different fruits and flavors. Today we shall go thru the recipe of baking a sponge cake with caramelized sugar.
Ingredients for Sponge cake with Caramelized Sugar:
- All-purpose flour /Maida: 200 gm
- Butter (home made or saltless variety): 200 gm
- Sugar:175 gm+ 25 gm for caramelization
- Eggs: 200 gm
- Cardamom / Elaichi: 6 nos
- Patta : 1 inch piece
- Vanilla essence: 1.5 tsp
- Cashewnut / Kaaju: 10 nos
- Raisins / Kismis: 10 nos
- Baking powder: 1+1/2 tsp
Procedure for preparing Sponge cake with Caramelized Sugar :
Method:
- Sieve maida and baking powder together for 2 times, this will ensure uniform mixing. Powder sugar in a mixer. Transfer in a mixing bowl.
- Eggs also needs to be weighed, you can only use the white of the egg to balance the weight. Beat eggs in the same mixer.
- Add butter ( kept at room temperature) to the powdered sugar in the mixing bowl. Mix well with a plastic ladle or with your hand. After 3 to 4 mins of constant mixing add beaten eggs. Mix all the ingredients again for 3 to 4 mins.
- To this base add maida and mix vigorously to remove any lumps of unmixed flour. Add the caramelized sugar and thoroughly mix the batter.
- After 5 mins add cashew,raisins and vanilla essence. It is ready to transfer into the baking oven.Retain a few for decorating the cake.
- Meanwhile grease the baking pan with butter. Sprinkle some dry maida onto the baking pan to form a thin layer of maida. Now pour the cake batter into the pan.Decorate with cashew and raisin on top.
- If you are using the micro oven, preheat oven to 200 deg C for 10mins. Bake in preheated oven at 200 degree C for 10 mins, then reduce temperature to 180 deg C and bake it for 30-35 mins.
- Take a tooth pick and prick the cake till the base to check whether it comes out clean or not. If the mixture is still sticky, then bake it for another 10 minutes. Check it again and turn off the oven.
- Remove pan from the oven and cool for about 5 minutes before flipping it over onto a platter. Use a butter knife to lightly run along the edges of the cake; make sure that the edges are all loose before you flip it.
- I use the cake oven with a sand tray accessory at the bottom. I heat the sand tray for 4 to 5 mins and then decrease the flame of the gas stove. I place the cake pan above the sand tray. The oven has to be kept at low flame for 25 mins.
- Sponge Cake with caramelized sugar is ready. Let it cool down for a while and then separate it from the pan with the help of a knife. Cut the cake in the shapes you desire and serve it.
- Pre-work: You need to caramelize sugar on the pan. Heat sugar on a thick bottomed pan. When it melts and become liquid keep stirring. It will start changing color and when it becomes dark brown you can add a few spoons of water and put off the flame. The other option will be to cool caramelized sugar on a tray of ice.
You will receive a lot of appreciation for the baked cake. The aroma of fresh cake baking will be all over your house and out in the open air too.
My kids will visit the kitchen often mainly because of the aroma and the curiosity to know what other varieties I’m actually attempting that day.
Try this recipe and enjoy healthy cooking. For more tasty recipes visit our Facebook page and Google+ page.
Atukulu Laddoo-Special sweet for Janmashtami
 Krishna Janmashtami is the annual celebration of the birth of Lord Krishna, the eight avatar of Lord Vishnu. Krishna Janmashtami is also called Gokulashtami , Krishna Jayanthi and is celebrated in various ways in different parts of India. Plenty of games are associated with Janmashtami- Dahi handi is a popular game in which the pot filled with butter, milk and water is hung at a height of 20 to 30 metres. The young children will form a pyramid and break the pot. Water will be sprayed constantly on the climbers to prevent them reach the height.
During Janmashtami children dress like Baal Krishna, they hold a flute and a peacock in the head band, wear a dhoti only as a lookalike of Bal Krishna. Special puja is performed in the evening when the childs legs are dipped in color and the colored impression is made on the floor when the child visits your home. This is believed to be symbolic of Nand Gopal i.e Bal Krishna coming to your home.
In some parts of India the image or statue of Lord Krishna is placed in swings and cradles and are kept swinging by devotees. All the Krishna temples are decorated and this also happens to attract pilgrims to places associated with Krishna’s childhood like Mathura, Gokul and Vrindavan. The Guruvayoor temple at kerala is also popular on Krishna Janmashtami.
Fasting is followed by most devotees and they break the fast with vegetarian dishes. Sweets are also distributed on this special occasion. Today I’m sharing a sweet recipe that is new and will certainly be liked.
Ingredients for Atukulu laddoo:
- Atukulu / Poha /Pressed rice : 1 cup
- Vermicelli: 1/3 cup
- Moong gram: ½ cup
- Sugar: ½ cup ( powdered)
- Cardamom/ Elaichi: 8 nos ( powdered)
- Kaaju / Cashewnut: 6 nos ( chop into small pieces)
- Kismis / Raisins: 6 nos ( slice into halves)
- Ghee: 1/3 cup
Procedure for preparing Atukulu laddoo/ Poha laddoo- Janmashtami special sweet:
Method:
- In a kadai fry Atukulu/ Poha, Vermicelli and Moong gram separately. Ensure they do not change color or burn.
- Transfer into separate plates. Allow it to cool.
- In a mixer powder Atukulu/ Poha, Vermicelli,Moong gram and Sugar separately.
- Heat 2 tsp of ghee in the same kadai, add chopped Kaaju and Kismis.Remove Kadai from flame.
- Mix all the powders together. Add elaichi powder and fried Kaaju, Kismis.
- Heat the remaining ghee and add spoon by spoon to the mixed powders. Mix all the ingredients and try to make small balls .
- Atukulu laddoo / Poha laddoo is ready to serve.
Variations in this laddoo will include addition of Dessicated coconut:1/3 cup. You can alternate vermicelli with oats as it is commonly available in most homes.
It is important that you fry and powder the ingredients separately as each ingredient has its own time to get heated and powdery too.
The flavors of cardamom and ghee will be so good that you will look forward to have more sweets.This delicious and grainy texture of laddoos will be a big surprise and a huge hit among your family and friends.
Go ahead and try this variety of laddoo or rava laddoo, til laddoo this Janmashtami. Enjoy the celebrations!!
Try this recipe and enjoy healthy cooking. For more healthy and tasty recipes visit our Facebook page and Google+ page.
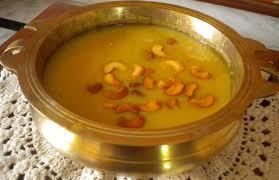
Surprise your family with Delicious Mango Kheer
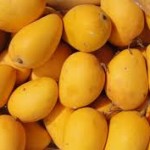
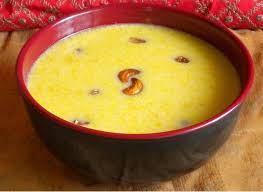 Mango Kheer is a delicious dessert usually prepared in summer time. Ideally served after refrigerating or at room temperature.Mango fruit is available in abundance during summer time. Try this authentic recipe with sweet ripe mangoes and surprise your family with your cuisine.
Mango is known to be the king of fruits. Mango Kheer is popularly called as Aam Ki Kheer, regionally termed as Mamadikaya payasam, Mambazha payasam . Whatever the name it is a hit when served. Children are the main lovers of this dessert. Do give a try.
Ingredients :
Mango puree: 1.5 cup
Basmathi rice: 1 cup
Milk:750 ml
Sugar: 7 to 8 tablespoons
Salt: a pinch
Cardamom/ Elaichi: 12 nos (peel and powder)
Cashewnuts: 10 nos
Raisins / Kismis: 15 nos
Ghee: 2 tbspn
Few mango slices for garnishing ( cut the slice very thin)
Saffron strands: a pinch
Pistachio (unsalted) : 8 nos crushed, Almonds-5 nos * optional
Procedure for preparing delicious Mango Kheer for dessert:
Method:
- Wash and soak Basmathi rice in water for 30 minutes. Drain water and blend in mixer for a minute. The rice will get broken and smaller in size.
- Add saffron strands in ¼ cup warm milk and keep aside for later use.
- In a flat bottomed non-stick pan add milk and allow it to boil. Add the blended rice to the boiling milk. Reduce the flame and continue stirring the mix at regular intervals.
- Cook until the rice is soft. Only then add the sugar and continue stirring to avoid catching at the base of the pan.
- Once the mixture has thickened, remove the pan from the flame.
- Now heat another pan, add ghee and fry cashewnuts, raisins till light brown in color and add this to the cooked rice mixture. Keep 2 or 3 nos for garnishing.
- At this stage add the mango puree, salt ,powdered cardamom and stir well.
- Add saffron mix solution and swirl the mango kheer gently such that the color spread is not uniform.
- When the kheer attains room temperature place it in the refrigerator for 30 minutes. Serve chilled.
- Garnish the mango kheer with mango slices , kaaju and kismis.
This recipe of Mango Kheer is a great melt-in-the-mouth summer treat with mango flavor, along with the rich texture as an outcome of sweetened cardamom flavored rice , makes this fruity dessert pure comfort food.
So why don’t you give a try.If you like this recipe or know of any variations do let us know in the comments.
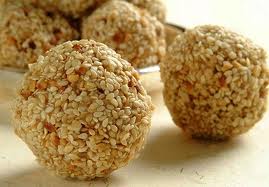
SOFT RAVA LADDOO WITH COCONUT
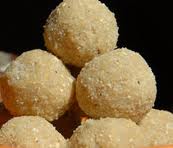
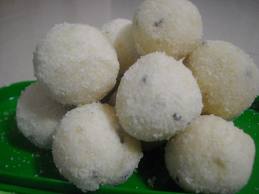 Rava Laddoo is a popular sweet during Diwali and other festive occasions . Due to the texture being soft this is made for elders and kids in the family .Today I’m sharing a soft rava laddoo recipe that includes desiccated coconut. This rava laddoo preparation is very easy and can be made within 15 to 20 minutes. Rava laddoo is also called Suji Ka laddoo.
In some parts of South India , the rava laddoo is made hard such that it remains for a fortnight. This recipe is an instant variety and can be retained for maximum 3 days. Preferably consume them fresh. For convenience, the base can be prepared and stored in an airtight container, you can roll the laddoos on need basis.
The rava laddoos are very soft and has to be handled with care. I have received positive feedback on many occasions. Thanks to my friend Mariam from whom I learnt this recipe. She was unmarried then but was good at cooking and was keen on experimenting new recipes. This recipe is dedicated to my friend who is abroad now.
Try this recipe and you are sure to repeat this process again.
Ingredients :
Bombay rava / Suji:1 cup
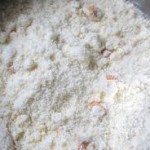
Desiccated coconut: ¾ cup+ ¼ cup
Sugar: ½ cup
Raisins: 5 nos ( cut into fine like pieces)
Cashew nut: 5 nos ( chop into fine pieces)
Cardamom / Elaichi: 4 nos ( remove pod and powder)
Ghee: 2 tbsn
Milk: ½ cup ( room temp)
Procedure for preparing Soft Rava laddoo with Coconut:
Method:
- In a kadai add ghee , when it becomes hot add Raisins and Cashew nut. Reduce flame and fry them. Drain and transfer onto a plate.
- Next fry Bombay rava / Suji in the same kadai. Mix it continuously to avoid burn or catching at the base of the kadai.
- Fry the rava until it turns white and smell of roasted rava is felt strongly. Add ¾ cup of desiccated coconut and stir continuously. When it becomes warm, put off the flame.
- Then add sugar, powdered cardamom and fried raising and cashewnut. Mix well.This base can be retained for at least 10 days in an air tight container. Sugar should be added coarse. Do not powder sugar for the instant soft laddoo variety.
- To make soft rava laddoo with coconut sprinkle milk over the base mixture of rava laddoo. Now mix the base thoroughly and roll the mix into small balls with your hand.
- Spread ¼ cup of desiccated coconut on a flat plate. Roll the laddoo on the desiccated coconut. The laddoo is covered with a coating of the coconut and it gives a royal look.
You will get approximately 12 laddoos. Looking yummy and pearly white. You can opt for sugar free variety to prepare soft rava laddoos if there are diabetic persons.
Other popular recipes with rava are Rava kesri, Rava upma, Rava dosa and the base for making puri in Pani puri. Drop in your comment after you try this instant rava laddoo variety.
TIL KA LADDOO
 Til ka ladoo is a favorite delicacy for Makara Sankranthi. Til laddoo is a simple recipe made with til/ sesame and jaggery. Til is sesame seed and jaggery is unrefined cane sugar. You can also enjoy them as sesame candy. Til ka ladoos are also made on various festivals especially for Makar Sankranti. Makara Sankaranthi is the harvest festival celebrated in many states of South India – Maharashtra, Andhra Pradesh, Karnataka and Punjab in North India.
Dishes made of til are consumed more in winter days as sesame provides heat and energy which is essential in cold climate.Til ka laddoo is a mandatory item for this festival. It is a soft sweet therefore elders too can relish til ka laddoo.
There is a famous saying Til-gul ghya, gode gode bola’ – a catchy phrase to sweeten one’s mouth and one’s speech, with these sesame and jaggery laddoo at Makar Sankranti, the harvest festival in Maharashtra.
Til laddoos are ideal for iron content. Recommended for girls and women suffering with low hemoglobin.
Recipe will make 30 to 35 ladoos
Ingredients :
Til / Sesame: 1.5 glass
Jaggery or gur : 1.5 glass
Ghee : 6 table spoons
Cardamom / Elaichi: 1 table spoon (powdered)
¾ cup water
Procedure for Til ka Laddoo:
Method:
- In a frying pan or kadai roast til seeds on medium heat stirring continuously. After 5 minutes sesame seeds will turn light brown in color and start splitting. Transfer the til seeds on a plate.
- In the same pan add water and crushed jaggery. When all jaggery is melted filter to remove all impurities. Boil the jaggery solution again till it starts thickening.
- While the jaggery is boiling apply ghee on a flat plate. Check point for addition of other ingredients : Add 1 drop of the thick jaggery solution in a cup of water. If the drops remains as a ball it is the correct mixing point. Lower the flame.
- At this stage add crushed elaichi, ghee and roasted til seeds. Mix all ingredients well and transfer onto a greased plate.
- When the mixture is cold enough to touch apply ghee on your palms take a small ball of the mixture and roll in between your palms. You can make approximately 30 to 35 balls.
- Store it in air tight containers. Will remain for 2 to 3 months.
You can try preparing til laddoos using roasted groundnut and til in a 1:1 ratio.You can add a handful of roasted desiccated coconut too to bring variations.
You can make puran poli or pineapple parippu payasam as a new variety in your sweet list.
Go ahead and try this sweet delicacy for your family. You can mention your observations in the comments and improve the recipe.
HAPPY SANKRANTHI !!
Have a great time with family , friends. SAFE kite flying too…….
HOME MADE GINGER WINE
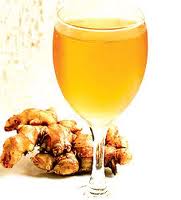 Ginger wine is popular and is served to all the family members and friends who visit our homes during Christmas time. A very simple and healthy recipe and can be done a fortnight prior to Christmas time.
Christmas reminds us of the Christmas tree, shining colorful stars, carols, nativity scenes, twinkling lights, decorations, foodies and of course the special home made wine.
A clear indication that the mass is gearing up for Christmas. Women folk start planning for soaking dry fruits in rum or brandy in the last week of November. I wanted to share this ginger recipe to make sure you can have a surprise menu for your family.
Ginger wine has a smooth and moist taste and therefore a popular choice by all. Ginger wine has some wonderful health benefits. Ginger is not only a spice that adds flavor, it is also used as a remedy for many sicknesses and disorders since ages.
Ginger has long been known to increase sexual desire. It also increases blood circulation and therefore during winter days it can be served as a health tonic in small measures.
Drinking a glass of ginger wine when you are stricken with cold, will get you back on your feet in good health quickly. Ginger is an ideal home remedy. Ginger relaxes the body so that the white blood cells can do their job in repairing the damaged cells; it also blocks the hormone that induces fever, headaches and body cramps.
Ingredients:
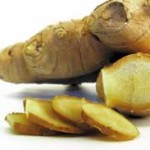 Ginger – 125 gms (finely chopped)
Sugar: 750 gms
Water : 1 litre ( boiled and brought to room temperature)
Yeast : ¼ tspn
Dry red chillies: 2 nos
Citric Acid: 10 gms
Caramelized sugar(optional)
Procedure for Ginger Wine:
Method:
- Clean the ginger. Chop ginger into fine pieces.
- Boil the chopped ginger along with sugar, broken red chillies and water for 5 to 8 minutes. Let it cool.
- Strain the contents .Add yeast and citric acid to the mixture. Stir well till all the crystals are dissolved.
- Transfer to air tight containers or you can use the ceramic jar popularly known as barani.
- The wine is ready for use after 3 days of storage. Hey! you will agree that this was a simple home made ginger wine recipe.
Note: All the storage bottles should be clean and dry prior to transferring the wine for bottling. Fill upto 2/3 of bottle quantity. Leave gap on the top side of the bottle. A safety measure for long term storage.
You can use caramelized sugar to enhance the color of the wine. We like it plain at our home. In case you plan to add caramelized sugar follow this procedure.
For caramelizing heat 3 tspns of sugar in a flat kadai. When it melts on a low flame and start burning add ½ glass of water and mix all the blackened sugar. Filter and add this into the mixture prior to bottling.
Label the bottle with the details of content, date of preparation and best before date. Keep the bottles in a dark and cool place. Best use within 12 months of preparation.
A very simple recipe, yet your timeliness will be appreciated by all who taste the ginger wine. Let this ginger wine be a surprise to all family members too.
This can be made into Christmas gifts to your dear ones. This wine is made at home and is a healthy drink. There are no side effects.
Go ahead and surprise your family with this special drink.
Must read for festive season: Hyderabad Mutton Biryani or you prefer Vegetable Biryani
PINEAPPLE PARIPPU PAYASAM
 Pineappale parippu payasam is a popular dessert served after a sadhya on occasions like Onam and festival gatherings. Usually Parippu payasam, Ada pradhaman, Semiya kheer is served. We have brought in a variation to this dessert. Fruits are liked by all. Pineappale when eaten fresh, leaves a itchy feeling for the throat. You can include your favorite fruit in payasam. Enjoy it hot or after cooling in the refrigerator as per individuals choice.
Payasam is a mandatory sweet dish after a heavy meal or sadya. You can give a twist to the regular payasam and let this sadya have a delightful surprise.
Serves – 8
Ingredients:
Pineapple: 1 small ( chopped)
Splitted green gram / Moong dhal (cherupayar parippu)
Jaggery: 2 cups grated
Condensed milk: 100g
Coconut milk: 2 cups
Cardamom powder: 1/2 tsp
Raisins and Cashewnuts-1/2 cup
Salt: a pinch
Water: 2 cups
Procedure for Pineappale Parippu Payasam:
Method:
- Dry roast moong dhal a shallow kadai. Keep the flame low to avoid burnt smell or deep browning of dhal.
- When moong dhal cools ,wash, add salt and pressure cook (2 whistles) .
- In a small vessel add grated jaggery and 1 cup water. Filter the jaggery syrup to remove any particles. Keep aside.
- In a shallow thick base kadai / urali add pineapple and jaggery syrup. Maintain medium flame.
- When pineapple is cooked and soft , add cooked moong dhal. Mix well to avoid lumps.
- Add condensed milk and cardamom powder. When it comes to a boil, add coconut milk.
- Fry raisins and cashew in ghee. Mix half of the quantity in the payasam. The remaining half can be spread to decorate.
- Pineapple parippu payasam is ready to serve.
Try this recipe for Onam and make your festive days tasteful too.
Serve Pineapple Parippu payasam hot or after cooling.
You can try Mixed fruit payasam as a treat for your family. We will be updating shortly.


