

HOME MADE GINGER WINE
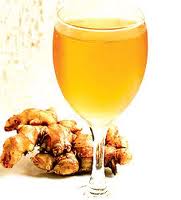 Ginger wine is popular and is served to all the family members and friends who visit our homes during Christmas time. A very simple and healthy recipe and can be done a fortnight prior to Christmas time.
Christmas reminds us of the Christmas tree, shining colorful stars, carols, nativity scenes, twinkling lights, decorations, foodies and of course the special home made wine.
A clear indication that the mass is gearing up for Christmas. Women folk start planning for soaking dry fruits in rum or brandy in the last week of November. I wanted to share this ginger recipe to make sure you can have a surprise menu for your family.
Ginger wine has a smooth and moist taste and therefore a popular choice by all. Ginger wine has some wonderful health benefits. Ginger is not only a spice that adds flavor, it is also used as a remedy for many sicknesses and disorders since ages.
Ginger has long been known to increase sexual desire. It also increases blood circulation and therefore during winter days it can be served as a health tonic in small measures.
Drinking a glass of ginger wine when you are stricken with cold, will get you back on your feet in good health quickly. Ginger is an ideal home remedy. Ginger relaxes the body so that the white blood cells can do their job in repairing the damaged cells; it also blocks the hormone that induces fever, headaches and body cramps.
Ingredients:
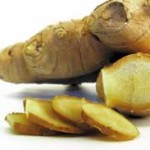 Ginger – 125 gms (finely chopped)
Sugar: 750 gms
Water : 1 litre ( boiled and brought to room temperature)
Yeast : ¼ tspn
Dry red chillies: 2 nos
Citric Acid: 10 gms
Caramelized sugar(optional)
Procedure for Ginger Wine:
Method:
- Clean the ginger. Chop ginger into fine pieces.
- Boil the chopped ginger along with sugar, broken red chillies and water for 5 to 8 minutes. Let it cool.
- Strain the contents .Add yeast and citric acid to the mixture. Stir well till all the crystals are dissolved.
- Transfer to air tight containers or you can use the ceramic jar popularly known as barani.
- The wine is ready for use after 3 days of storage. Hey! you will agree that this was a simple home made ginger wine recipe.
Note: All the storage bottles should be clean and dry prior to transferring the wine for bottling. Fill upto 2/3 of bottle quantity. Leave gap on the top side of the bottle. A safety measure for long term storage.
You can use caramelized sugar to enhance the color of the wine. We like it plain at our home. In case you plan to add caramelized sugar follow this procedure.
For caramelizing heat 3 tspns of sugar in a flat kadai. When it melts on a low flame and start burning add ½ glass of water and mix all the blackened sugar. Filter and add this into the mixture prior to bottling.
Label the bottle with the details of content, date of preparation and best before date. Keep the bottles in a dark and cool place. Best use within 12 months of preparation.
A very simple recipe, yet your timeliness will be appreciated by all who taste the ginger wine. Let this ginger wine be a surprise to all family members too.
This can be made into Christmas gifts to your dear ones. This wine is made at home and is a healthy drink. There are no side effects.
Go ahead and surprise your family with this special drink.
Must read for festive season: Hyderabad Mutton Biryani or you prefer Vegetable Biryani
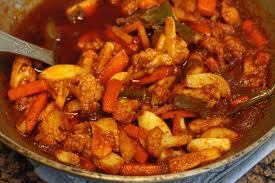
CRUNCHY MIXED VEGETABLE PICKLE
November 21, 2013 by admin
Filed under Curries, Rice & Chutney Varieties, Pickles
Pickles are a favorite combination with meals. Our family enjoys pickle and therefore we make pickle seasonal wise all round the year. Fresh pickles are in great demand. The oily, hot reddish color and the unique flavors of masala and spices makes it a favorite one.
In winters the urge to eat pickles and spicy stuff is high. The taste buds signals for hot, spicy, at times sweet items too. To fulfill needs of all family members I decided to make mixed vegetable pickle this week.
The pickles made seasonal wise at home are: Mango pickle, Lime pickle, Tomato pickle, Amla pickle-Usirikkai, small amla-Gooseberry pickle, Drumstick pickle, Wild lime-Vellanaranga pickle,…the list will continue…. In addition to these we make non-veg pickles like Fish pickle, Mutton pickle, Beef pickle, Prawn pickle, etc
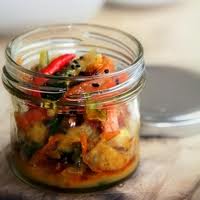 Mixed Vegetable Pickle is the spicy, tangy and crunchy pickle made with the fresh Indian vegetables. A great combination with rice- dal, curd rice and parathas. When soaked in vinegar it leaves the vegetable fresh and retains the crunchy texture.
Mixed Vegetable pickle can be made any time of the year. This is an instant variety and stays good if placed in the refrigerator between servings. It can be stored upto 3 months if handled properly.
Ingredients :
Carrots : 2 nos (equal to ½ cup when chopped)
Beans: 6 nos (equal to ¼ cup when chopped)
Cluster beans: 6 nos (equal to ¼ cup when chopped)
Bitter gourd: ½ piece (equal to ½ cup when chopped)
Beetroot: ¼ piece (equal to ¼ cup when chopped)
Cauli Flower: 3 mini florets (equal to ½ cup when chopped)
Lime : 2 nos ( cut in 1 inch size)
Ginger : 4 inch piece (chop finely)
Green chilly : 3 nos (slit length wise)
Vinegar: ½ cup
I include 5 to 6 Garlic pods (split length wise), this is optional. You can add other vegetables like radish, gherkins (kovakai) as per your choice. Increase masala as per the quantity of vegetables.
Ingredients for Masala:
Red chilli powder- 2 table spoons
Turmeric powder: ½ tspn
Salt: 1.5 tspn
Oil – 1/2 cup
White Vinegar: ¼ cup
Ingredients for Seasoning:
Mustard – 1/2 tsp
Curry leaves : 1 stem
Asafoetida (Hing) : 1/2 tsp
Procedure for Mixed Vegetable Pickle:
 Method:
- Peel external layer of carrot, beetroot, radish. Wash all the vegetables. Drain them completely. Leave it for an hour to dry.
- Chop all vegetable in small pieces. Remove bitter gourd seeds and lime seeds while chopping.
- In a vessel mix all the chopped vegetables- quantity approximately 4.5 cups. Add salt, turmeric powder, chilli powder. Mix well and keep aside for 3 to 4 hours.
- Heat oil in a kadai/pan. When hot add mustard seeds. When the mustard seeds crackle, lower flame add curry leaves and hing. Transfer this hot oil to the vessel containing mixed vegetables.
- Do not mix it immediately. Let the vegetables remain in contact with hot oil till you add the next ingredient- vinegar.
- In the same kadai add vinegar immediately and allow it to boil. Put off flame after 3 minutes of boiling. When cool add this to the mixed vegetable vessel.
- Mix all the contents thoroughly and bottle it.
- The multi color combination looks great. Try this pickle and let us know your feedback. I’m sure your family will enjoy this pickle made at home.
This pickle can be consumed after a day’s time. The bottle should be dry and free of moisture. Place the bottle in the refrigerator always. Use a fresh, dry spoon to dispense the pickle. Remember handling is important for the pickles shelf life.
This crunchy mixed vegetable pickle is an instant variety, typically south Indian preparation and can be stored upto 3 months if handled with care.
SIMPLE WAY TO PREPARE FRESH MOONG GRAM SPROUTS AT HOME
 Sprouts have always been a popular nutritional food for many diet conscious people around the globe. Sprouts are a powerhouse of nutrition. Sprouts contain abundant enzymes, protein, chlorophyll, vitamins, minerals and amino acids. They also contain high level of antioxidants. Sprouts top the list of “health food”. Moreover they are high in fiber and low in calories. So even those who are looking for a way to lose weight can include sprouts in their diet.
Today I’m going to share the recipe for an easy and quick way to prepare fresh moong gram sprouts at home. You do not need any sprouting jar or any special gadgets to make sprouts at home. Homemade sprouts are fresher and tastier than the store purchased ones. Actually I avoid the store ones as I’m not sure about the water they use for preparing sprouts.
As people are becoming conscious about health and diet in particular you can use the method suggested to make sprouts at home. You can consume sprouts fresh- direct form, include in salads, in sandwiches too. Do not cook the sprouts as it loses the nutritional values.
I was not sure how to make sprouts at home. I had to learn the process to complete my sons school project. My son was thrilled when we sprouted moong gram at home for his school project. He went around showing his grandparents, neighbors and friends as if he had performed some magic trick. He did not hesitate to eat a few as he had participated in the sprout preparation. Initially I used to add fresh grated coconut and spread little sugar. Later on, I added grated carrot and salt.
We sprout beans once or twice a week. Even little quantity yields high proteins and nutrition.Sprouted beans is good for diabetic patients.
Fresh Moong gram sprouts Recipe:
Yields: 3 cups
Time required:
Soaking time: 7 to 8 hrs
Standing time: 18 to 24 hrs
Ingredients :
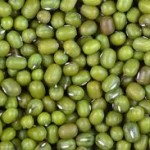 Whole Moong gram (Green gram) : 1 cup
Water: to soak
Procedure for Fresh Moong gram sprouts:
Method:
- Dispense the moong gram and check for any stones.
- Wash the moong gram twice and soak in 3.5 cups of water for 7 to 8 hrs.
- You will see that the moong gram has swollen and become plumpy and full.
- Drain the water and wash again. Ensure there is no water.
- Now transfer the moong gram into a wet muslin cloth. Tie the edges together and hang it in on a rod. Check the cloth in between, if you observe the cloth is dry sprinkle water over the cloth to make it damp.
- After app. 18 hrs open the muslin cloth and check the length of sprouts. If it is small keep it for another 6 hrs atleast.
By now you will see the sprouts popping out from the cloth. You can also know the length of the sprout that has emerged.
In Summers the germination is quick within 20 hrs and in cold weather it takes nearly 24 hrs for the sprouts to emerge with required length.
We at home enjoy longer sprouts. If you want to avoid muslin cloth, you can opt this simple method.
- After you drain the soaked moong gram, transfer into a casserole or hot pack. Drain all water. Leave it for 12 to 16 hrs untouched.
- You will be happy to see the white sprouts that have elongated from the gram.
You can store sprouts in refrigerator for 1or 2 days and plan use when required.
The soaking time and standing time for Chana (chick peas) and black chana is higher. The soaking time will be 10 to 12 hrs and the standing time will be 24 to 30 hrs.


