

HOW TO MAKE THICK CURD
January 29, 2014 by admin
Filed under How to make...for beginners
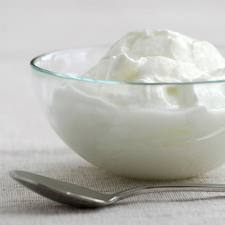 Preparing curd is an art by itself. Indian homes are very used to having curd/ yoghurt also called dahi along with meals. In South India curd is consumed at the end of the meal be it lunch or dinner. Fresh curd is in great demand.
Yogurt is a fermented milk product produced by bacterial fermentation of milk. The bacteria used to make yogurt are known as “yogurt cultures“. Fermentation of lactose by these bacteria produces lactic acid, which acts on milk protein to give yogurt its texture and its characteristic taste.
An old myth regarding curd
Curd is tasty when fresh and it is not sour (pulla / pulippa) . Starter yoghurt is called Ora /thodu. There is a myth that starter curd/ ora/ thodu should not be borrowed from another home at night. When there was a need for going to neighbors house for starter curd, my granny used to remind that it was not the right time to borrow. Grandma would continue saying that you should not borrow salt and sarso i.e mustard seeds from anyone. It will convey poverty or daaridram i.e financially poor status. This tradition of borrowing starter curd continues in modern times because it is natural and not induced.
These were few old memories. Now that we have groceries and super markets at every lane in the localities be it urban or rural, buying commodities can be planned any time of the day.
Tips for preparing curd :
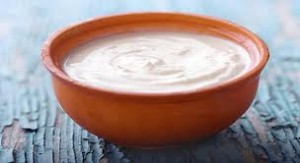
Do not add starter curd to hot milk. The bacteria will die and the milk will get curdled…appearance of split milk. Ensure the milk is lukewarm temp app. 45 deg C. Check point is when you dip your finger into the milk (ready for preparing curd) it should be feel warm. The curd will set in the shape of the container you dispense into. You can cut thru’ the curd while serving.
I’ll share the benefits of curd after I share the easy recipe of making thick curd at home.
Ingredients :
Starter curd / Thodu: 1 tbsn heaped
Milk: 2 cups
Procedure for making thick curd:
- Boil milk .Lower the flame and let it continue boiling for 3 to 4 mins.
- Allow the milk to cool down to lukewarm temp. Higher temperatures will split the milk and it will have a curdled appearance with an odd taste.
- Dispense the starter curd into a glass and add ½ cup of milk and mix thoroughly with the spoon.
- Now transfer the quantity from one glass to the 2nd glass, back to back 4 to 5 times. The process is similar to cooling tea which is seen in tea shops. The vendor transfers the tea from one jug to another jug and repeat this 3 to 4 times, the tea will be of right temp to drink also giving a foamy appearance on top of the glass.
- The starter curd gets thoroughly mixed with milk. Keep the utensil closed and undisturbed for 4 hours. Setting is quick in summer due to external temp and heat. In winters you need to provide at least 6 hrs setting time.
- You can leave a red dry chilly along with stem over the curd. This will also help curd set faster.
You can make several recipes with curd. Common recipes are: Butter milk, Lassi, Raitha, Curd rice, Kadi etc. Curd is added in chicken preparations eg: chicken curry, manchuria, used for making cake.
 Benefits of curd:
Curd improves appetite when taken along with sugar and salt, actually stimulates the taste buds. Curd quenches thirst too. By-products like lassi and buttermilk are popular drinks at summer.
Curd is good for digestive system, immune system, osteoporosis, stomach problems and cures vaginal infection.
Curd is enjoyed by people of all ages. Do you know preparing curd without starter curd i.e thodu. Give your inputs on this query, article in the comments.
How to Prepare Basic Garam Masala at Home
January 21, 2014 by admin
Filed under How to make...for beginners
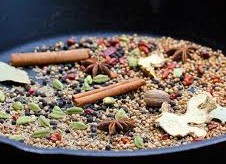 Garam masala is one of the most essential item in an Indian kitchen .The dishes which demand garam masala are aplenty and the freshly powdered garam masala is the secret to the success of many recipes. The aroma of fresh cardamom, cloves and cinnamom is distinct.
When I started cooking I used to purchase the packs from the market. I looked for ISI brand. Each brand taste different basically due to the addition of the base ingredients. Different parts in India prepare garam masala with various base ingredients and quantities. Preferences of ingredients include Coriander seeds, Black whole Pepper, Dry red chilly, bay leaf, etc.
Today I’m sharing the basic recipe of garam masala which lends great aroma and has received lots of appreciation from family and friends. The idea for this posts triggered when I went shopping for groceries with my new neighbor who is recently married . She was purchasing Garam masala powder.
When I enquired with her she mentioned that she did not know how to prepare garam masala powder at home. I suggested that if she had 15 minutes to spare in a month she can prepare fresh garam masala at home. She was inclined to learn the procedure. We purchased all the base ingredients .
After a cup of hot tea and snacks she prepared we began to make basic garam masala powder. I appreciated the enthusiasm she showed towards cooking even though she is a starter.
Basically it is a matter of convenience. For bachelors and busy working people they opt for ready made packets. Making basic garam masala at home is easy and can be followed by bachelors too.
I preferably buy 10 gm packs as it will be easy. Measuring will not be required.
Ingredients :
Cardamom / Elaichi: 10 gm or 2 tbsn
Cloves / Grambu : 10 gm or 2 tbsn
Cinnamom / Patta: 10 gm or 4 sticks of 1 inch size
Fennel seeds / Soamp : 10 gm or 2 tbspn
Caraway seeds / Shahjeera: 5 gm or 1 tbsn
Star anise: 3 or 4 nos
Accessories: Dry Grinder(small jar), Fine mesh filter ,air tight container
Procedure for preparing Basic Garam masala at home:
 To make homemade garam masala dispense all the ingredients into a heavy bottomed pan. Break the cinnamom sticks into finer pieces. Keep the flame in medium. Keep stirring to avoid burnt smell. When sufficiently hot put off the flame.You will get a roasted smell of the ingredients. Let it cool. Powder all the ingredients in a dry grinder. The small jar is sufficient for powdering.
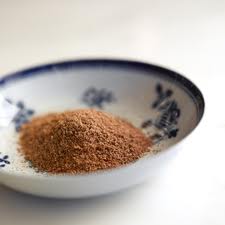
I like the home made garam masala powder to be slightly coarse. Therefore I do not remove the cardamom pods. If you want fine garam masala powder you can filter thru’ a wire mesh. Powder the coarse stuff once again. Transfer to an airtight container. Do not close the lid immediately. Keep a small gap .When the garam masala powder has reached normal temperature close the lid tightly.
This garam masala will last upto 3 months. You can powder homemade garam masala as per your usage at home. Powdering quantity for a month is ideal as the freshness of garam masala powder is retained.
Another option for using the left over cardamom pods are : you can add the cardamom pods in the tea leaf box or directly add 2-3 elaichi pod covers in the boiling tea. Great method for preparing elaichi tea.
You can prepare pickles, wine, various chutneys and sharpen your culinary skills.
Do you prepare garam masala powder differently. Include your comment to let all readers know.
Read the simple way to extract fresh coconut milk at home. and the simple way to prepare fresh moong gram sprouts at home.
TIL KA LADDOO
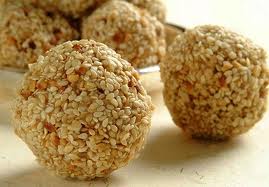 Til ka ladoo is a favorite delicacy for Makara Sankranthi. Til laddoo is a simple recipe made with til/ sesame and jaggery. Til is sesame seed and jaggery is unrefined cane sugar. You can also enjoy them as sesame candy. Til ka ladoos are also made on various festivals especially for Makar Sankranti. Makara Sankaranthi is the harvest festival celebrated in many states of South India – Maharashtra, Andhra Pradesh, Karnataka and Punjab in North India.
Dishes made of til are consumed more in winter days as sesame provides heat and energy which is essential in cold climate.Til ka laddoo is a mandatory item for this festival. It is a soft sweet therefore elders too can relish til ka laddoo.
There is a famous saying Til-gul ghya, gode gode bola’ – a catchy phrase to sweeten one’s mouth and one’s speech, with these sesame and jaggery laddoo at Makar Sankranti, the harvest festival in Maharashtra.
Til laddoos are ideal for iron content. Recommended for girls and women suffering with low hemoglobin.
Recipe will make 30 to 35 ladoos
Ingredients :
Til / Sesame: 1.5 glass
Jaggery or gur : 1.5 glass
Ghee : 6 table spoons
Cardamom / Elaichi: 1 table spoon (powdered)
¾ cup water
Procedure for Til ka Laddoo:
Method:
- In a frying pan or kadai roast til seeds on medium heat stirring continuously. After 5 minutes sesame seeds will turn light brown in color and start splitting. Transfer the til seeds on a plate.
- In the same pan add water and crushed jaggery. When all jaggery is melted filter to remove all impurities. Boil the jaggery solution again till it starts thickening.
- While the jaggery is boiling apply ghee on a flat plate. Check point for addition of other ingredients : Add 1 drop of the thick jaggery solution in a cup of water. If the drops remains as a ball it is the correct mixing point. Lower the flame.
- At this stage add crushed elaichi, ghee and roasted til seeds. Mix all ingredients well and transfer onto a greased plate.
- When the mixture is cold enough to touch apply ghee on your palms take a small ball of the mixture and roll in between your palms. You can make approximately 30 to 35 balls.
- Store it in air tight containers. Will remain for 2 to 3 months.
You can try preparing til laddoos using roasted groundnut and til in a 1:1 ratio.You can add a handful of roasted desiccated coconut too to bring variations.
You can make puran poli or pineapple parippu payasam as a new variety in your sweet list.
Go ahead and try this sweet delicacy for your family. You can mention your observations in the comments and improve the recipe.
HAPPY SANKRANTHI !!
Have a great time with family , friends. SAFE kite flying too…….
SIMPLE WAY TO EXTRACT FRESH COCONUT MILK AT HOME
January 7, 2014 by admin
Filed under How to make...for beginners
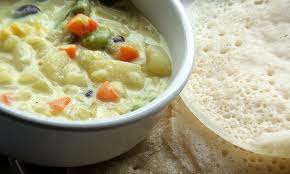
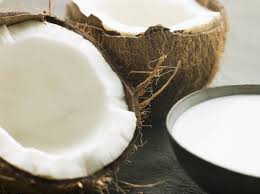 Coconut milk is required for many South Indian dishes. Coconut milk is used for making sweet delicacies like achappam, payasams,ada pradhaman. Coconut milk is lavishly added in appams, stew curry made of egg, chicken, fish or meat. Coconut milk enriches the dish and brings the rich texture to the curry. The gravy thickness is balanced by adding coconut milk to the dish.
In Kerala due to the abundant availability of coconut women prefer to extract fresh coconut milk at home. In the earlier days women used the grinding stone to grind the coconut and extract milk. Thanks to technology we now add coconut to the grinder and with the press of the button we can grind the coconut and extract milk. You can follow this simple way to extract fresh coconut milk at home and enjoy the taste.
Bachelors have one step ahead , they have now shifted to purchase coconut milk powder and add in curries as per the consistency required for the recipe thin / thick.
Whatever the situation may be I enjoy the taste of fresh coconut milk in the dishes and sweets. To avoid surprises like power cut etc…I first extract coconut milk and then start the preparation.
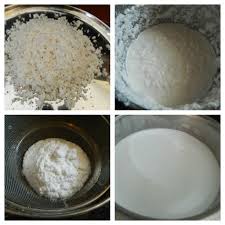 Coconut milk is extracted in 3 stages. The coconut milk is classifies as 1st milk- Onnam paal, 2nd milk- Randam paal, 3rd milk – Munnam paal. The difference basically is that the 1st milk is the thickest of all. It is the cream of the entire coconut you have extracted. The 2nd milk is a little thinner. It is added in curries and dishes as a replacement of water. The basic ingredients i.e vegetables / meat are basically cooked in this milk. The third milk will have a pale color. It is the final rinse of coconut milk. Do not waste this milk, can be extracted in little amount. 3rd milk is used to rinse the grinder in which masalas have been grinded, jaggery is boiled for sweet dishes.
You can chop the coconut pieces and shred in the grinder prior to grinding for coconut milk extraction. Recommended to use warm water in winter for grinding the coconut. I prefer using lukewarm water all round the year.
Let us understand the simple way to extract fresh Coconut milk at home:
Ingredients :
Fresh coconut: 2 cups (grated)
Water: 3 cups (lukewarm temp.)
Accessories: Grinder, Fine mesh filter or muslin cloth for filtering, 3 utensils for storage of milk extracted.
Procedure for extracting fresh Coconut milk at home:
Method:
- Add grated coconut and 1 cup of lukewarm water in the grinder. Grind to a fine paste. Empty into a filter and extract milk. Keep this aside carefully.
- For 2nd milk add 1.5 cup of lukewarm water to the coconut shreds. Grind it for 2 minutes. Filter the coconut milk. Keep the second milk aside.
- The final rinse is with ½ glass water. Grind for a minute and filter the shreds. You will get a pale colored water. This is useful to simmer vegetables or meat.
This was not a complicated task. Keep all the accessories close by and start the grinding. Enjoy the freshness of coconut milk and your family will appreciate the effort for natural and homemade coconut milk. The sweet dishes and stew curry will taste different. Go ahead and definitely give a try. There are no preservatives.The dishes look royal and totally different.
You can store this in the refrigerator for 3 days .It will till stay fresh.
 Most recipes mention thick or thin coconut milk. Thick coconut milk is the 1st milk that is added always at the end of the cooking prior to putting off the flame. The precaution taken is because if the 1st coconut milk boils in the curry, the gravy has a split appearance similar to split milk.
Just to update, in the preparation of rose cookies / achappam, the coconut milk is added in reverse order. 1st milk is added first, then second milk and last 3rd milk. This is because the base is mixed first and fried later. The water addition for coconut milk extraction will be in lesser quantities as base consistency has to be adjusted to get crispy and shaped achappams.
I’ve shared my experiences. If you have any further tips for improving the procedure do let us know.


