

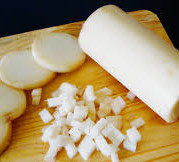
Quick Spicy snack- Bread Paneer Rolls
January 22, 2015 by admin
Filed under How to make...for beginners, Snacks & Salads
 Bread Paneer rolls are a great snack and a tasty appetizer for high tea also called afternoon tea. A quick and easy recipe. The ingredients are all available at home. It is a matter of preparing the snack. Paneer is Indian cottage cheese or Chena, you can easily make it at home.
Involve your kids for the preparation and they will definitely nourish the snack. A nice way to learn new skills and preparing in emergencies.
Most of the dishes that is prepared at home was learnt by merely watching my mom and aunt doing the home tasks. Actually about two decades back there was less opportunity to watch cooking shows on Television. Now with the zoom of technology and several channels emerging on television you get to see several chefs and in case you missed the schedule, you can watch the same recipe thru’ a video or blog.
This opportunity was not there then. However we made use of our memory or at the most write down the recipe for future reference. I still continue that practice of jotting down in the Recipes diary.
Let’s move on to the recipe and understand the requirements.
Ingredients for Bread Paneer Rolls
- Bread slices : 6 nos
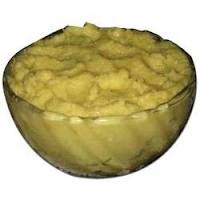
- Shredded paneer / Cottage cheese: 1 cup
- Green chilly: 1 tsp (finely chopped)
- Jeera / Cumin seeds: ¼ tsp
- Garam masala powder: ¼ tsp
- Coriander leaves: 2 tsp (finely chopped)
- Ginger : 1 tsp ( finely chopped)
- Pepper powder: a pinch
- Milk: 2-3 tsp
- Salt: to taste
- Ghee: 2 tbspn
- Water: ½ cup
- Butter-2 tbsp ( to apply on roll during heating)
This recipe will make 6 bread paneer rolls.
Procedure for preparing Bread Paneer Rolls
Method:
- In a small bowl add shredded paneer, chopped green chillies, jeera, garam masala, coriander leaves, chopped ginger, salt and mix well. Filling is ready.
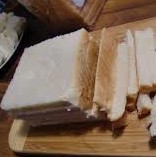
- Trim the edges of the bread slices. Preferably use sandwich bread.
- Flatten each bread slice using a rolling pin.
- Spread a thin layer of the filling mix onto the flat bread slice. Sprinkle water to make bread moist and also roll it into a cylinder, making sure the edges are sealed.
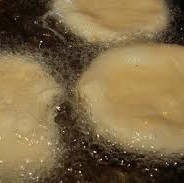
- When the heating pan or skillet is ready butter all around the roll and grill on medium heat. You should keep turning to ensure even browning all around the bread paneer roll.
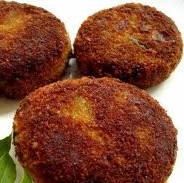
- Serve them with tomato ketchup. You can cut them into halves and make it even more tempting for the kids.
Hey get going…try making some bread paneer rolls.
You can try variations in this recipe by adding mashed boiled potato in place of paneer. Try this recipe and enjoy easy and healthy cooking. For more healthy and tasty recipes visit our Facebook page and Google+ page.
Bake a Sponge cake with Caramelized sugar
August 25, 2014 by admin
Filed under Cakes-Baking, How to make...for beginners
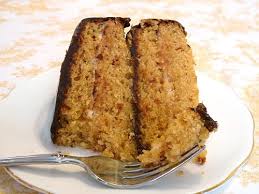 Cakes are universally popular during birthdays and special occasions at home. We have a practice of baking cake additionally from the home made butter. The butter is fresh and ideal for making soft and spongy cakes.
Cake baking is no great skill. The secret of baking cake successfully lies with the proportions of the ingredients. Any mismatch will make the cake become a disaster. Therefore recommend you to go by weight and not measures for basic ingredients.
Cake baking process is no rocket science but basic awareness of the role for each of the ingredients during the basic process needs understanding for the users.
You can bake cakes in various different ways by experimenting with different fruits and flavors. Today we shall go thru the recipe of baking a sponge cake with caramelized sugar.
Ingredients for Sponge cake with Caramelized Sugar:
- All-purpose flour /Maida: 200 gm
- Butter (home made or saltless variety): 200 gm
- Sugar:175 gm+ 25 gm for caramelization
- Eggs: 200 gm
- Cardamom / Elaichi: 6 nos
- Patta : 1 inch piece
- Vanilla essence: 1.5 tsp
- Cashewnut / Kaaju: 10 nos
- Raisins / Kismis: 10 nos
- Baking powder: 1+1/2 tsp
Procedure for preparing Sponge cake with Caramelized Sugar :
Method:
- Sieve maida and baking powder together for 2 times, this will ensure uniform mixing. Powder sugar in a mixer. Transfer in a mixing bowl.
- Eggs also needs to be weighed, you can only use the white of the egg to balance the weight. Beat eggs in the same mixer.
- Add butter ( kept at room temperature) to the powdered sugar in the mixing bowl. Mix well with a plastic ladle or with your hand. After 3 to 4 mins of constant mixing add beaten eggs. Mix all the ingredients again for 3 to 4 mins.
- To this base add maida and mix vigorously to remove any lumps of unmixed flour. Add the caramelized sugar and thoroughly mix the batter.
- After 5 mins add cashew,raisins and vanilla essence. It is ready to transfer into the baking oven.Retain a few for decorating the cake.
- Meanwhile grease the baking pan with butter. Sprinkle some dry maida onto the baking pan to form a thin layer of maida. Now pour the cake batter into the pan.Decorate with cashew and raisin on top.
- If you are using the micro oven, preheat oven to 200 deg C for 10mins. Bake in preheated oven at 200 degree C for 10 mins, then reduce temperature to 180 deg C and bake it for 30-35 mins.
- Take a tooth pick and prick the cake till the base to check whether it comes out clean or not. If the mixture is still sticky, then bake it for another 10 minutes. Check it again and turn off the oven.
- Remove pan from the oven and cool for about 5 minutes before flipping it over onto a platter. Use a butter knife to lightly run along the edges of the cake; make sure that the edges are all loose before you flip it.
- I use the cake oven with a sand tray accessory at the bottom. I heat the sand tray for 4 to 5 mins and then decrease the flame of the gas stove. I place the cake pan above the sand tray. The oven has to be kept at low flame for 25 mins.
- Sponge Cake with caramelized sugar is ready. Let it cool down for a while and then separate it from the pan with the help of a knife. Cut the cake in the shapes you desire and serve it.
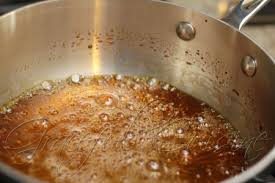
- Pre-work: You need to caramelize sugar on the pan. Heat sugar on a thick bottomed pan. When it melts and become liquid keep stirring. It will start changing color and when it becomes dark brown you can add a few spoons of water and put off the flame. The other option will be to cool caramelized sugar on a tray of ice.
You will receive a lot of appreciation for the baked cake. The aroma of fresh cake baking will be all over your house and out in the open air too.
My kids will visit the kitchen often mainly because of the aroma and the curiosity to know what other varieties I’m actually attempting that day.
Try this recipe and enjoy healthy cooking. For more tasty recipes visit our Facebook page and Google+ page.
My experiences in the kitchen-Part 2
July 28, 2014 by admin
Filed under How to make...for beginners, Kitchen tips & tricks
 For a beginner in the kitchen all the activities will feel like a huge task. As you experience with cooking several dishes you start gaining confidence and the tasks start looking simpler and less complicated. Here are a few tips from my experiences in the kitchen in continuation to the previous posts that was shared.
Watch out for the tips and tricks that has to be managed while working in the kitchen.
Cutting or chopping vegetables
- Sharpen your knife with a stone. Soak the stone in water and then rub the knife in an angle to get a better finish. Avoid the electric sharpener as much metal will be rubbed off in the process.

- To avoid crying while cutting onions refrigerate and then cut. If you have not refrigerated then place an onion on the tip of the knife you use to cut the onion. No shedding of tears.
- To avoid itching after cutting elephant foot take a small piece and place it on flame using a pincer. Your itching will minimize and gradually stop.
- Vara pindi / Banana stem dish is tasty. While chopping banana stem you need to remove the fibers that is present between the stem. Ideal method cut the inner white stem in ½ inch circular pieces. While segregating you will observe long hairy threads along with the circular piece. Roll this hairy threads on your finger and proceed to cut another circular slice. This way unwanted threads can be removed and finally hold 4 to 5 circular slices and chop them fine.
- Do not throw away the water in which rice is washed prior to cooking. Raw banana , banana stem , banana flower chopped for torran i.e a dry vegetable dish: can be soaked in this water. This will avoid becoming black. Drain water and squeeze the ingredients well prior to cooking.
- Add chopped Potato, brinjal (egg plant) ,elephant foot in water to avoid blackening. The actual color of the vegetable is retained.
- To keep the green chillies fresh for a longer time, remove the stems before storing.
- Wash and dry ladies finger prior to chopping. This will relieve you of stickiness.
- Reduce bitterness of Karela. Slit karelas ( bitter gourd) length wise and apply a mixture of salt. Keep aside for ½ hour and then cook.
Cooking tips:
- While boiling pasta and noodles, use some oil in the water to avoid sticking. When the noodles are boiled, drain all the hot water and then add cold water. This way all the noodles will get separated.
- To prevent the growth of fungus in pickles, burn a small grain of asafoetida over a burning coal and invert the empty pickle jar for some time before putting pickles in the jar.
- Before cooking cauliflower florets soak them in warm salted water for a while to get rid of any tiny insects that may be present deep inside the florets and not visible to the eye.
- A little rice flour added to bhajia batter will not only make the bhajias crisper but also less oily.
- Always warm dry spices like cumin seeds, cardamom, cloves, etc. on a griddle before powdering. They will grind faster and the powder will be finer.
- If you want the onion to change color during sautéing on a low flame, add ½ tsp of sugar and you will see a coloration appear .
Safety tips:
- If you are not using a chopping board, then it is advised to use finger gloves while cutting vegetables.

- Fry the fat of chicken in a kadai on a low flame. The oil that is collected can be stored in a clean and dry bottle. This oil is ideal to apply on minor burns in the kitchen. It gives cooling effect and heals faster too. Shelf life: 3 years
General tips:
- If the lemon or lime is hard, put it in warm water for 5-10 minutes to make it easier for squeeze. Also lemon can be used while washing chicken, fish, meat to remove that raw blood smell, cleansing properties too.
- To remove fish and meat odor from your hands rub with lemon rind.
- Always keep dough (atta/ maida flour) covered with a moist cloth to avoid a dry crust from forming on it.
- Crust removed from bread for making sandwiches etc., can be sun dried or oven dried and powdered in a mixer to form fine breadcrumbs. Refrigerate and use as required. You can make tikkis or use in cutlets.
- Commonly observed that jam bottle cap does not open as it is seal locked. Make a small dent on the cap with a knife to remove the vacuum and you will be able to open the cap.
- Soak and cook dhals ,you can save cooking gas. For more tips on gas saving methods check out- Great tips to save LPG in your kitchen.
- Keep a scissor, bottle opener, stone for sharpening knives handy in the kitchen to avoid delays.
An organized kitchen is the key to work efficiently. Once a week organize the racks to ensure you get your containers and spoons on time.
Related reading:
My experiences in the kitchen-Part 1
How to Prepare Basic Garam Masala at Home
How to make Ginger Garlic paste at home
How to extract fresh Coconut milk at home
My experiences in the kitchen-Part 1
July 18, 2014 by admin
Filed under How to make...for beginners, Kitchen tips & tricks
 Working in the kitchen is fun. If the day is hot and not going good you will end up with more mess. Here are few special tricks that I have learnt along with the art of cooking . I started off with great experiences and at times disastrous ones too during experimentation in the kitchen. I wish to share these tricks and kitchen tips to the beginners and newbies experimenting in the kitchen.
Indian cooking involves lots of masalas, powdering and grinding in the cooking process You can save time and effort, also learn from experiences rather than inventing the wheel again.
Frying papad at home:
- Prick at least two holes to avoid papad bulging. Store in tight containers to avoid fried papad becoming soft.
- Place unfried papad in the refrigerator. To prevent stiffening and breakage of the papads once the cover is opened, place the unfried papads in a polythene cover this will prevent stiffening and breakage.
Boiling milk:
- Dispense packet milk into container and only then place on the stove. If not the milk catches at the base leaving a burnt smell. Low or Medium flame should be maintained while boiling milk.
- While boiling milk at medium heat stir the milk with a spoon. It will avoid milk sticking at the bottom of the vessel.
Handling hot oil:
- While frying puris in oil, immerse in oil and then press with a flat spoon such that the puri will puff like a ball. Do not leave the dough for a long time, it’ll absorb oil. Instant frying is the key to avoid oil absorption for puri.
- To check oil is hot, put a small piece of the dough / batter. If it comes up boiling, the oil is hot enough to fry. If the batter is lying at the base, oil needs more heating.
- To cool the oil and avoid fumes after frying activity, switch off flame and put 8-10 cooked rice into the oil. It will absorb the heat.
- Fry papad in medium flame. To retain color of fryums while frying, heat the oil sufficiently, lower the flame completely and then add fryums to avoid the deep brown color
Cake baking tips:
- Weigh and add quantities while you plan to make a cake. Measuring can be tricky and the cake baking will not be accurate.
- If you plan to add soaked nuts and raisins while baking. Coat them with All purpose flour (maida) and then add when the baking is half way through. This will avoid the nuts and raisins reaching the bottom.
- After applying butter on the cake tin, sprinkle maida and then pour the batter. The baked cake will come off easily.
Making soft idli and crispy dosa
- If you add half a teaspoon of fenugreek seeds to the lentil and rice mixture while soaking, dosas will be more crisp, idlis will be soft.
- Apply ghee in the idli tray prior to dispensing the batter. The idlis will come away freely without sticking at the base.
- To check tawa has become hot , sprinkle few drops of water. If it sizzles with steam coming out it indicates tawa is hot.
- Rub slices of onion on dosa tawa (griddle) before spreading dosas. This will avoid the dosa from stubbornly sticking to the griddle or tawa.
Preparing cutlet with a crispy covering
- To prevent oil foaming while frying cutlets- use only egg white. Make a small hole on one end of the egg. Let the egg white flow freely into a bowl. Whisk the egg white thoroughly and the process will not be messy.
- To get a crispy covering for your cutlets, powder fresh bread. Dip the cutlet balls in egg white (pepper and salt included) and finally coat with powdered fresh bread.
- If you have to make cutlets in a hurry and have no breadcrumbs use semolina for coating them.
There is a popular saying, “ The best way to win a man’s heart is thru’ his stomach”. You can also win the hearts of your family members by cooking good and healthy food.
Remember to cook as per the need. Avoid wastage as there are thousands of people going without a meal every day.
Related reading:
How to Prepare Garam Masala at Home
How to make Ginger Garlic paste at home
Simple way to prepare fresh Moong gram sprouts at home
How to make Ginger- Garlic paste at home
March 4, 2014 by admin
Filed under How to make...for beginners
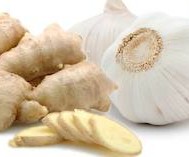
 Ginger garlic paste is an indispensable ingredient in every Indian Kitchen. Most of the curries call for ginger garlic paste. All the more for the non vegetarians. You can make fresh ginger garlic paste at home. Homemade ginger garlic paste is the best as it is fresh and you are sure there are no artificial flavors and hygiene factors are maintained too.
I make the paste during weekends and therefore I’ have stock for 2 weeks at east. The procedure is very simple requiring some pre-work. The pre-work is time consuming , the results are great. The purchased ginger garlic smells different with a color tinge too. Therefore replicate the process of preparing ginger garlic paste at home.
The basic ingredients are Ginger and garlic. Add salt while grinding. Salt will act as a preservative during storage and will help retain freshness. Soak ginger in water for 10 mins to remove soil and color. Peel ginger skin after draining water. Recycle the muddy water in the potted plants. Peel garlic to avoid strands in the paste.
Tips to peel garlic:
Separate garlic pods and then apply a little vegetable oil and place it in the sun for an hour. The garlic needs to be pushed at the top side and the peel can be separated. I usually do garlic peeling while watching television. You will not realize the effort as you will be engrossed watching the show. Included humor…..
Watch out for the kids not switching ‘ON’ on the ceiling fan without informing you. The entire room will be spread with garlic peel. The other source can be the wind blowing from the window. Ingredients :
Ginger: 100 gms
Garlic :100 gms
Salt: ½ tsp
Procedure for preparing Ginger garlic paste at home:
Method:
- Wash, rinse and peel ginger. Drain water and chop into pieces.
- Peel garlic. Chop the garlic pods if large.
- In a mixer add chopped ginger and garlic pods. Add salt and grind to a fine paste.
- You can add 2 to 3 tspns of water if the contents are not freely moving in the mixer.
- Transfer contents to a clean dry bottle or box.
- Dispense with a clean dry spoon. Place the bottle in the refrigerator always.
- Shelf life is 3 to 4 weeks if placed in the refrigerator.
- If placed out for more than an hour the color changes also giving an aged smell.
 Salt addition while grinding ginger garlic is a tested and sure way for long storage. People do add oil, turmeric powder to keep ginger garlic paste fresh
 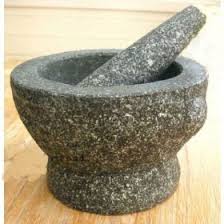 At times I prefer to add freshly minced ginger garlic especially for non vegetarian dishes. I have a grinding stone to crush ginger and garlic as per requirement.
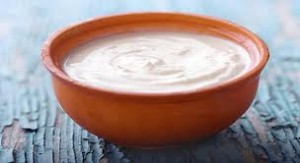
HOW TO MAKE THICK CURD
January 29, 2014 by admin
Filed under How to make...for beginners
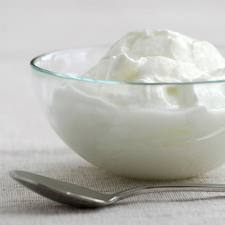 Preparing curd is an art by itself. Indian homes are very used to having curd/ yoghurt also called dahi along with meals. In South India curd is consumed at the end of the meal be it lunch or dinner. Fresh curd is in great demand.
Yogurt is a fermented milk product produced by bacterial fermentation of milk. The bacteria used to make yogurt are known as “yogurt cultures“. Fermentation of lactose by these bacteria produces lactic acid, which acts on milk protein to give yogurt its texture and its characteristic taste.
An old myth regarding curd
Curd is tasty when fresh and it is not sour (pulla / pulippa) . Starter yoghurt is called Ora /thodu. There is a myth that starter curd/ ora/ thodu should not be borrowed from another home at night. When there was a need for going to neighbors house for starter curd, my granny used to remind that it was not the right time to borrow. Grandma would continue saying that you should not borrow salt and sarso i.e mustard seeds from anyone. It will convey poverty or daaridram i.e financially poor status. This tradition of borrowing starter curd continues in modern times because it is natural and not induced.
These were few old memories. Now that we have groceries and super markets at every lane in the localities be it urban or rural, buying commodities can be planned any time of the day.
Tips for preparing curd :
Do not add starter curd to hot milk. The bacteria will die and the milk will get curdled…appearance of split milk. Ensure the milk is lukewarm temp app. 45 deg C. Check point is when you dip your finger into the milk (ready for preparing curd) it should be feel warm. The curd will set in the shape of the container you dispense into. You can cut thru’ the curd while serving.
I’ll share the benefits of curd after I share the easy recipe of making thick curd at home.
Ingredients :
Starter curd / Thodu: 1 tbsn heaped
Milk: 2 cups
Procedure for making thick curd:
- Boil milk .Lower the flame and let it continue boiling for 3 to 4 mins.
- Allow the milk to cool down to lukewarm temp. Higher temperatures will split the milk and it will have a curdled appearance with an odd taste.
- Dispense the starter curd into a glass and add ½ cup of milk and mix thoroughly with the spoon.
- Now transfer the quantity from one glass to the 2nd glass, back to back 4 to 5 times. The process is similar to cooling tea which is seen in tea shops. The vendor transfers the tea from one jug to another jug and repeat this 3 to 4 times, the tea will be of right temp to drink also giving a foamy appearance on top of the glass.
- The starter curd gets thoroughly mixed with milk. Keep the utensil closed and undisturbed for 4 hours. Setting is quick in summer due to external temp and heat. In winters you need to provide at least 6 hrs setting time.
- You can leave a red dry chilly along with stem over the curd. This will also help curd set faster.
You can make several recipes with curd. Common recipes are: Butter milk, Lassi, Raitha, Curd rice, Kadi etc. Curd is added in chicken preparations eg: chicken curry, manchuria, used for making cake.
 Benefits of curd:
Curd improves appetite when taken along with sugar and salt, actually stimulates the taste buds. Curd quenches thirst too. By-products like lassi and buttermilk are popular drinks at summer.
Curd is good for digestive system, immune system, osteoporosis, stomach problems and cures vaginal infection.
Curd is enjoyed by people of all ages. Do you know preparing curd without starter curd i.e thodu. Give your inputs on this query, article in the comments.
How to Prepare Basic Garam Masala at Home
January 21, 2014 by admin
Filed under How to make...for beginners
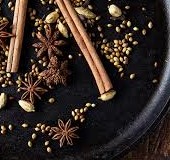
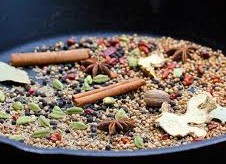 Garam masala is one of the most essential item in an Indian kitchen .The dishes which demand garam masala are aplenty and the freshly powdered garam masala is the secret to the success of many recipes. The aroma of fresh cardamom, cloves and cinnamom is distinct.
When I started cooking I used to purchase the packs from the market. I looked for ISI brand. Each brand taste different basically due to the addition of the base ingredients. Different parts in India prepare garam masala with various base ingredients and quantities. Preferences of ingredients include Coriander seeds, Black whole Pepper, Dry red chilly, bay leaf, etc.
Today I’m sharing the basic recipe of garam masala which lends great aroma and has received lots of appreciation from family and friends. The idea for this posts triggered when I went shopping for groceries with my new neighbor who is recently married . She was purchasing Garam masala powder.
When I enquired with her she mentioned that she did not know how to prepare garam masala powder at home. I suggested that if she had 15 minutes to spare in a month she can prepare fresh garam masala at home. She was inclined to learn the procedure. We purchased all the base ingredients .
After a cup of hot tea and snacks she prepared we began to make basic garam masala powder. I appreciated the enthusiasm she showed towards cooking even though she is a starter.
Basically it is a matter of convenience. For bachelors and busy working people they opt for ready made packets. Making basic garam masala at home is easy and can be followed by bachelors too.
I preferably buy 10 gm packs as it will be easy. Measuring will not be required.
Ingredients :
Cardamom / Elaichi: 10 gm or 2 tbsn
Cloves / Grambu : 10 gm or 2 tbsn
Cinnamom / Patta: 10 gm or 4 sticks of 1 inch size
Fennel seeds / Soamp : 10 gm or 2 tbspn
Caraway seeds / Shahjeera: 5 gm or 1 tbsn
Star anise: 3 or 4 nos
Accessories: Dry Grinder(small jar), Fine mesh filter ,air tight container
Procedure for preparing Basic Garam masala at home:
 To make homemade garam masala dispense all the ingredients into a heavy bottomed pan. Break the cinnamom sticks into finer pieces. Keep the flame in medium. Keep stirring to avoid burnt smell. When sufficiently hot put off the flame.You will get a roasted smell of the ingredients. Let it cool. Powder all the ingredients in a dry grinder. The small jar is sufficient for powdering.
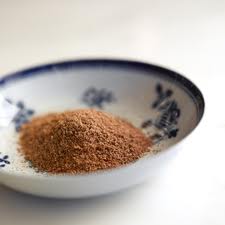
I like the home made garam masala powder to be slightly coarse. Therefore I do not remove the cardamom pods. If you want fine garam masala powder you can filter thru’ a wire mesh. Powder the coarse stuff once again. Transfer to an airtight container. Do not close the lid immediately. Keep a small gap .When the garam masala powder has reached normal temperature close the lid tightly.
This garam masala will last upto 3 months. You can powder homemade garam masala as per your usage at home. Powdering quantity for a month is ideal as the freshness of garam masala powder is retained.
Another option for using the left over cardamom pods are : you can add the cardamom pods in the tea leaf box or directly add 2-3 elaichi pod covers in the boiling tea. Great method for preparing elaichi tea.
You can prepare pickles, wine, various chutneys and sharpen your culinary skills.
Do you prepare garam masala powder differently. Include your comment to let all readers know.
Read the simple way to extract fresh coconut milk at home. and the simple way to prepare fresh moong gram sprouts at home.
SIMPLE WAY TO EXTRACT FRESH COCONUT MILK AT HOME
January 7, 2014 by admin
Filed under How to make...for beginners
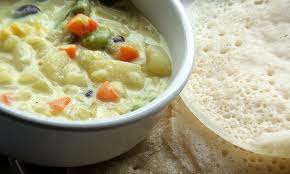
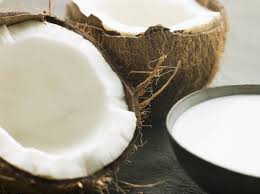 Coconut milk is required for many South Indian dishes. Coconut milk is used for making sweet delicacies like achappam, payasams,ada pradhaman. Coconut milk is lavishly added in appams, stew curry made of egg, chicken, fish or meat. Coconut milk enriches the dish and brings the rich texture to the curry. The gravy thickness is balanced by adding coconut milk to the dish.
In Kerala due to the abundant availability of coconut women prefer to extract fresh coconut milk at home. In the earlier days women used the grinding stone to grind the coconut and extract milk. Thanks to technology we now add coconut to the grinder and with the press of the button we can grind the coconut and extract milk. You can follow this simple way to extract fresh coconut milk at home and enjoy the taste.
Bachelors have one step ahead , they have now shifted to purchase coconut milk powder and add in curries as per the consistency required for the recipe thin / thick.
Whatever the situation may be I enjoy the taste of fresh coconut milk in the dishes and sweets. To avoid surprises like power cut etc…I first extract coconut milk and then start the preparation.
 Coconut milk is extracted in 3 stages. The coconut milk is classifies as 1st milk- Onnam paal, 2nd milk- Randam paal, 3rd milk – Munnam paal. The difference basically is that the 1st milk is the thickest of all. It is the cream of the entire coconut you have extracted. The 2nd milk is a little thinner. It is added in curries and dishes as a replacement of water. The basic ingredients i.e vegetables / meat are basically cooked in this milk. The third milk will have a pale color. It is the final rinse of coconut milk. Do not waste this milk, can be extracted in little amount. 3rd milk is used to rinse the grinder in which masalas have been grinded, jaggery is boiled for sweet dishes.
You can chop the coconut pieces and shred in the grinder prior to grinding for coconut milk extraction. Recommended to use warm water in winter for grinding the coconut. I prefer using lukewarm water all round the year.
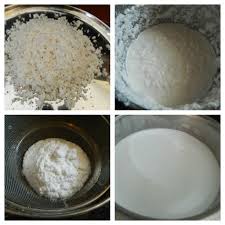
Let us understand the simple way to extract fresh Coconut milk at home:
Ingredients :
Fresh coconut: 2 cups (grated)
Water: 3 cups (lukewarm temp.)
Accessories: Grinder, Fine mesh filter or muslin cloth for filtering, 3 utensils for storage of milk extracted.
Procedure for extracting fresh Coconut milk at home:
Method:
- Add grated coconut and 1 cup of lukewarm water in the grinder. Grind to a fine paste. Empty into a filter and extract milk. Keep this aside carefully.
- For 2nd milk add 1.5 cup of lukewarm water to the coconut shreds. Grind it for 2 minutes. Filter the coconut milk. Keep the second milk aside.
- The final rinse is with ½ glass water. Grind for a minute and filter the shreds. You will get a pale colored water. This is useful to simmer vegetables or meat.
This was not a complicated task. Keep all the accessories close by and start the grinding. Enjoy the freshness of coconut milk and your family will appreciate the effort for natural and homemade coconut milk. The sweet dishes and stew curry will taste different. Go ahead and definitely give a try. There are no preservatives.The dishes look royal and totally different.
You can store this in the refrigerator for 3 days .It will till stay fresh.
 Most recipes mention thick or thin coconut milk. Thick coconut milk is the 1st milk that is added always at the end of the cooking prior to putting off the flame. The precaution taken is because if the 1st coconut milk boils in the curry, the gravy has a split appearance similar to split milk.
Just to update, in the preparation of rose cookies / achappam, the coconut milk is added in reverse order. 1st milk is added first, then second milk and last 3rd milk. This is because the base is mixed first and fried later. The water addition for coconut milk extraction will be in lesser quantities as base consistency has to be adjusted to get crispy and shaped achappams.
I’ve shared my experiences. If you have any further tips for improving the procedure do let us know.


