

Special Falahari recipe: Chatpati Sago Chaat
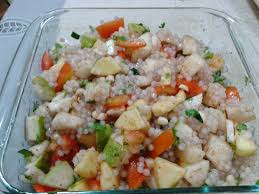 Chatpati Sago Chaat is a special recipe prepared during fasting days. In India fasting is followed for many festivals and during this duration women break the fast with light meals and healthy diet too.
Falahari dishes are made mostly on days fast is observed. Falahari is derived from phal or fal which means fruits and ahaar which means food or diet. Basically phalahari means a diet which consists of fresh fruits. along with fruits even vegetables, herbs, dry fruits, some cereals and yogurt is a part of phalahari diet.
Sago chaat is an oil free dish. You will require boiled sabudhana / sago to prepare this dish. People of all ages love chaat and you can prepare chatpati sago chaat that is simple to prepare yet delicious and mouthwatering too.
Chatpati sago chaat is a combination of cooked sabudhana ,fruits and vegetables. Let’s go through the ingredients required and the procedure to prepare.
Ingredients for Chatpati Sago Chaat:
- Sago or Sabudhana: ¾ cup
- Tomato: 1
- Guava: ½
- Apple: ½
- Green Chilli (used for mirchi bajji) -2 tsp (finely chopped)
- Groundnuts / Peanuts: handful (roasted and remove peel)
- Pomegranate: a handful
- Grapes: a handful
- Coriander leaves: 3 tbsp ( chopped)
- Mint leaves: 1 tbsp ( chopped)
- Lemon juice: 1 tbsp
- Sugar: 2 tsp
- Red chilli powder: ¼ tsp ( optional)
- Chaat masala: ½ tsp
- Salt: 2 pinches
- Crushed Pepper:1/4 tsp
Procedure for preparing Chatpati Sago Chaat:
Method:
- Wash and soak the sago in water for 2 hrs.

- Boil the soaked sago and strain through a colander. Add fresh water on this and you will get clear sabudhana. Transfer into a large serving bowl.
- Peel Apple, cut all the fruits and add to the serving bowl. Add roasted peanuts, coriander and mint leaves, Sugar, red chilli powder, chaat masala, crushed pepper, salt. Mix well with the help of two forks.
- Sprinkle with lime juice. Mix again and serve.
Chatpati sago chaat is nutritious and filling too after a long fast. A good way to break the fast.
Pineapple, pear are also a good combination for this falahari chaat. You can add sweet and sour tamarind chutney in place of sugar.
Try this recipe and enjoy healthy cooking. For more healthy and tasty recipes visit our Facebook page and Google+ page
Also read:
Dalia Salad- Healthy Recipe for Weight loss
My experiences in the kitchen-Part 1, Part-2
Dalia Salad- Healthy Recipe for Weight loss
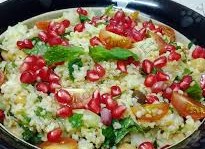 Dalia salad is a healthy recipe ideal for weight loss. Dalia is basically broken wheat and is called bulgar. Dalia is popular in India and is introduced for a child in the form of porridge. Dalia is high in fibre, low in fat, diabetic friendly and ideal to lose weight. You can make interesting recipes to make the cooked dalia tastier and healthier.
Today I’m sharing a delicious salad made from dalia and raw veggies. This salad will provide good amount of vitamins and minerals to the body.
Ingredients for Dalia Salad:
- Dalia or Bulgar: ½ cup
- Onion: 1 small (finely chopped)
- Tomato: 1 small (chopped)
- Carrot: 3 tbsp (grated)
- Lemon juice: 2 spoons
- Olive oil: 1 tsp
- Crushed pepper: ¼ tsp
- Fresh coriander leaves: 1 tbsp(finely chopped)
- Fresh mint leaves: 1 tbsp(finely chopped)
- Pomegranate (Anar): a handful- optional
- Salt: as per taste
- Cooking oil / Ghee: 4 tbsp
Procedure for preparing Dalia Salad:
Method:
- Pressure cook dalia in 2 cups of water.
- In a large wide bowl add chopped onions, chopped tomatoes, grated carrot, chopped coriander and mint leaves, pomegranate, lemon juice, olive oil, crushed pepper, salt and mix well.
- After dalia has cooled down, add cooked dalia to the above mixture . Mix well.
- Dalia Salad is ready and can be served immediately. Yo will love the flavors of olive oil, lime and crushed peppers .
Broken wheat has high fiber content and the dish is filling. You can have Dalia Salad for breakfast or prepare when you plan for a light dinner too. Popular dishes made with dalia are payasam, upma, puttu, etc.
Try this recipe and enjoy healthy cooking. For more healthy and tasty recipes visit our Facebook page and Google+ page.
Please add a comment and, if you like the post, feel free to share it with your friends.
VEGETABLE CARVING
 Vegetable carving is an artistic display of techniques that involves sculpting vegetables to form pretty centerpieces for table settings and other uses. Your dinner arrangements are complete when you have laid down the entire menu including salads. Now you can bring a twist in the arrangements by placing cute shapes of vegetables along with the chopped cucumber, carrot, tomato and other salads.
No matter how good food you prepare but if you do not present it in an effective manner all your effort is gone in vain. Let’s make a start in understanding simple techniques to improve the art.
The beginnings:
Japan has also been referred to as the root of the art of fruit and vegetable carving, called Mukimono in Japanese. Now this has developed into a major and critical part of chefs training. Vegetable carving and designing has become a career in many countries. Exhibitions and photo galleries have been initiated based on the subject of carving on vegetables and fruits.
Display of vegetable carving:
The products of vegetable carving are generally flowers or birds, but there is no limit to human imagination and therefore they have made sculpting of famous personalities. Design beautiful images and colorful combination to create shapes. Usually vegetable carving is used for garnish, you can also have a flower arrangement to beautify your table .
Go ahead , spare some time and learn the basic skills of vegetable carving. You can make your family proud with no extra costs. Your guests too will be amazed at your presentation skills in addition to the expert culinary skills.
This is a series in vegetable carving skills which involve simple tools and techniques. Therefore go thru’ these video clips to understand.
Learn to make Tomato rose:
Watch this video for simple understanding:
Learn to make Carrot rose.
Watch this video for simple understanding:
Learn to make Cucumber rose:
Watch this video for simple understanding:
Learn to make Carrot butterfly.
Watch this video for simple understanding:
Various books and instructional videos teach the art of fruit and vegetable carving. Additionally, tool sets are sold for those who participate, either professionally or as a hobby. Such tools include knife and garnishing sets. Cutters come in various sizes for sculpting different fruits and vegetables. These tools are typically constructed of stainless steel.
Hope you have enjoyed this article. Learn to beautify your dining table with the creative designs mentioned in this article.
Leave in your comments or ideas for making salads with simple vegetable or fruit carving.
Read: Simple way Prepare Fresh Moong gram sprouts at Home
SIMPLE WAY TO PREPARE FRESH MOONG GRAM SPROUTS AT HOME
 Sprouts have always been a popular nutritional food for many diet conscious people around the globe. Sprouts are a powerhouse of nutrition. Sprouts contain abundant enzymes, protein, chlorophyll, vitamins, minerals and amino acids. They also contain high level of antioxidants. Sprouts top the list of “health food”. Moreover they are high in fiber and low in calories. So even those who are looking for a way to lose weight can include sprouts in their diet.
Today I’m going to share the recipe for an easy and quick way to prepare fresh moong gram sprouts at home. You do not need any sprouting jar or any special gadgets to make sprouts at home. Homemade sprouts are fresher and tastier than the store purchased ones. Actually I avoid the store ones as I’m not sure about the water they use for preparing sprouts.
As people are becoming conscious about health and diet in particular you can use the method suggested to make sprouts at home. You can consume sprouts fresh- direct form, include in salads, in sandwiches too. Do not cook the sprouts as it loses the nutritional values.
I was not sure how to make sprouts at home. I had to learn the process to complete my sons school project. My son was thrilled when we sprouted moong gram at home for his school project. He went around showing his grandparents, neighbors and friends as if he had performed some magic trick. He did not hesitate to eat a few as he had participated in the sprout preparation. Initially I used to add fresh grated coconut and spread little sugar. Later on, I added grated carrot and salt.
We sprout beans once or twice a week. Even little quantity yields high proteins and nutrition.Sprouted beans is good for diabetic patients.
Fresh Moong gram sprouts Recipe:
Yields: 3 cups
Time required:
Soaking time: 7 to 8 hrs
Standing time: 18 to 24 hrs
Ingredients :
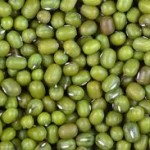 Whole Moong gram (Green gram) : 1 cup
Water: to soak
Procedure for Fresh Moong gram sprouts:
Method:
- Dispense the moong gram and check for any stones.
- Wash the moong gram twice and soak in 3.5 cups of water for 7 to 8 hrs.
- You will see that the moong gram has swollen and become plumpy and full.
- Drain the water and wash again. Ensure there is no water.
- Now transfer the moong gram into a wet muslin cloth. Tie the edges together and hang it in on a rod. Check the cloth in between, if you observe the cloth is dry sprinkle water over the cloth to make it damp.
- After app. 18 hrs open the muslin cloth and check the length of sprouts. If it is small keep it for another 6 hrs atleast.
By now you will see the sprouts popping out from the cloth. You can also know the length of the sprout that has emerged.
In Summers the germination is quick within 20 hrs and in cold weather it takes nearly 24 hrs for the sprouts to emerge with required length.
We at home enjoy longer sprouts. If you want to avoid muslin cloth, you can opt this simple method.
- After you drain the soaked moong gram, transfer into a casserole or hot pack. Drain all water. Leave it for 12 to 16 hrs untouched.
- You will be happy to see the white sprouts that have elongated from the gram.
You can store sprouts in refrigerator for 1or 2 days and plan use when required.
The soaking time and standing time for Chana (chick peas) and black chana is higher. The soaking time will be 10 to 12 hrs and the standing time will be 24 to 30 hrs.
RUSSIAN SALAD
September 25, 2012 by admin
Filed under Salads, Snacks & Salads
Russian Salad is a nutritious and healthy dish. It is popular among children too for the sweet mix taste. A good starter during meals.
Ingredients:
2 Boiled potatoes
2 Apples
2 Cups boiled chicken
1 Cup boiled beans
1 Cup cream
1 Cup yoghurt (curd)
1 Cup Mayonnaise
Salt to taste

Procedure of Russian salad:
- Cut potatoes, chicken, beans and apples into pieces
- Mix yoghurt, cream and mayonnaise well.
- Add potatoes, chicken and apples
- Russian Salad is ready.


