

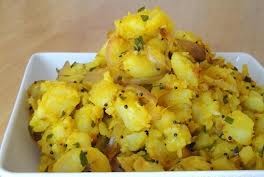
Aval Nanachathu- Sweet Poha with Coconut
October 30, 2014 by admin
Filed under Breakfast recipes, Rice varieties, Snacks & Salads
Aval nanachatha is an instant recipe ideal for breakfast and evening snacks. Sweet Poha with coconut is served during travel too as it is convenient to serve and eat too. Small banana is a good combination to have along with aval nanachatha, you can have it otherwise too.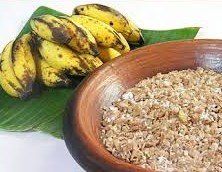
Aval is also called Poha in North India, Flattened rice, Atukulu in Telugu. Poha is made with a spicy taste in North India. Aval nanachatha itself means wetting or dampen the flakes. Therefore you need to lightly sprinkle water/ coconut water to make it absorb the taste of jaggery and fresh coconut.
In some parts of kerala, milk is used to prepare aval nanachatha, I love the taste of black coffee in aval nanachatha.
Ingredients for Aval Nanachatha- Sweet Poha with coconut
- Flattened rice/ Aval/ Poha: 3 cups
- Fresh coconut : 1 cup ( grated)
- Jaggery: 1 cup ( grated)
- Black coffee / Coconut water: 1 cup ( at room temp)
- Elaichi / Cardamom: 2 nos ( powdered)
Procedure for preparing Aval Nanachatha- Sweet Poha with coconut:
Method:
- Sift the flattened rice to remove any small powdered particles.
- In a wide vessel add flattened rice, grated coconut, grated jaggery, powdered cardamom and mix well.
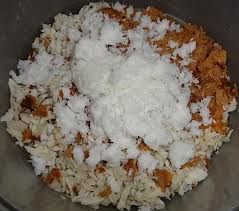
- Sprinkle water / coconut water or black coffee (kattan kapi) and mix the ingredients. The mix should not become soggy, it should remain as sweetened flakes.
- Mix and serve. People do serve this with small banana.Prepare this instantly and serve .The longer you retain it will become soggy and the crispness of atuluku will go away.
- If you are using the kerala poha i.e thick and red variety you will have to sprinkle lukewarm water / black coffee / milk.
My mom used to chop banana as slices and serve aval nanachatha when we were kids. Now I follow that practice for my kids.
The combination of fresh coconut and grated jaggery is loved by kids and elders and usually my kids will grab from the plate immediately after they get to know something new is being prepared in the kitchen. They will make multiple rounds to see the progress. Their senses for smell is perfect (as Madhuri Dixit says in Jhalak Dikla jaa-TV prog) and they will come sniffing from their respective study rooms more so, if they are studying. I repeat this because you will not get them during play time or TV time.
You can try this recipe with sugar too if jaggery is not available. This is an easily digestible, healthy snack and can be made in no time. Give a try for evening snacks today.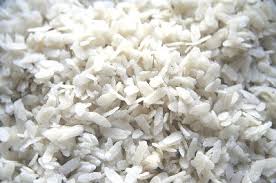
I’m planning to prepare aval vilayichatha some time shortly. There are plenty of recipes with aval : Atukulu laddoo, Fried Atukulu and so on.
In winters you can have it with hot chukka kapi and brighten your mood.
Try this recipe and enjoy healthy cooking. For more healthy and tasty recipes visit our Facebook page and Google+ page
Enjoy Combo Offer-Hot Steaming Tapioca with Bird’s Eye Chilli Chutney
October 9, 2014 by admin
Filed under Breakfast recipes, Chutney varieties, Snacks & Salads
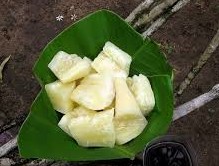
 Today I’m sharing a recipe of Kappa Puzhungiyathu along with Kanthari Mulaku Chammanthi. It is a great combination especially when you are having a great appetite. It boosts energy levels. I’m sure any keralite staying away from home will long to have a bite of this delicious feast. The images are so tempting that I would like to grab a piece or two from the banana leaf spread.
The back ground was that I reached home tired after work and was in no mood to cook dinner. I was relaxing after a cup of tea and my hubby comes in with a big bag of kerala store items. As we are away from Kerala, he longs for Friday -basic reason to collect the fresh stock of ethakka (kerala banana) ,kappa (tapioca), Chena (elephant foot), Kaachil (Purple Yam), Kochu ulli (Shallots), Kanthari Mulakka (bird’s eye chilies),Coconuts, masala powders , etc..
The visual image of Kappa Puzhungiyathu with green chilli chutney combination was so tempting that I finalized on the menu for dinner. This is a quick dish and relished too bringing in nostalgic memories back home. Though my younger son was fussy over the change in menu (pulka regularly), he was willing to adjust with fish curry.
Therefore started to prepare the menu finalized for dinner: Kappa Puzhungiyathu along with Kanthari Mulaku Chammanthi.
Ingredients for Kappa Puzhungiyathu – Boiled Tapioca- Yuca- Cassava
- Kappa-Tapioca- Yuca- Cassava : 2 large roots
- Water: as required to cook
- Salt: as per taste
Procedure for preparing Kappa Puzhungiyathu – Boiled Tapioca:
Method:
- Cut the kappa-tapioca into 4 cm length slices.Peel the skin , it will come off as a thick layer.
- Slice these round pieces lengthwise into 2 or 4 pieces to allow easy cooking.
- Transfer the cut pieces into a large shallow pan containing water. Wash the immersed kappa thoroughly to remove any impurities and sand particles.
- Pour water till the level of chopped kappa-tapioca and cover the vessel with a lid. Allow this to boil. After 4 to 5 minutes of boiling, drain the water completely. This step is essential to remove the katta or starch.
- Now pour the same amount of fresh water and allow the kappa-tapioca to boil. Add salt as required and cook for 10 to 12 minutes until it turns soft and tender.
- Put off the flame. Drain the water completely and keep aside.
- Serve it steaming hot with kanthari Mulaku Chammanthi/ Chicken curry with lots of gravy, Fish curry-Kerala style.
Ingredients for Kanthari Mulaku Chammanthi-Bird’s Eye Chiili Chutney
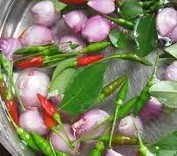
- Kanthari Mulaku / Bird’s eye chilli: 20 nos (optional green chilli-4 nos)
- Shallots/Pearl Onion/Kochulli: 12 nos
- Tamarind extract: soak lime sized tamarind and extract thick pulp
- Salt: as per taste
- Coconut oil: 3 tspn
- Curry leaves-shred 4 to 5 leaves
Procedure for preparing Kanthari Mulaku Chammanthi- Green chilli dip:
Method:
- In a mixer ,pulse kanthari Mulaka/ green chilli, shallots, curry leaves 2 or 3 times. You can also use the arakalla- motor and pestle – ideal for taste.
- Green chilli is an option for kanthari Mulaka, like wise use onion for shallots.
- Transfer the mixture into a serving bowl. Add salt ,tamarind extract and coconut oil and mix well.
- Ready to serve with steaming kappa puzhingiyatha.
This is a quick fix menu and can be prepared with ease. You can prepare the green chilli dip when the kappa is boiling. Maximum time will be 25 to 30 minutes for preparing this menu.
Chicken curry with gravy, Fish curry are great combinations. An ideal recipe for breakfast, evening snacks and dinner too.
We enjoyed this sumptuous dinner. Go ahead and give it a try…
Try this recipe and enjoy healthy cooking. For more healthy and tasty recipes visit our Facebook page and Google+ page
Prepare special Chettinad Kuzhi Paniyaram with left over dosa batter
June 3, 2014 by admin
Filed under Breakfast recipes
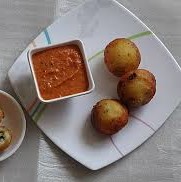 Special Chettinad Kuzhi Paniyaram is prepared with left over idli-dosa batter. A quick and healthy recipe. Consumption of oil is very less. The crispy Chettinad Kuzhi Paniyaram is in great demand. You can make use of the left over idli- dosa batter, be creative and your family is going to ask you for more numbers.
Kuzhi Paniyaram has various name like paddu, appe, guliappa, gulittu, gundponglu, ponganalu, and gunta pongadalu in various languages. The name kuzhi means a hole, the mould into which the batter is poured.
Ingredients :
Idli – Dosa batter: 2 cups
Shallots: 20 to 22 or 1 large onion
Green chilly: 3 nos
Urad dhal: 3 tsp
Mustard seeds: 1.5 tsp
Jeera: ½ tsp
Curry leaves:2 sprigs
Hing / Asafetida: 2 pinches
Fresh grated coconut: 3 tbsp
Fresh ginger: ½ tsp
Salt – 2 pinches
Oil: 8 tsp
Procedure for preparing Chettinad Kuzhi Paniyaram:
Method:
- Chop shallots, green chillies and curry leaves.
- Heat oil in a pan and add mustard, when they splutter add jeera, urad dhal. Roast till the dhal turns light brown. Lower flame and add asafetida.
- Continue to add the chopped shallots, green chilly and curry leaves.Add 2 pinches of salt and continue stirring. When the onions become translucent put off the flame.
- Add fresh grated coconut and finely chopped ginger. Mix well. It will get sauted in the heat of the pan.
- Transfer the contents in the pan to the batter. Mix well. No need to add salt as this is left over batter of idli -dosa.
- Heat the paniyaram pan, add few drops of oil in each mould. Pour the batter in each mould upto 3/4th level. Close the pan with a lid and allow this to cook at medium flame for 2 to 3 mins.
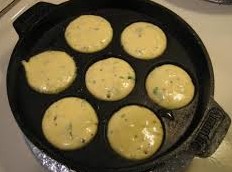
- Now turn each paniyaram in the pan upside down with a fork / spoon. If required pour a drop of oil on the mould. Let it remain for 2-3 mins, there is no need to place the lid.
- You will observe a crispy texture on the cooked side and a soft, spongy texture inside. Check if the batter has cooked by pricking a toothpick into the paniyaram, the stick should come out clean. Take off all the kuzhi paniyarams into a serving bowl.
- Now repeat the process to complete the batter. Serve hot Chettinad kuzhi paniyaram with roasted onion chutney or any chutney of your choice.
Ginger is an optional ingredient in the Chettinad kuzhi paniyaram. Including ginger in the batter gives a distinct aroma and is liked by elders in masala idli too. You can use onions in place of shallots ( sambhar onions) , the fact is that shallots add to the unique taste of chettinad kuzhi paniyaram.
This special Chettinad paniyaram can be prepared for breakfast or as a snack too. Oil consumption is less, cooked by steam and therefore a healthy breakfast.During festival time sweet paniyaram is made adding jaggery and banana.
Make use of your left over idli- dosa batter and let your preparation do the talking for you.
WHEAT STEAM CAKE-GOTHAMBU PUTTU
March 18, 2014 by admin
Filed under Breakfast recipes
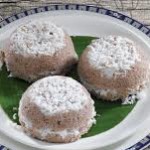
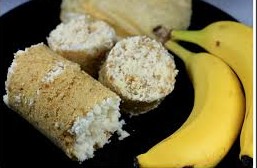 Wheat steam cake is a special breakfast in Kerala, popularly known as Gothambu puttu or Wheat puttu. Due to health reasons people are avoiding rice flour breakfast and switching over to wheat flour recipes, oats recipes as this is healthy and filling too. People with diabetes will not feel hungry till noon. Wheat steam cake is a healthy breakfast which can be made easily at home.
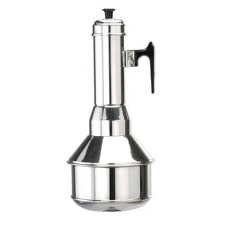
I learnt this recipe as my in-laws were diabetic and I wanted to avoid rice flour in the breakfast menu. The preparation is easy, you require a puttu maker or a steel sieve like utensil with large holes. This can be placed over a wide bowl such that all steam passes thru’ the sieve and the puttu is steam cooked.
We have a puttu maker so that we get a long cylindrical steam cake in our plates. When served hot they enjoy it. You can certainly give a try.
Ingredients :
Wheat flour: 1 cup
Grated coconut: ¼ cup
Salt: 2 pinches ( to taste)
Water: 1/3 cup or sufficient to wet the powder.
Accessory required: Puttu maker
Procedure for preparing Wheat Steam cake – Gothambu puttu:
Method:
- Dispense wheat flour in a wide kadai. Dry roast wheat flour over medium flame stirring continuously until the powder feels warm when touched with your palm.
- Watch out for the powder not to catch the base.
- Remove from flame and allow wheat flour to cool.
- Sprinkle lukewarm water on the powder and stir the powder thoroughly. You will observe small lumps. Continue sprinkling little water till all the dry powder has formed small fine lumps.
- Ensure the powder has not become sticky. The right check for consistency is when you hold a fistful of powder it forms a shape and stays together, when you press the ball it falls apart.
- Transfer this wet powdery lumps into a mixer and inch it 2-3 times. This will remove all lumps and give a uniform puttu base.
- Place the puttu maker on the flame and when steam starts releasing from the vent holes, remove the puttu holder from the pot.
- Fill the ingredients layer wise. Fill grated coconut, prepared wheat flour, and repeat this filling once more. The last layer should be grated coconut.
- Fill contents loosely .Do not compress the wheat flour into puttu maker.
- After 6-8 mins of continuous steam releasing thru the vent the wheat steam cake is ready to serve.
- Gently push the steamed wheat puttu onto a plate. Ideal combination is with small banana (pazham) and sugar.
Diabetic patients can enjoy gothambu puttu with pappadam, cooked moong gram, Kadala curry. Few enjoy wheat puttu without any additions. They prefer it hot. The fresh coconut which blends with the gothambu puttu gives that extra taste factor.
A suitable alternative if you do not have a puttu maker is a kadai in the bottom with a wide sieve placed on top to grab all the steam. Spread coconut at the base then prepared wheat flour and again repeat this layer 1 time. Ensure the spread is loose and not compressed. Close the sieve with a large plate to avoid steam loss.
 Wheat puttu is a healthy breakfast and can be made easily at home. Have a healthy start. There are other variations like rice puttu, ragi puttu, oats puttu,rava puttu.
If you like this recipe or know of any variations do let us know in the comments.
HOTEL MASALA DOSA RECIPE
October 1, 2013 by admin
Filed under Breakfast recipes
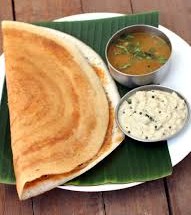 My family loves dosa and specially the masala dosa served at hotels. Many a times I go to veg restaurants only to have masala dosa. I love the crispiness and the taste of dosas. Many of you may be willing to experiment and surprise your family . The ingredients are not new but the proportion is very important to get that crispy texture.
My kids always ask why the masala dosa made at home does not get match this colour and crispiness. I was keen to adapt this preparation and went ahead to master this dosa variety.
As today is October 01, – Elders day. I’ve dedicated this recipe to all the elders at home and in our neighborhood. Happy Elders day…. Let us take this moment to remember all the dedication they had in our upbringing, to place us where we are.
Serves – 6
Ingredients:
Par Boiled rice / Puzhungal ari: 2 cups
Raw rice / Regular cooking rice: ½ cup
Urad dhal (split black gram): ½ cup
Toovar shal (split red gram: ½ tbsp
Chana dhal ( split Bengal gram) : ½ tbsp
Fenugreek (methi): 1 tsp
Sugar: 1tsp
Salt: 1 tbsp
Procedure for Hotel Masala Dosa Recipe:
Method: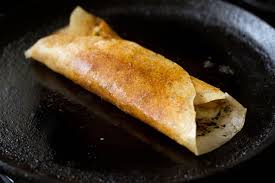
- Soak rice, dhals, fenugreek in water for app. 4 hrs. Soak them together ,ensure there is enough water in the container.
- Wash and drain all water. In a mixie ,grind them into a smooth batter. Add little water while grinding to ensure smoothness.
- Transfer the batter into a large vessel to avoid dripping on fermentation. Add salt to the batter.
- Fermentation process will take app. 6 to 8 hrs.
- Prior to making dosa mix the batter well, add sugar to the batter. Mix batter thoroughly.
- Heat the dosa tava / pan. When hot sprinkle few drops of water .The water will sizzle and evaporate indicating the dosa pan is sufficiently hot for the dosa process.
- With the help of a sliced onion or spoon spread the oil on the dosa tava.
- Pour two spoonful of batter on the tava and uniformly spread into a large circle. Pour oil on the sides of the dosa.
- Slowly flip the dosa on the other side. After a few seconds reverse on the first side.
- Dosa is ready. Add 1 large tbsp of masala aloo sabji in the middle of the dosa.
- Fold it from 2 sides. You can opt for triangular shapes or cone shaped dosa.
- Few people like to spread red chilli chutney over the dosa. It is purely personal choice.
- Children may find it too hot.
- Referring to the hotel masala dosa recipe it is served plain with only aloo sabji.
- The dosa is served hot along with coconut chutney and sambhar.
My mouth is watering….umhh…hope you enjoy this family surprise recipe..
You can definitely be innovative and creative in the dosa preparation. Over fermentation will make the dosa batter taste sour. If you want to reserve batter for the next day, do not add salt and sugar. Add salt and sugar prior to making the dosa.
Remember this dosa is best when eaten hot. Hotel masala dosa is golden brown and crispy, you can enjoy eating hot straight from the pan.
RED CHILLI CHUTNEY FOR MASALA DOSA
October 1, 2013 by admin
Filed under Breakfast recipes, Chutney varieties
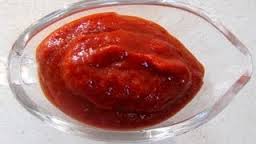 Red chilli chutney for dosa is a latest favorite at our home. Even the kids have one or two dosa with a dash of red chutney on one side of the dosa. It is a quick recipe and I’m sure taking less time for preparation.
Other varieties of chutney enjoyed with dosa or masala dosa is coconut chutney, mint leaves chutney or onion tomato chutney
Commonly made in South Indian homes.
Serves – 6
Ingredients:
Red chillies: 8 nos
Garlic : 5 medium cloves
Salt: ¼ tsp
Procedure for Red Chilli chutney for Masala Dosa:
Method:
- Soak chilles in ½ cup of hot water . Close the lid of the vessel.
- After 45 mins to 1 hour time, the red chillies will become soft .
- Grind them with garlic and salt. Do not add water. Paste needs to be thick.
- After the dosa batter is cooked on one side, apply a tsp of red chilli chutney over the dosa as a thin layer.
Steaming dosa and hot spicy chutney is a great combination.
Onion Tomato chutney
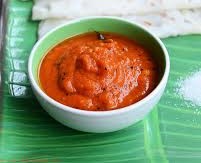 For those who cannot indulge in hot spicy chutney there is a variant for you: Onion Tomato chutney. If you do not have coconut at home you can make this chutney and win the hearts of your family members. All ingredients are available at home and can be made with ease.
Serves – 6
Ingredients:
Tomato: 1 cup chopped
Onion: 1 cup chopped
Red chilly powder : 2.5 tsp
Turmeric powder (Haldi) : ¾ tsp
Tamarind: size of a small lime
Curry leaves: 1 sprig
Salt: to taste
For Seasoning:
Mustard seeds: 1 tsp
Urad dhal(split black gram):1 tsp
Dried red chilly: 1 no
Curry leaves: 1 sprig
Asafoetida (hing): a pinch
Cooking oil: 1 tbsp+1tbsp for sautéing and seasoning
Procedure for Onion Tomato chutney served for Masala Dosa:
Method:
- Heat oil in a pan , add chopped onion and sauté for 2 mins
- To this add chopped tomato and stir for a minute.
- Add red chilli powder, curry leaves, salt, turmeric powder and tamarind.
- Mix well till the aroma of raw smell disappears.
- Put off the flame. Let the contents cool down.
- Gring this in a mixie to a soft paste. Do not add water, chutney needs to be thick.
- In another kadai season and add to the ground paste.
- Onion tomato chutney is ready to be served. It has a wonderful colour and it is not hot and spicy therefore can be relished by kids too.
Hot dosa along with Onion tomato chutney is a great treat for dosa lovers. Ideal replacement for coconut chutney or mint chutney usually served with dosa.
SABUDHANA UPMA
July 9, 2013 by admin
Filed under Breakfast recipes
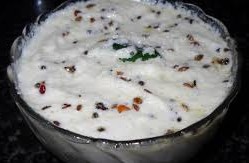
 Sabudhana Upma is a popular Maharashtrian dish. Cooked usually for breakfast, evening snack, during fasting and festive occasions. Sabudhana /Sago upma is a quick dish to make , easily digestible and a favorite at home too.
The pearly white appearance is a huge hit among kids. There are several names for eg: pearl upma, sago khichdi etc. In South India the dish has grated coconut and powdered groundnut is excluded. They instead add whole groundnut during tempering.
I tasted this dish from my friends tiffin box. I enjoyed the texture of sabudhana in the upma. I pushed my mom to make it. After 1 or 2 attempts it became a success. I further experimented with addition of grated carrots and fresh peas. Among all the varieties the preferred choice is the Maharashtrian style of making Sabudhana upma.
Another info to share. I always wondered in my childhood as to the source of Sabudhana. I was surprised at the uniformity in shape and the white color of sabudhana balls.We used to see more of the transparent balls in payasam and sweets. I was told that Sabudhana / sago is a product of the South Indian Topiaca.
This is one dish which I can consume at any time of the day. I never hesitate when offered. Try this recipe and I’m sure you will love the flavor and aroma.
Serves – 4
Ingredients:
Sabudhana / Sago : 2 cups
Onion : 1 medium size ( chop it to fine pieces)
Potato : 1 medium size ( boiled- dice into small pieces)
Groundnut : ½ cup ( Roasted, peeled and powder coarsely)
Salt : (to taste)
For tempering:
Mustard seeds: ½ tsp
Cumin seeds: ½ tsp
Urad dhal: 1 tbsp
Curry leaves: 1 sprig
Green chilly: 3 nos ( slice it into halves- lengthwise )
Turmeric powder: 2 pinches
Cooking Oil: 3 tbspn
For garnishing:
Coriander leaves / Kothmir : 2 tbspn
Lime juice – ½ lime
Procedure for Sabudhana Upma:
Pre-work:
- Soak Sabudhana / Sago in water for at least 3 to 4 hrs. The level of water should be such that sabudhana is submerged in water. Do not add excess water, upma will become soggy.
- After soaking for the said duration wash and rinse the sabudhana well. Drain complete water and spread the sabudhana on a plate to avoid becoming lumps.
- Roast peanuts. When cool, remove skin and coarsely powder in mixer.
Method:
- Heat oil in a flat kadai / non stick pan. When hot, add mustard seeds, cumin seeds, Urad dhal, curry leaves, green chilly, diced potato.
- Lower flame. Keep stirring the ingredients for 2 mins. Add turmeric and salt.
- Add soaked sabudhana. Mix well and steam cook the ingredients. The sabudhana will turn transparent by now.
- After 3 to 4 mins toss groundnut powder. Mix well. Switch off flame.
- Garnish the upma with coriander leaves and lime juice.
- Serve hot . You can combine sabudhana upma with pickle or curds.
Tips:
- While soaking sabudhana, water should not float on the surface.
- Option – Heat the sago prior to soaking in water to avoid lumps and mushy feel. Ensure the color does not change.
BREAD SANDWICH
June 26, 2013 by admin
Filed under Breakfast recipes, Snacks & Salads
 Bread sandwich is a popular snack be it home or during an outing. What I like about it is the hygiene part. The sandwiches available at shops are usually covered in a nice cover and it makes it more irresistible.
Children love bread sandwich and is ordered mostly during Interval time during a movie along with chips, popcorn or a cool refreshment drink , etc. It is a filling snack and enjoyed by people of all ages.
Bread sandwich can be packed for school snacks. Convenient during travel too.
Now that the school had started and the rains have commenced. You can give an option for your kids.
You can make tasty bread sandwiches at your home. Just follow this simple recipe and give your family a huge surprise during snack time in the evening.
Serves – 4
Ingredients:
Bread : 12 slices
Cucumber : 1 large and tender( peel and cut into thin slices)
Cheese : 4 slices
Butter : 8 tsp ( as required / optional)
Salt and pepper powder (to taste)
For chutney:
Mint leaves / Pudinah leaves : ¼ cup
Coriander leaves / Kothmir : ½ cup
Lime juice – ½ lime
Green chilli: 2 medium size
Salt: to taste
Water : 2 to 3 tbsp ( for grinding)
Procedure for Bread Sandwich:
- Wash leaves and green chilli. Drain water completely. Chop it to medium pieces. Grind in mixer along with lime juice, water and salt. Divide paste into 8 equal portions.

- Butter 8 slices of bread and place it on a plate with buttered side up.1 tsp per slice of bread.
- Spread chutney on both sides for 4 slices of bread .
- On a plate arrange the bread sandwich in the following sequence.
- Bread slice with butter on top side, spread 4 to 5 cucumber slices.
- Sprinkle some salt and pepper powder.
- Place a cheese slice over it.
- Now place the bread slice with chutney on both sides.
- Place 4 to 5 cucumber slices. Sprinkle some salt and pepper powder.
- Place the bread slice with butter side down. This is the last layer.
- Cut the 4 edges of the bread carefully with a sharp knife.
- Cut the sandwich with a knife into 2 halves-shape of triangles.
The sandwich will look and taste just like the one you buy at your favorite bakery or snack shop. You can bring in variations in chutney by adding sesame seeds/ peanut chutney
Your kids will also enjoy with tomato sauce. Add your creativity , include smiley faces with sauce on the serving plate.
There are various variations to bread and you can experiment by adding tomato slices / onion slices / salad leaves / boiled egg etc.
Make vegetable cutlet with the bread edges known as bread crumbs.
Go ahead and try this popular snack.
RAGI DOSA
May 27, 2013 by admin
Filed under Breakfast recipes
 Ragi Dosa is a healthy breakfast option on holidays when you have time to serve your family hot crispy dosas. Ragi dosa is a wonderful evening meal too. Ragi or Finger Millet is high in dietary fibre, calcium and iron. Ragi is gluten free, easily digestible with an earthy, nutty flavor. In South India during Summer season, Ragi is included in various dishes and is ideal during summer season.
Ragi dosa is an instant preparation with all ingredients easily available in the kitchen. Just give a try to this dish and I’m sure your attempt will be appreciated.
Ragi flour is available in packs at your nearby retail store. The dosa has a deep brown color and therefore the chutney you serve should be in contrast color red (red chilli chutney) or orange- tomato chutney.
Serves – 4
Ingredients:
Ragi flour : 1 cup
Semolina / B.rava:1 cup
Maida: ½ cup
Rice flour / Wheat flour: ½ cup
Butter milk : 1.5 cup
Green chilly: 2 nos (finely chopped)
Onions: 1 medium size ( finely chopped) – optional
Coriander leaves: 2 tablespoons finely chopped
Curry leaves- 1 stem finely chopped
Cumin seeds ( Jeera) – 1 tsp
Ginger: 1 inch piece finely chopped
Salt : to taste
Water: as required to maintain batter consistency
Cooking Oil for dosa frying.
Procedure for RAGI DOSA:
- Add all the ingredients except oil into a large bowl . The ragi dosa batter should be free flowing, no lumps and the consistency should be running as similar to thick buttermilk.
- Place a dosa pan / tawa on the stove, when hot do the water test i.e sprinkle drops of water on the tawa, the water will sizzle on the pan with heat.
- Maintain medium flame for proper cooking of ragi dosa.
- Apply oil on the tawa. Pour the batter in a circle at the edges of the pan. Then gradually fill the centre by spreading the batter gently in the gaps.
- After 2 -3 minutes turn the dosa for cooking on the other side.
- Dosa is ready and can be served along with spicy chutney or podi of your choice.
Quick tips:
To evenly spread the oil on pan I cut the onion into half. I hold the tail portion / stem of the onion and dip the flat end in a cup containing oil. I apply the flat end of onion with oil on the pan for uniform spread of oil.
If the batter is catching on the tawa, the decrease the flame .I used ghee on the batter prior to setting of 1st side. You can sprinkle grated carrot and chopped onions after spreading the batter. My children enjoyed the crispy dosa with mint chutney or tomato chutney.
MASALA EGG OMELETTE
April 23, 2013 by admin
Filed under Breakfast recipes
 Egg omelette is a quick and tasty dish in the menu. Loved by people of all ages at any time of the day. Teenagers experiment cooking usually with simple recipes and omelette is the preferred choice. Basic preparation of egg omelette involves salt, onion and pepper . Here is a trendy variety in the egg brand.
Sure you are going to enjoy this variety – Masala Egg Omelette
Ingredients:
Eggs : 4 nos
Onion: 2 medium finely chopped
Green chillies : 2 ( finely minced)
Black pepper powder : ¼ tsp
Turmeric powder : 2 pinches
Garam Masala powder : ¼ tsp
Milk : 2 tbpns
Coriander leaves: 2 tbsps ( finely chopped)
Oil : 3 tbsps
Include vegetables(optional): Carrot , Capsicum , Tomato – 3 tbspn of each vegetable ( finely minced ) or shredded chicken : 3 tbspn
Salt ( to taste)
Procedure for Masala Egg Omelette:
- Beat the eggs in a bowl till foamy. Add all the ingredients except oil and mix well.
- Heat the pan. When hot , spread oil in the pan. Reduce flame and pour half of the omelette base onto pan. Swirl the pan such that the omelette base spreads over.
- Cook on medium flame till one side is brown.
- The centre will be liquidy therefore be careful while flipping omellette on the pan. With a ladle gently flip over and cook the other side for another minute.
- You can add grated cheese on the omelette , the heat of the omellette will lightly melt the cheese.
- The masala egg omelette has cooked and is ready to serve.
- Transfer the masala egg omelette onto a plate and serve with bread , buns or chapathis.
- Prior to making the next omelette, mix the omelette base well and pour.
- Maintain low flame to avoid burnt smell of omelette.
Your family will ask you make more of this tasty omelette. Enjoy…


