

Enjoy Summer Cooler – Cucumber Mint Smoothie
June 9, 2014 by admin
Filed under Juices and Coolants
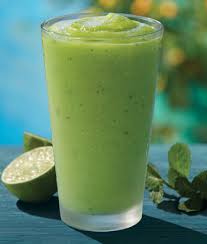 Cucumber Mint Smoothie is a refreshing drink in hot summers. You can feel the coolness from within when you sip this drink. The flavors of mint, lime and cucumber is very soothing and will make you feel fresh and ready to bang on with energy.
Hyderabad Summer is at its peak now and the humidity levels are at all time high. Sweat keeps flowing from the head and neck even if inside a room. There is no sign of monsoon, infact all are looking forward for the rains.
To beat the external heat and make yourself comfortable on a hot day, there is nothing refreshing than a chilled yogurt based drink. You can make an easy recipe at home and feel cool. This is a quick and easy way to get the calcium in your diet and thereby benefiting your body.
Ingredients :
Cucumber: ½ cup (peeled and diced)
Fresh mint leaves: 3 nos
Ice cubes-: 10-12
Yogurt: 1.5 cup (thick consistency)
Chaat masala: a pinch
Black salt: As per taste
Lime juice: ½ tsp
Chilled water: ¼ cup (optional for thinner consistency)
Procedure for preparing Cucumber Mint Smoothie recipe:
Method:
In a mixer blend diced cucumber, mint leaves, ice cubes, yogurt, chaat masala and black salt.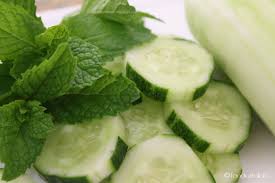
You can add water and blend if you desire a thinner consistency.
Dispense into serving glasses and dash it with lime juice. Serve cold.
Garnish with mint leaf and cucumber peel.
Cucumber Mint Smoothie is a refreshing drink and soothing in hot summers. Feel the coolness and come back with doubled energy after taking this smoothie. The flavors of mint, lime and cucumber revives you and you are ready for action.
Beat the Heat with Ginger Mint Lemonade
May 26, 2014 by admin
Filed under Juices and Coolants
 Ginger mint Lemonade is a popular summer cooler in much demand during hot sultry days. This homemade summer beverage is sure to please family and friends at a party or a get-together.
Ginger mint Lemonade can be made at home, the recipe is simple and can be made in advance to avoid last minute rush. You need to instantly mix all the ingredients.
Ingredients :
Lime / Lemon : 12 nos (approx. 1 cup extract)
Mint leaves: 1cup (chopped)
Fresh Ginger: 1 tbsp (crushed)
Sugar: ¾ cup
Water: 3 cups plain and 9 cups chilled water
Salt: ¼ tsp
Procedure for preparing Ginger Mint Lemonade recipe:
Method:
- Extract juice of 12 lemons. Strain and keep aside.
- Boil a cup of water add sugar and stir to allow sugar to dissolve completely. After 2 mins of boiling allow the sugar solution to cool.
- In another vessel boil 2 cups of water. Put off the flame and add crushed ginger and ½ cup of fresh mint leaves. Close the lid and allow to steep. After about 15 mins, strain the liquid and cool. Discard the crushed ginger and mint leaves.
- Take a large bowl. Add 9 cups of cold water. Add the lime juice extract, sugar syrup, ginger-mint solution, salt.
- Mix thoroughly. Adjust sweetness by adding more sugar syrup, adjust tart by adding more of lime juice.
- Dispense into tall glasses. Decorate with ice cubes, lime slice and mint leaves.
- Honey is a good substitute for sugar. Only caution is not to boil honey. Just add the required quantity into the lemonade and stir.
- Few people also enjoy this cooler with a pinch of roasted cumin powder / a pinch of chaat masala to enhance the taste.
Great summer cooler and as it is homemade it is healthy too. Beat the heat with this summer cooler. It will be a hit in the summer for elders and children alike.
Benefits of each ingredient:
Lemon: Lemon water makes for a powerful detox drink; lemon juice helps to cleanse and alkalize the body.
Mint: Mint adds a touch of sweetness without the sugar to your water, and it also helps settle your stomach and aids in digestion as well.
Ginger: The spicy root helps cleanse out your system, aids in digestion, and settles your stomach.
Hey go ahead and make this Ginger mint Lemonade 1 day in advance and mix with chilled water upon requirement.
BANANA MILK SHAKE -RECIPE FOR ALL SEASONS
May 6, 2014 by admin
Filed under Juices and Coolants
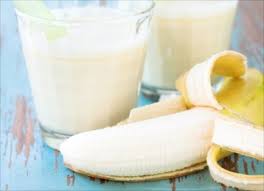 Banana Milk shake is a quick to make and ideal summer coolant during hot and sweating days. You can prepare this recipe with basic ingredients that are available on your kitchen counter.
Start the day with this recipe as it has weight losing properties too. Banana Milkshake is popular among kids. You can add other fruits like Mango, Strawberry and decorate the shake with a combination of colors and flavors
The milkshake is a good source of heart-healthy fiber and protein. Milk is a good source of calcium, potassium, phosphorous and magnesium. Bananas offer 10 percent of your recommended daily needs for vitamin C, which is important to maintain a healthy immune system and may play a role in helping to lower blood pressure.
Read thru’ to understand how to make delicious recipe for all seasons at home-Banana Milk Shake.
Ingredients :
Banana: 2 ripe ones (Robusta variety)
Curd: 1 cup
Milk-1/2 cup
Sugar- 1 tsp
Vanilla essence: ½ tsp
Lemon juice: 1 tsp
For Garnishing:
Mint leaf / Cherry / Lemon rind / Sliced banana
Procedure for preparing Banana Milk Shake recipe:
 Method:
- Chop the banana into slices.
- In a mixer add all ingredients and blend till it forms a smooth paste.
- Pour into serving glasses. Garnish with mint leaf and cherry. You can explore and try your experiments.
- Add chilled milk,if you like it cold.
Go ahead and try this banana milk shake today itself. Beat the heat with this summer cooler. If you like this recipe or know of any variations do let us know in the comments.
You can try the other summer coolants: Ragi java, Pudina pani, Green Mango drink, Buttermilk ,Ice cream soda and milk shake recipe .Be healthy and cool this summer.
Courtesy: Vanita Magazine.Adapted the banana milk shake recipe from the recipes section printed in Malayalam.
| If you want a similar Recipe website for FREE Visit Special offer for May2014 |
|---|
KERALA VATTAYAPPAM -STEAMED RICE CAKE
April 16, 2014 by admin
Filed under Snacks & Salads
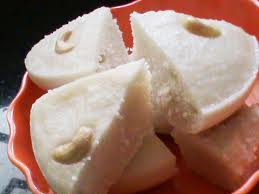 Kerala Vattayappam is a special Kerala dish prepared as a tea snack. Kerala Vattayappam is basically steamed rice cake. Vattayappam is famous as a traveling snack as it is steam cooked. No indigestion issues from the snack. Kerala Vattayappam is popular during prayers and carol services.
Vattayappam is served among church members and family, friends after Maundy Thursday service. The ingredients are available at every home and easy to prepare too.
Ingredients :
Raw rice: 1 cup ( soaked)
Cooked rice: ½ cup
Fresh coconut : 1 cup ( grated)
Salt: ¼ tsp
Sugar:4 tsp or as required
Yeast : ¼ tsp
Water: ¼ cup to ½ cup( or use fresh coconut water)
Ghee / cooking oil: 2 tsp
For garnishing:
Raisins: 3 tsp
Cashewnuts: 2 tsp
Cardamom: 6 nos ( crushed)
Procedure for preparing Kerala Vattayapam- Steamed rice cake:
Method:
- Soak rice in water for approximately 6 hrs.
- Wash and drain the rice. Grind the soaked rice with the cooked rice and grated coconut to make a smooth batter.
- While grinding add water or coconut water. Mix the yeast in 2 tspn of luke warm water and add along with the ingredients. Add sugar and salt to the ingredients.
- The batter will be thick. Mix the batter well and allow it to ferment overnight.
- Grease a flat bottomed pan with ghee / cooking oil. Pour the batter till half full.
- In a small pan roast cashewnuts and raisins and garnish them on top. Sprinkle crushed cardamom on top.
- Steam the batter for 15 to 20 mins on a medium flame till done.
- To check if done prick a tooth pick and see if there is any wetness.The vattayappam will raise and the garnishing will look great after it is cooked.
- Cut the vattayappam into desired shapes and serve
Variations in this Kerala vattayappam are:
- Replace sugar with jaggery.
- Use fresh coconut water in place of plain water.
- In some parts of Kerala, individuals add shallots, cumin(jeera), garlic flakes while grinding the batter.
Note: If your grinder is getting warm while grinding the batter, add 2 to 3 ice cubes such that the batter does not get warmed up.
If you like this recipe or know of any variations to the steamed rice cake do let us know in the comments.
VEGETABLE CARVING
 Vegetable carving is an artistic display of techniques that involves sculpting vegetables to form pretty centerpieces for table settings and other uses. Your dinner arrangements are complete when you have laid down the entire menu including salads. Now you can bring a twist in the arrangements by placing cute shapes of vegetables along with the chopped cucumber, carrot, tomato and other salads.
No matter how good food you prepare but if you do not present it in an effective manner all your effort is gone in vain. Let’s make a start in understanding simple techniques to improve the art.
The beginnings:
Japan has also been referred to as the root of the art of fruit and vegetable carving, called Mukimono in Japanese. Now this has developed into a major and critical part of chefs training. Vegetable carving and designing has become a career in many countries. Exhibitions and photo galleries have been initiated based on the subject of carving on vegetables and fruits.
Display of vegetable carving:
The products of vegetable carving are generally flowers or birds, but there is no limit to human imagination and therefore they have made sculpting of famous personalities. Design beautiful images and colorful combination to create shapes. Usually vegetable carving is used for garnish, you can also have a flower arrangement to beautify your table .
Go ahead , spare some time and learn the basic skills of vegetable carving. You can make your family proud with no extra costs. Your guests too will be amazed at your presentation skills in addition to the expert culinary skills.
This is a series in vegetable carving skills which involve simple tools and techniques. Therefore go thru’ these video clips to understand.
Learn to make Tomato rose:
Watch this video for simple understanding:
Learn to make Carrot rose.
Watch this video for simple understanding:
Learn to make Cucumber rose:
Watch this video for simple understanding:
Learn to make Carrot butterfly.
Watch this video for simple understanding:
Various books and instructional videos teach the art of fruit and vegetable carving. Additionally, tool sets are sold for those who participate, either professionally or as a hobby. Such tools include knife and garnishing sets. Cutters come in various sizes for sculpting different fruits and vegetables. These tools are typically constructed of stainless steel.
Hope you have enjoyed this article. Learn to beautify your dining table with the creative designs mentioned in this article.
Leave in your comments or ideas for making salads with simple vegetable or fruit carving.
Read: Simple way Prepare Fresh Moong gram sprouts at Home
HEART SHAPED – VEGETABLE CUTLET
February 14, 2014 by admin
Filed under Snacks & Salads
 Vegetable cutlet is a mouth watering delicacy. Vegetable cutlet is popular as a snack or starter too. This article is being posted on Valentine’s day as a gift of love. There is a popular saying that, “you can make a man happy thru’ his tummy only”. In India the situation is no different. No matter how modern or career oriented you may be a cup of tea or a small snack will make your man happy and cheer his mood.
Go ahead and surprise your soul mate…loved ones on Valentine’s day with these heart shaped cutlets. Serve them hot with chutney or sauce. These are homemade snacks that can be eaten without any worry of the quality. You can design the cutlets in various shapes: circle, oval, square, star, flower, heart shaped as per the mold you have and the occasion. For kids you can cut into mickey outline. You can make use of the empty snack boxes in various cartoon characters available in the market.
Ingredients :
Potato: 1 large
Carrot: 1 large
Onion: 1 small ( optional -finely chopped)
Beans: ½ cup chopped
fresh corn: ¼ cup
Green peas: ¼ cup
Green chilly: 2 tbsn (finely chopped)
Ginger-garlic paste : ½ tspn
Garam masala: ¼ tspn
Coriander leaves: 3 tbsns (finely chopped)
Cumin powder: ¼ tspn
Salt: as per taste
Lime juice: 1 tbsn
Corn flour: 3 tspn
Bread crumbs: 1.5 cup
Oil: for frying
.
Procedure for preparing Heart shaped –Vegetable Cutlet:
Method:
- Peel potato and carrot and pressure cook for 2 whistles. When cool mash it without any lumps.
- Potato is the basic ingredient that binds the cutlet and ensure good shape formation.
- Steam fresh corn and green peas. Add a little salt to avoid band taste when it becomes tender.
- Mix corn flour with 5 to 6 tbsn of water such that the liquid is thick and can be used as a coating for the cutlet.
- Mix all the ingredients together. Apply oil on the palms and then divide the mixture into equal sizes.
- If you are cutting shapes then spread the mixture on a flat plate. Press the mold and cut into desired shapes.

- Immerse the shapes into the corn starch batter and then into the flat plate containing bread crumbs.
- Ensure a the sides of the cutlet is covered with bread crumbs.
- Heat oil in a pan and when hot add the cutlets one by one. Fry them golden brown on both sides. The vegetable cutlet should be half immersed in the oil to fry sufficiently.
- You can bake the vegetable cutlet to avoid oil consumption.
- Fry the complete batch in oil. Serve hot with sauce or chutney.
Delight your family with these hot delicious Heart shaped Vegetable cutlet.
Happy Valentine Day!!
There are various options to the cutlet i.e addition of other vegetables and you can opt for rava / Sooji in place of bread crumbs. You will have to do shallow frying to avoid rava getting separated.
Note: Non – vegetarians can opt for egg white as a coating to immerse cutlet prior to application of bread crumbs.
If you like this recipe or know of any variations do let us know in the comments.
HOMEMADE BISCUITS
December 30, 2013 by admin
Filed under Snacks & Salads
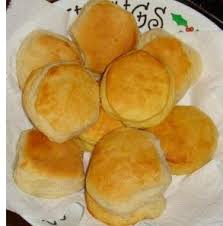 Biscuits are loved by kids and elders too,if you give them home made ones there is no turning back. This is an easy snack and very soft therefore edible by little ones who have developed tooth.
I usually prepare homemade biscuits when we are expecting guests and there is no stock of any snack to be served. You can use various molds to shape out the biscuit. At times I invert cups ,bottle cap of various sizes is also a good alternative.
The ingredients are always available at home. In the initial days when baking oven was not available I used the same ingredients to fry a tin of biscuits. These can be stored for a week’s time. Idea snack during Christmas too.
When you fry the biscuits at home, the aroma will spread across and your neighbors will also be curious to know from which kitchen this smell is coming.
Ingredients:
Maida (All Purpose four): 250 gms
Sugar: 125 gms
Egg: 2 nos
Butter or ghee: 100 gms
Cardamom (Elaichi) : 5 to 6 nos
Baking powder: ½ tspn
Milk : ½ cup
Cooking oil: 2 cups
Procedure for making Homemade Biscuits:
Method:
- To make homemade biscuits there is some prework involved.
- Sieve maida and baking powder together and keep aside. The next step is to powder sugar in a grinder , transfer the sugar powder to a mixing bowl.
- Keep aside ¼ cup of maida, this will be required for rolling the dough and cutting shapes at a later stage.
- Beat eggs to a fluffy texture in the same grinder
- I prefer to use butter in this snack as the final output is very soft. Ensure butter is at room temperature.
- Powder cardamom. Take away the peels. You can add this into boiling tea and enjoy cardamom tea.
- Add butter to the mixing bowl containing sugar powder. Mix well. Add beaten eggs to the base and continue mixing. When there are no lumps, add the maida powder sieved along with baking powder. Add cardamom powder. Knead the dough thoroughly to make a ball.
- If the dough is very hard, add milk little by little such that it forms a smooth ball. Let the dough remain for 15 to 20 minutes.
- Make small balls of the dough and spread on the stone similar to a chapathi. Use maida for patting the dough such that it does not stick and roll out to 1/2 inch thickness.
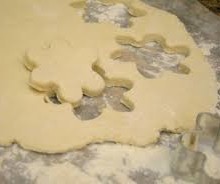
- Now cut into shapes you desire. Place the shapes on a flat plate.
- Heat oil in a flat based kadai / pan. When hot add the cut shapes in it.
- Maintain flame at medium flame such that the biscuits does not get a deep color. Once light brown turn the side with a spatula.
- When done drain the biscuits onto a napkin to remove any oil that is present. Your homemade biscuits are ready to serve.
- When cool you can store it into air tight containers . This will lasts for a week’s time.
Note: You can make salted biscuits for a change with the same ingredient by excluding sugar and adding ½ tspn salt to the recipe.
You can bake the homemade biscuits in an oven similar to baking a cake. Set the time as per your experience. Share the timings and temperature for the benefit of other readers too.
Read and enjoy making these popular recipes:
RED CHILLI CHUTNEY FOR MASALA DOSA
SIMPLE WAY TO PREPARE FRESH MOONG GRAM SPROUTS AT HOME
 Sprouts have always been a popular nutritional food for many diet conscious people around the globe. Sprouts are a powerhouse of nutrition. Sprouts contain abundant enzymes, protein, chlorophyll, vitamins, minerals and amino acids. They also contain high level of antioxidants. Sprouts top the list of “health food”. Moreover they are high in fiber and low in calories. So even those who are looking for a way to lose weight can include sprouts in their diet.
Today I’m going to share the recipe for an easy and quick way to prepare fresh moong gram sprouts at home. You do not need any sprouting jar or any special gadgets to make sprouts at home. Homemade sprouts are fresher and tastier than the store purchased ones. Actually I avoid the store ones as I’m not sure about the water they use for preparing sprouts.
As people are becoming conscious about health and diet in particular you can use the method suggested to make sprouts at home. You can consume sprouts fresh- direct form, include in salads, in sandwiches too. Do not cook the sprouts as it loses the nutritional values.
I was not sure how to make sprouts at home. I had to learn the process to complete my sons school project. My son was thrilled when we sprouted moong gram at home for his school project. He went around showing his grandparents, neighbors and friends as if he had performed some magic trick. He did not hesitate to eat a few as he had participated in the sprout preparation. Initially I used to add fresh grated coconut and spread little sugar. Later on, I added grated carrot and salt.
We sprout beans once or twice a week. Even little quantity yields high proteins and nutrition.Sprouted beans is good for diabetic patients.
Fresh Moong gram sprouts Recipe:
Yields: 3 cups
Time required:
Soaking time: 7 to 8 hrs
Standing time: 18 to 24 hrs
Ingredients :
 Whole Moong gram (Green gram) : 1 cup
Water: to soak
Procedure for Fresh Moong gram sprouts:
Method:
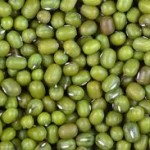
- Dispense the moong gram and check for any stones.
- Wash the moong gram twice and soak in 3.5 cups of water for 7 to 8 hrs.
- You will see that the moong gram has swollen and become plumpy and full.
- Drain the water and wash again. Ensure there is no water.
- Now transfer the moong gram into a wet muslin cloth. Tie the edges together and hang it in on a rod. Check the cloth in between, if you observe the cloth is dry sprinkle water over the cloth to make it damp.
- After app. 18 hrs open the muslin cloth and check the length of sprouts. If it is small keep it for another 6 hrs atleast.
By now you will see the sprouts popping out from the cloth. You can also know the length of the sprout that has emerged.
In Summers the germination is quick within 20 hrs and in cold weather it takes nearly 24 hrs for the sprouts to emerge with required length.
We at home enjoy longer sprouts. If you want to avoid muslin cloth, you can opt this simple method.
- After you drain the soaked moong gram, transfer into a casserole or hot pack. Drain all water. Leave it for 12 to 16 hrs untouched.
- You will be happy to see the white sprouts that have elongated from the gram.
You can store sprouts in refrigerator for 1or 2 days and plan use when required.
The soaking time and standing time for Chana (chick peas) and black chana is higher. The soaking time will be 10 to 12 hrs and the standing time will be 24 to 30 hrs.
CHICKEN ROLLS (CHICKEN FRANKIES)
October 22, 2013 by admin
Filed under Snacks & Salads
 Chicken rolls are popularly known as Chicken Kathi rolls in India. This is a famous street snack sold at food outlets. Chicken rolls are in huge demand at busy commercial places where the vendors can make a whole lot of money with the sales. Chicken roll are also referred to as Chicken Frankies. This is a quick and filling snack, enjoyed by all. In this recipe we have used boneless chicken filling ,you can select from a wide range of stuffings. You can complement the filling with meat, vegetables, beef, paneer, mushrooms and make the dish taste different everytime. You can create a lot of variations and make the dish tasty.
You can prepare this dish at home and make your snack time an enjoyable one.
Makes – 8 rolls
Ingredients for the filling:
Chicken ( boneless) : 500 gms
Onions: 3 tsp(finely chopped)
Ginger: 1 tsp( finely chopped)
Garlic: 1 tsp( finely chopped) Optional: 1.5 tsp ginger- garlic paste
Tomatoes: ½ cup (finely chopped)
Turmeric powder: ¼ tsp
Red Chilli powder: ½ tsp
Coriander powder: ½ tsp
Cumin powder: ¼ tsp (roast and powder)
Chaat masala: ¾ tsp
Oil: 2 tbsp
Salt: to taste
Ingredients for the dough:
Wheat powder/Atta : 1 cup
All purpose Flour /Maida:1/2 cup
Salt: ½ tsp
Egg: 1
Oil: 1 tbsp
Warm water: ¼ cup
Oil required for applying on the rotis
Egg: 4 nos ( Beat them nicely with 2 pinches of pepper and a pinch of salt).
Ingredients for garnish:
Onions: 1 no., finely sliced
Green chilly: 1 no., finely chopped
Coriander leaves / Kothmir -1 bunch, finely chopped
Lemon -2 nos. diced
Mint chutney or Kothmir Chutney (optional)
Procedure for Chicken rolls (Chicken Frankies):
Method:
- Cut boneless chicken into small pieces. Wash with ½ piece of lime and drain excess water. This will remove blood smell.
- In a kadai / pan add oil. When it become hot add onions . After sauting for 2-3 mins add ginger and garlic. Adding salt at this stage will help onions to cook faster.
- When the onion is cooked add tomatoes. Reduce the flame to medium. Cook till the mixture becomes a lump and starts leaving oil.
- Add all the spices : Turmeric powder, Red Chilli powder , Coriander powder , Garam Masala powder , Cumin powder and Chaat masala.
- Saute the powders and the mixture to avoid catching at the base of the kadai.
- Add the chicken pieces to the mixture and mix thoroughly.
- After 2 to 3 mins you will observe chicken pieces changing color. Reduce the flame completely. Place a lid such that the chicken pieces cooks with steam. Mix frequently to prevent chicken pieces getting burnt.
- Check if the chicken is cooked with a spoon. The pieces will get cut easily when cooked.
- Remove the lid of the pan and dry any excess liquid that is present in the kadai.
- When dry put off the flame. Check for the taste. Your filling is ready.
Now to the next task of preparing rotis for the Chicken Frankies.
- Combine Wheat flour and Maida with salt and oil. Add 1 egg to the mixture and knead well.
- Add water carefully while kneading the dough. The consistency of the dough should be a little softer than Chapati dough. Knead for 4 to 5 minutes.
- Heat a flat tawa for the rotis.
- Divide the dough into eight equal parts. Flatten the ball between palms.
- Dip the ball into a bowl containing maida and roll the dough with the pin. The rotis should be thin and bigger than a chapathi size. Keep dusting the dough with maida to ensure it does not stick to the pin when you press .
- Now lift the roti and place on the hot tawa. Lower the flame to medium. When you observe bubbles surfacing, flip the roti.
- Pour about 2 to 3 spoons of beaten egg on one side of the roti. Smear the egg thoroughly on the roti.
- Now the other side also roti color changes .Flip the roti. Spread few drops of oil on the exterior side of the roti such that the egg side cooks gently.
- With a spatula , loosen the Egg side from the tawa. Apply oil on the top side. Flip once and allow the plain side to cook for a minute and take the roti off the tawa.
- Make other rotis in the same manner.
Now it is time to assemble the chicken frankies together.
- Heat the chicken such that it is warm. Add all the garnish ingredients and mix well. Divide into equal portions required for the number of rotis.

- Spread the filling on the egg side of the roti. On one end of the roti place the filling and roll the roti. Place some mint chutney or kothmir chutney on the roti. Roll the roti to form a tight roll.
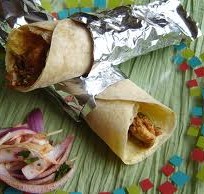
- Wrap the chicken frankies with foil to keep warm while serving . If you are serving immediately place a toothpick to avoid unwrapping of roti.
- Chicken rolls are ready to serve.
Do not get boggled with the length of the recipe. It will take not more than 45 mins to 1 hour of your time. Go ahead and surprise your family with this special snack.
You can experiment the rolls with vegetarian ingredients or add cheese for the children to make it less spicy.
My mouth is watering….umhh…hope you enjoy this family surprise recipe.
BREAD SANDWICH
June 26, 2013 by admin
Filed under Breakfast recipes, Snacks & Salads
 Bread sandwich is a popular snack be it home or during an outing. What I like about it is the hygiene part. The sandwiches available at shops are usually covered in a nice cover and it makes it more irresistible.
Children love bread sandwich and is ordered mostly during Interval time during a movie along with chips, popcorn or a cool refreshment drink , etc. It is a filling snack and enjoyed by people of all ages.
Bread sandwich can be packed for school snacks. Convenient during travel too.
Now that the school had started and the rains have commenced. You can give an option for your kids.
You can make tasty bread sandwiches at your home. Just follow this simple recipe and give your family a huge surprise during snack time in the evening.
Serves – 4
Ingredients:
Bread : 12 slices
Cucumber : 1 large and tender( peel and cut into thin slices)
Cheese : 4 slices
Butter : 8 tsp ( as required / optional)
Salt and pepper powder (to taste)
For chutney:
Mint leaves / Pudinah leaves : ¼ cup
Coriander leaves / Kothmir : ½ cup
Lime juice – ½ lime
Green chilli: 2 medium size
Salt: to taste
Water : 2 to 3 tbsp ( for grinding)
Procedure for Bread Sandwich:
- Wash leaves and green chilli. Drain water completely. Chop it to medium pieces. Grind in mixer along with lime juice, water and salt. Divide paste into 8 equal portions.

- Butter 8 slices of bread and place it on a plate with buttered side up.1 tsp per slice of bread.
- Spread chutney on both sides for 4 slices of bread .
- On a plate arrange the bread sandwich in the following sequence.
- Bread slice with butter on top side, spread 4 to 5 cucumber slices.
- Sprinkle some salt and pepper powder.
- Place a cheese slice over it.
- Now place the bread slice with chutney on both sides.
- Place 4 to 5 cucumber slices. Sprinkle some salt and pepper powder.
- Place the bread slice with butter side down. This is the last layer.
- Cut the 4 edges of the bread carefully with a sharp knife.
- Cut the sandwich with a knife into 2 halves-shape of triangles.
The sandwich will look and taste just like the one you buy at your favorite bakery or snack shop. You can bring in variations in chutney by adding sesame seeds/ peanut chutney
Your kids will also enjoy with tomato sauce. Add your creativity , include smiley faces with sauce on the serving plate.
There are various variations to bread and you can experiment by adding tomato slices / onion slices / salad leaves / boiled egg etc.
Make vegetable cutlet with the bread edges known as bread crumbs.
Go ahead and try this popular snack.


