

KERALA VATTAYAPPAM -STEAMED RICE CAKE
April 16, 2014 by admin
Filed under Snacks & Salads
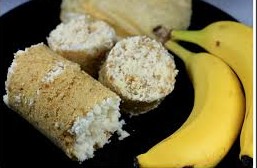
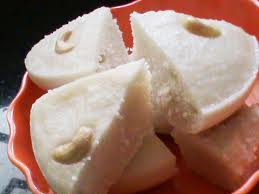 Kerala Vattayappam is a special Kerala dish prepared as a tea snack. Kerala Vattayappam is basically steamed rice cake. Vattayappam is famous as a traveling snack as it is steam cooked. No indigestion issues from the snack. Kerala Vattayappam is popular during prayers and carol services.
Vattayappam is served among church members and family, friends after Maundy Thursday service. The ingredients are available at every home and easy to prepare too.
Ingredients :
Raw rice: 1 cup ( soaked)
Cooked rice: ½ cup
Fresh coconut : 1 cup ( grated)
Salt: ¼ tsp
Sugar:4 tsp or as required
Yeast : ¼ tsp
Water: ¼ cup to ½ cup( or use fresh coconut water)
Ghee / cooking oil: 2 tsp
For garnishing:
Raisins: 3 tsp
Cashewnuts: 2 tsp
Cardamom: 6 nos ( crushed)
Procedure for preparing Kerala Vattayapam- Steamed rice cake:
Method:
- Soak rice in water for approximately 6 hrs.
- Wash and drain the rice. Grind the soaked rice with the cooked rice and grated coconut to make a smooth batter.
- While grinding add water or coconut water. Mix the yeast in 2 tspn of luke warm water and add along with the ingredients. Add sugar and salt to the ingredients.
- The batter will be thick. Mix the batter well and allow it to ferment overnight.
- Grease a flat bottomed pan with ghee / cooking oil. Pour the batter till half full.
- In a small pan roast cashewnuts and raisins and garnish them on top. Sprinkle crushed cardamom on top.
- Steam the batter for 15 to 20 mins on a medium flame till done.
- To check if done prick a tooth pick and see if there is any wetness.The vattayappam will raise and the garnishing will look great after it is cooked.
- Cut the vattayappam into desired shapes and serve
Variations in this Kerala vattayappam are:
- Replace sugar with jaggery.
- Use fresh coconut water in place of plain water.
- In some parts of Kerala, individuals add shallots, cumin(jeera), garlic flakes while grinding the batter.
Note: If your grinder is getting warm while grinding the batter, add 2 to 3 ice cubes such that the batter does not get warmed up.
If you like this recipe or know of any variations to the steamed rice cake do let us know in the comments.
TAMARIND RASAM RECIPE WITHOUT TOMATO AND DAL
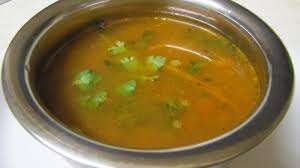 Rasam is popular among South Indians .Tamarind rasam is ideal when you are feeling down and need an energy boost. Rasams are made in different styles in different parts of South India. Addition of dhal or tomato is commonly seen in preparation. Basic ingredients are tamarind pulp, tomato and rasam powder.
In a formal meal, the rasam course is served after the sambhar course and followed by curd rice. Served to eat with rice or few people enjoy drinking the light soup by itself. Rasam is consumed as an appetizer before the beginning of a meal.Rasam can be considered daily, a mandatory curry in most homes.
Today I’m sharing a tamarind rasam recipe without tomato and dal. The recipe is simple and can be followed with ease. This rasam is ideal during winter and cold evenings.
Ingredients :
Tamarind: Medium Lemon sized ball
Garlic cloves: 3 to 4 nos (crush them lightly)
Fenugreek seed powder(Methi / Menthulu): ¼ tsp
Turmeric powder: ¼ tsp
Pepper powder: 1.5 tsp
Salt ( to taste)
Asafoetida (Hing): 2 pinches
For seasoning:
Mustard seeds: 1 tsp
Cumin seeds( Jeera): 1 tsp
Curry leaves: 1 stalk
Dry red chillies: 2 nos
For garnishing:
Chopped coriander leaves : 2 tbsp
Procedure for preparing Tamarind rasam without tomato and dal:
Method:
- Soak tamarind in 1 cup water for 30 mins. Strain the pulp by adding water.
- Heat oil in a kadhai and add mustard seeds. Add garlic pods, cumin seeds, curry leaves, dry red chilies.
- Saute a while and add pepper powder, Fenugreek seed powder and asofoetida. Add tamarind water along with squeezed pulp.
- To this add 1 cup water and turmeric powder.
- Mix the watery solution, add salt as per taste. Cook till it boils.
- Garnish with chopped coriander and serve with steamed rice.
The pepper aroma will be strong and smells perfect. Remembering the catchy words of a popular ad: Ee rasam bahu kemam (this rasam taste excellent)
Benefits of having Rasam:
- Rasam when had at the beginning of the meal is said to increases the appetite.
- Rasam contains many spices which are considered beneficial to health.
- Steaming hot rasam is soothing when you are suffering from a cold, cough or sore throat.
- When you have a headache plan for a rasam preparation, it will relieve your headache.
- Rasam is served to the person who is sick with fever and has no appetite and feels tastelessness in the mouth, it not only increases the appetite but also the spices in the rasam hit the mouth and throat increasing the taste in the mouth.
If you like this recipe or know of any variations do let us know in the comments.
Summer special recipes for further reading: Buttermilk, Ragi Java, Green Mango drink, Pudina Pani
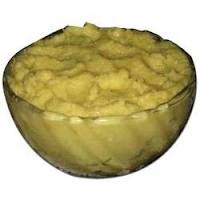
UGADI PACHADI
March 31, 2014 by admin
Filed under Chutney varieties
 Ugadi Pachadi is made on the auspicious occasion of Ugadi. Ugadi marks the beginning of the Telugu New Year. This festival brings happiness with the beginning of Vasanth Ruthu (Spring season). Ugadi pachadi is a mandatory preparation in all Telugu homes. This pachadi consists of 6 tastes also known as Shadruchulu i.e Sweet, Sour, Bitter, Salty, Spicy-Hot and pungent.
This is an easy recipe not requiring great skills. The right proportions in addition of ingredients will bring up that taste that will bring in nostalgic memories of childhood days.
Ingredients:
Neem flower petals: 2 tea spoons
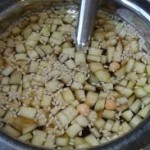
Raw Mango: 2 Table spoons (finely chopped)
Tamarind: Small lemon size ball
Green chillies: ½ tspn finely chopped
Salt: ¼ tspn
Jaggery: ½ cup powdered
Water: 3 cups
Ripe Banana: 1 no. chopped
Putnal pappu / Fried chick pea: 2 table spoons
Procedure for Ugadi Pachadi:
- Separate the petals from the flowers by rubbing them between your palms. Sieve and collect only the petals of the neem flowers. Wash and keep aside
- Soak tamarind in 1 cup warm water for 20 minutes. Add 2 cups of water and dilute it to a thin, watery mix.
- Heat putnal papu and keep aside.
- Add rawmango pieces, neem flower petals, salt, green chilles, grated jaggery. Mix well till jaggery dissolves completely. Then add cut banana and roasted putnal pappu.
- Serve chilled for the youngsters who tend to be fussy over the taste. Use water stored in earthern pot (Kunda) such that the temperature is suitable for elders while serving Ugadi Pachadi at your home.
Homemade katti meethi Ugadi Pachadi is ready to serve.
Few areas in andhra do add roasted Sesame(til) and crushed saunf (fennel)
Special dishes like Pulihora, Bobbatlu- Puran Poli and Payasam is served .Learn to make special laddoos this Ugadi for your family and dear ones.
HAPPY UGADI….Wishing all prosperity ….UGADI SUBHAKANKSHULU
“U” thsavam – Festival
“G” owravam – Respect
“A” anandam – Happiness
“D” hanam – Money
“I” shwaryam – Prosperity
“UGADI” Shrikara Nama Samvatsra Shubhakankshalu!
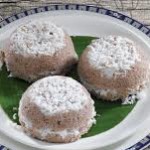
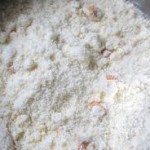
WHEAT STEAM CAKE-GOTHAMBU PUTTU
March 18, 2014 by admin
Filed under Breakfast recipes
 Wheat steam cake is a special breakfast in Kerala, popularly known as Gothambu puttu or Wheat puttu. Due to health reasons people are avoiding rice flour breakfast and switching over to wheat flour recipes, oats recipes as this is healthy and filling too. People with diabetes will not feel hungry till noon. Wheat steam cake is a healthy breakfast which can be made easily at home.
I learnt this recipe as my in-laws were diabetic and I wanted to avoid rice flour in the breakfast menu. The preparation is easy, you require a puttu maker or a steel sieve like utensil with large holes. This can be placed over a wide bowl such that all steam passes thru’ the sieve and the puttu is steam cooked.
We have a puttu maker so that we get a long cylindrical steam cake in our plates. When served hot they enjoy it. You can certainly give a try.
Ingredients :
Wheat flour: 1 cup
Grated coconut: ¼ cup
Salt: 2 pinches ( to taste)
Water: 1/3 cup or sufficient to wet the powder.
Accessory required: Puttu maker
Procedure for preparing Wheat Steam cake – Gothambu puttu:
Method:
- Dispense wheat flour in a wide kadai. Dry roast wheat flour over medium flame stirring continuously until the powder feels warm when touched with your palm.
- Watch out for the powder not to catch the base.
- Remove from flame and allow wheat flour to cool.
- Sprinkle lukewarm water on the powder and stir the powder thoroughly. You will observe small lumps. Continue sprinkling little water till all the dry powder has formed small fine lumps.
- Ensure the powder has not become sticky. The right check for consistency is when you hold a fistful of powder it forms a shape and stays together, when you press the ball it falls apart.
- Transfer this wet powdery lumps into a mixer and inch it 2-3 times. This will remove all lumps and give a uniform puttu base.
- Place the puttu maker on the flame and when steam starts releasing from the vent holes, remove the puttu holder from the pot.
- Fill the ingredients layer wise. Fill grated coconut, prepared wheat flour, and repeat this filling once more. The last layer should be grated coconut.
- Fill contents loosely .Do not compress the wheat flour into puttu maker.
- After 6-8 mins of continuous steam releasing thru the vent the wheat steam cake is ready to serve.
- Gently push the steamed wheat puttu onto a plate. Ideal combination is with small banana (pazham) and sugar.
Diabetic patients can enjoy gothambu puttu with pappadam, cooked moong gram, Kadala curry. Few enjoy wheat puttu without any additions. They prefer it hot. The fresh coconut which blends with the gothambu puttu gives that extra taste factor.
A suitable alternative if you do not have a puttu maker is a kadai in the bottom with a wide sieve placed on top to grab all the steam. Spread coconut at the base then prepared wheat flour and again repeat this layer 1 time. Ensure the spread is loose and not compressed. Close the sieve with a large plate to avoid steam loss.
 Wheat puttu is a healthy breakfast and can be made easily at home. Have a healthy start. There are other variations like rice puttu, ragi puttu, oats puttu,rava puttu.
If you like this recipe or know of any variations do let us know in the comments.
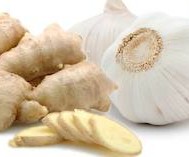
How to make Ginger- Garlic paste at home
March 4, 2014 by admin
Filed under How to make...for beginners
 Ginger garlic paste is an indispensable ingredient in every Indian Kitchen. Most of the curries call for ginger garlic paste. All the more for the non vegetarians. You can make fresh ginger garlic paste at home. Homemade ginger garlic paste is the best as it is fresh and you are sure there are no artificial flavors and hygiene factors are maintained too.
I make the paste during weekends and therefore I’ have stock for 2 weeks at east. The procedure is very simple requiring some pre-work. The pre-work is time consuming , the results are great. The purchased ginger garlic smells different with a color tinge too. Therefore replicate the process of preparing ginger garlic paste at home.
The basic ingredients are Ginger and garlic. Add salt while grinding. Salt will act as a preservative during storage and will help retain freshness. Soak ginger in water for 10 mins to remove soil and color. Peel ginger skin after draining water. Recycle the muddy water in the potted plants. Peel garlic to avoid strands in the paste.
Tips to peel garlic:
Separate garlic pods and then apply a little vegetable oil and place it in the sun for an hour. The garlic needs to be pushed at the top side and the peel can be separated. I usually do garlic peeling while watching television. You will not realize the effort as you will be engrossed watching the show. Included humor…..
Watch out for the kids not switching ‘ON’ on the ceiling fan without informing you. The entire room will be spread with garlic peel. The other source can be the wind blowing from the window. Ingredients :
Ginger: 100 gms
Garlic :100 gms
Salt: ½ tsp
Procedure for preparing Ginger garlic paste at home:
Method:
- Wash, rinse and peel ginger. Drain water and chop into pieces.
- Peel garlic. Chop the garlic pods if large.
- In a mixer add chopped ginger and garlic pods. Add salt and grind to a fine paste.
- You can add 2 to 3 tspns of water if the contents are not freely moving in the mixer.
- Transfer contents to a clean dry bottle or box.
- Dispense with a clean dry spoon. Place the bottle in the refrigerator always.
- Shelf life is 3 to 4 weeks if placed in the refrigerator.
- If placed out for more than an hour the color changes also giving an aged smell.
 Salt addition while grinding ginger garlic is a tested and sure way for long storage. People do add oil, turmeric powder to keep ginger garlic paste fresh
  At times I prefer to add freshly minced ginger garlic especially for non vegetarian dishes. I have a grinding stone to crush ginger and garlic as per requirement.
VEGETABLE CARVING
 Vegetable carving is an artistic display of techniques that involves sculpting vegetables to form pretty centerpieces for table settings and other uses. Your dinner arrangements are complete when you have laid down the entire menu including salads. Now you can bring a twist in the arrangements by placing cute shapes of vegetables along with the chopped cucumber, carrot, tomato and other salads.
No matter how good food you prepare but if you do not present it in an effective manner all your effort is gone in vain. Let’s make a start in understanding simple techniques to improve the art.
The beginnings:
Japan has also been referred to as the root of the art of fruit and vegetable carving, called Mukimono in Japanese. Now this has developed into a major and critical part of chefs training. Vegetable carving and designing has become a career in many countries. Exhibitions and photo galleries have been initiated based on the subject of carving on vegetables and fruits.
Display of vegetable carving:
The products of vegetable carving are generally flowers or birds, but there is no limit to human imagination and therefore they have made sculpting of famous personalities. Design beautiful images and colorful combination to create shapes. Usually vegetable carving is used for garnish, you can also have a flower arrangement to beautify your table .
Go ahead , spare some time and learn the basic skills of vegetable carving. You can make your family proud with no extra costs. Your guests too will be amazed at your presentation skills in addition to the expert culinary skills.
This is a series in vegetable carving skills which involve simple tools and techniques. Therefore go thru’ these video clips to understand.
Learn to make Tomato rose:
Watch this video for simple understanding:
Learn to make Carrot rose.
Watch this video for simple understanding:
Learn to make Cucumber rose:
Watch this video for simple understanding:
Learn to make Carrot butterfly.
Watch this video for simple understanding:
Various books and instructional videos teach the art of fruit and vegetable carving. Additionally, tool sets are sold for those who participate, either professionally or as a hobby. Such tools include knife and garnishing sets. Cutters come in various sizes for sculpting different fruits and vegetables. These tools are typically constructed of stainless steel.
Hope you have enjoyed this article. Learn to beautify your dining table with the creative designs mentioned in this article.
Leave in your comments or ideas for making salads with simple vegetable or fruit carving.
Read: Simple way Prepare Fresh Moong gram sprouts at Home
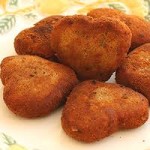
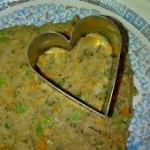
HEART SHAPED – VEGETABLE CUTLET
February 14, 2014 by admin
Filed under Snacks & Salads
 Vegetable cutlet is a mouth watering delicacy. Vegetable cutlet is popular as a snack or starter too. This article is being posted on Valentine’s day as a gift of love. There is a popular saying that, “you can make a man happy thru’ his tummy only”. In India the situation is no different. No matter how modern or career oriented you may be a cup of tea or a small snack will make your man happy and cheer his mood.
Go ahead and surprise your soul mate…loved ones on Valentine’s day with these heart shaped cutlets. Serve them hot with chutney or sauce. These are homemade snacks that can be eaten without any worry of the quality. You can design the cutlets in various shapes: circle, oval, square, star, flower, heart shaped as per the mold you have and the occasion. For kids you can cut into mickey outline. You can make use of the empty snack boxes in various cartoon characters available in the market.
Ingredients :
Potato: 1 large
Carrot: 1 large
Onion: 1 small ( optional -finely chopped)
Beans: ½ cup chopped
fresh corn: ¼ cup
Green peas: ¼ cup
Green chilly: 2 tbsn (finely chopped)
Ginger-garlic paste : ½ tspn
Garam masala: ¼ tspn
Coriander leaves: 3 tbsns (finely chopped)
Cumin powder: ¼ tspn
Salt: as per taste
Lime juice: 1 tbsn
Corn flour: 3 tspn
Bread crumbs: 1.5 cup
Oil: for frying
.
Procedure for preparing Heart shaped –Vegetable Cutlet:
Method:
- Peel potato and carrot and pressure cook for 2 whistles. When cool mash it without any lumps.
- Potato is the basic ingredient that binds the cutlet and ensure good shape formation.
- Steam fresh corn and green peas. Add a little salt to avoid band taste when it becomes tender.
- Mix corn flour with 5 to 6 tbsn of water such that the liquid is thick and can be used as a coating for the cutlet.
- Mix all the ingredients together. Apply oil on the palms and then divide the mixture into equal sizes.
- If you are cutting shapes then spread the mixture on a flat plate. Press the mold and cut into desired shapes.
- Immerse the shapes into the corn starch batter and then into the flat plate containing bread crumbs.
- Ensure a the sides of the cutlet is covered with bread crumbs.
- Heat oil in a pan and when hot add the cutlets one by one. Fry them golden brown on both sides. The vegetable cutlet should be half immersed in the oil to fry sufficiently.
- You can bake the vegetable cutlet to avoid oil consumption.
- Fry the complete batch in oil. Serve hot with sauce or chutney.
Delight your family with these hot delicious Heart shaped Vegetable cutlet.
Happy Valentine Day!!
There are various options to the cutlet i.e addition of other vegetables and you can opt for rava / Sooji in place of bread crumbs. You will have to do shallow frying to avoid rava getting separated.
Note: Non – vegetarians can opt for egg white as a coating to immerse cutlet prior to application of bread crumbs.
If you like this recipe or know of any variations do let us know in the comments.
SOFT RAVA LADDOO WITH COCONUT
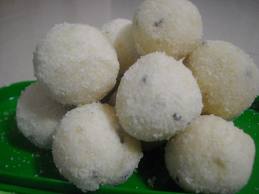 Rava Laddoo is a popular sweet during Diwali and other festive occasions . Due to the texture being soft this is made for elders and kids in the family .Today I’m sharing a soft rava laddoo recipe that includes desiccated coconut. This rava laddoo preparation is very easy and can be made within 15 to 20 minutes. Rava laddoo is also called Suji Ka laddoo.
In some parts of South India , the rava laddoo is made hard such that it remains for a fortnight. This recipe is an instant variety and can be retained for maximum 3 days. Preferably consume them fresh. For convenience, the base can be prepared and stored in an airtight container, you can roll the laddoos on need basis.
The rava laddoos are very soft and has to be handled with care. I have received positive feedback on many occasions. Thanks to my friend Mariam from whom I learnt this recipe. She was unmarried then but was good at cooking and was keen on experimenting new recipes. This recipe is dedicated to my friend who is abroad now.
Try this recipe and you are sure to repeat this process again.
Ingredients :
Bombay rava / Suji:1 cup
Desiccated coconut: ¾ cup+ ¼ cup
Sugar: ½ cup
Raisins: 5 nos ( cut into fine like pieces)
Cashew nut: 5 nos ( chop into fine pieces)
Cardamom / Elaichi: 4 nos ( remove pod and powder)
Ghee: 2 tbsn
Milk: ½ cup ( room temp)
Procedure for preparing Soft Rava laddoo with Coconut:
Method:
- In a kadai add ghee , when it becomes hot add Raisins and Cashew nut. Reduce flame and fry them. Drain and transfer onto a plate.
- Next fry Bombay rava / Suji in the same kadai. Mix it continuously to avoid burn or catching at the base of the kadai.
- Fry the rava until it turns white and smell of roasted rava is felt strongly. Add ¾ cup of desiccated coconut and stir continuously. When it becomes warm, put off the flame.
- Then add sugar, powdered cardamom and fried raising and cashewnut. Mix well.This base can be retained for at least 10 days in an air tight container. Sugar should be added coarse. Do not powder sugar for the instant soft laddoo variety.
- To make soft rava laddoo with coconut sprinkle milk over the base mixture of rava laddoo. Now mix the base thoroughly and roll the mix into small balls with your hand.
- Spread ¼ cup of desiccated coconut on a flat plate. Roll the laddoo on the desiccated coconut. The laddoo is covered with a coating of the coconut and it gives a royal look.
You will get approximately 12 laddoos. Looking yummy and pearly white. You can opt for sugar free variety to prepare soft rava laddoos if there are diabetic persons.
Other popular recipes with rava are Rava kesri, Rava upma, Rava dosa and the base for making puri in Pani puri. Drop in your comment after you try this instant rava laddoo variety.
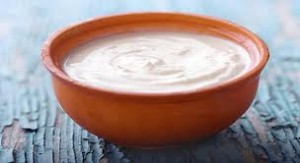
HOW TO MAKE THICK CURD
January 29, 2014 by admin
Filed under How to make...for beginners
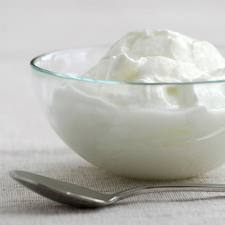 Preparing curd is an art by itself. Indian homes are very used to having curd/ yoghurt also called dahi along with meals. In South India curd is consumed at the end of the meal be it lunch or dinner. Fresh curd is in great demand.
Yogurt is a fermented milk product produced by bacterial fermentation of milk. The bacteria used to make yogurt are known as “yogurt cultures“. Fermentation of lactose by these bacteria produces lactic acid, which acts on milk protein to give yogurt its texture and its characteristic taste.
An old myth regarding curd
Curd is tasty when fresh and it is not sour (pulla / pulippa) . Starter yoghurt is called Ora /thodu. There is a myth that starter curd/ ora/ thodu should not be borrowed from another home at night. When there was a need for going to neighbors house for starter curd, my granny used to remind that it was not the right time to borrow. Grandma would continue saying that you should not borrow salt and sarso i.e mustard seeds from anyone. It will convey poverty or daaridram i.e financially poor status. This tradition of borrowing starter curd continues in modern times because it is natural and not induced.
These were few old memories. Now that we have groceries and super markets at every lane in the localities be it urban or rural, buying commodities can be planned any time of the day.
Tips for preparing curd :
Do not add starter curd to hot milk. The bacteria will die and the milk will get curdled…appearance of split milk. Ensure the milk is lukewarm temp app. 45 deg C. Check point is when you dip your finger into the milk (ready for preparing curd) it should be feel warm. The curd will set in the shape of the container you dispense into. You can cut thru’ the curd while serving.
I’ll share the benefits of curd after I share the easy recipe of making thick curd at home.
Ingredients :
Starter curd / Thodu: 1 tbsn heaped
Milk: 2 cups
Procedure for making thick curd:
- Boil milk .Lower the flame and let it continue boiling for 3 to 4 mins.
- Allow the milk to cool down to lukewarm temp. Higher temperatures will split the milk and it will have a curdled appearance with an odd taste.
- Dispense the starter curd into a glass and add ½ cup of milk and mix thoroughly with the spoon.
- Now transfer the quantity from one glass to the 2nd glass, back to back 4 to 5 times. The process is similar to cooling tea which is seen in tea shops. The vendor transfers the tea from one jug to another jug and repeat this 3 to 4 times, the tea will be of right temp to drink also giving a foamy appearance on top of the glass.
- The starter curd gets thoroughly mixed with milk. Keep the utensil closed and undisturbed for 4 hours. Setting is quick in summer due to external temp and heat. In winters you need to provide at least 6 hrs setting time.
- You can leave a red dry chilly along with stem over the curd. This will also help curd set faster.
You can make several recipes with curd. Common recipes are: Butter milk, Lassi, Raitha, Curd rice, Kadi etc. Curd is added in chicken preparations eg: chicken curry, manchuria, used for making cake.
 Benefits of curd:
Curd improves appetite when taken along with sugar and salt, actually stimulates the taste buds. Curd quenches thirst too. By-products like lassi and buttermilk are popular drinks at summer.
Curd is good for digestive system, immune system, osteoporosis, stomach problems and cures vaginal infection.
Curd is enjoyed by people of all ages. Do you know preparing curd without starter curd i.e thodu. Give your inputs on this query, article in the comments.
How to Prepare Basic Garam Masala at Home
January 21, 2014 by admin
Filed under How to make...for beginners
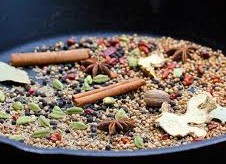 Garam masala is one of the most essential item in an Indian kitchen .The dishes which demand garam masala are aplenty and the freshly powdered garam masala is the secret to the success of many recipes. The aroma of fresh cardamom, cloves and cinnamom is distinct.
When I started cooking I used to purchase the packs from the market. I looked for ISI brand. Each brand taste different basically due to the addition of the base ingredients. Different parts in India prepare garam masala with various base ingredients and quantities. Preferences of ingredients include Coriander seeds, Black whole Pepper, Dry red chilly, bay leaf, etc.
Today I’m sharing the basic recipe of garam masala which lends great aroma and has received lots of appreciation from family and friends. The idea for this posts triggered when I went shopping for groceries with my new neighbor who is recently married . She was purchasing Garam masala powder.
When I enquired with her she mentioned that she did not know how to prepare garam masala powder at home. I suggested that if she had 15 minutes to spare in a month she can prepare fresh garam masala at home. She was inclined to learn the procedure. We purchased all the base ingredients .
After a cup of hot tea and snacks she prepared we began to make basic garam masala powder. I appreciated the enthusiasm she showed towards cooking even though she is a starter.
Basically it is a matter of convenience. For bachelors and busy working people they opt for ready made packets. Making basic garam masala at home is easy and can be followed by bachelors too.
I preferably buy 10 gm packs as it will be easy. Measuring will not be required.
Ingredients :
Cardamom / Elaichi: 10 gm or 2 tbsn
Cloves / Grambu : 10 gm or 2 tbsn
Cinnamom / Patta: 10 gm or 4 sticks of 1 inch size
Fennel seeds / Soamp : 10 gm or 2 tbspn
Caraway seeds / Shahjeera: 5 gm or 1 tbsn
Star anise: 3 or 4 nos
Accessories: Dry Grinder(small jar), Fine mesh filter ,air tight container
Procedure for preparing Basic Garam masala at home:
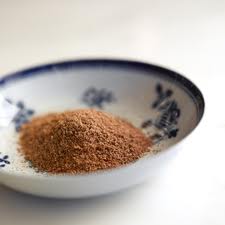 To make homemade garam masala dispense all the ingredients into a heavy bottomed pan. Break the cinnamom sticks into finer pieces. Keep the flame in medium. Keep stirring to avoid burnt smell. When sufficiently hot put off the flame.You will get a roasted smell of the ingredients. Let it cool. Powder all the ingredients in a dry grinder. The small jar is sufficient for powdering.
I like the home made garam masala powder to be slightly coarse. Therefore I do not remove the cardamom pods. If you want fine garam masala powder you can filter thru’ a wire mesh. Powder the coarse stuff once again. Transfer to an airtight container. Do not close the lid immediately. Keep a small gap .When the garam masala powder has reached normal temperature close the lid tightly.
This garam masala will last upto 3 months. You can powder homemade garam masala as per your usage at home. Powdering quantity for a month is ideal as the freshness of garam masala powder is retained.
Another option for using the left over cardamom pods are : you can add the cardamom pods in the tea leaf box or directly add 2-3 elaichi pod covers in the boiling tea. Great method for preparing elaichi tea.
You can prepare pickles, wine, various chutneys and sharpen your culinary skills.
Do you prepare garam masala powder differently. Include your comment to let all readers know.
Read the simple way to extract fresh coconut milk at home. and the simple way to prepare fresh moong gram sprouts at home.


