

TIL KA LADDOO
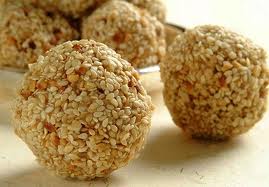 Til ka ladoo is a favorite delicacy for Makara Sankranthi. Til laddoo is a simple recipe made with til/ sesame and jaggery. Til is sesame seed and jaggery is unrefined cane sugar. You can also enjoy them as sesame candy. Til ka ladoos are also made on various festivals especially for Makar Sankranti. Makara Sankaranthi is the harvest festival celebrated in many states of South India – Maharashtra, Andhra Pradesh, Karnataka and Punjab in North India.
Dishes made of til are consumed more in winter days as sesame provides heat and energy which is essential in cold climate.Til ka laddoo is a mandatory item for this festival. It is a soft sweet therefore elders too can relish til ka laddoo.
There is a famous saying Til-gul ghya, gode gode bola’ – a catchy phrase to sweeten one’s mouth and one’s speech, with these sesame and jaggery laddoo at Makar Sankranti, the harvest festival in Maharashtra.
Til laddoos are ideal for iron content. Recommended for girls and women suffering with low hemoglobin.
Recipe will make 30 to 35 ladoos
Ingredients :
Til / Sesame: 1.5 glass
Jaggery or gur : 1.5 glass
Ghee : 6 table spoons
Cardamom / Elaichi: 1 table spoon (powdered)
¾ cup water
Procedure for Til ka Laddoo:
Method:
- In a frying pan or kadai roast til seeds on medium heat stirring continuously. After 5 minutes sesame seeds will turn light brown in color and start splitting. Transfer the til seeds on a plate.
- In the same pan add water and crushed jaggery. When all jaggery is melted filter to remove all impurities. Boil the jaggery solution again till it starts thickening.
- While the jaggery is boiling apply ghee on a flat plate. Check point for addition of other ingredients : Add 1 drop of the thick jaggery solution in a cup of water. If the drops remains as a ball it is the correct mixing point. Lower the flame.
- At this stage add crushed elaichi, ghee and roasted til seeds. Mix all ingredients well and transfer onto a greased plate.
- When the mixture is cold enough to touch apply ghee on your palms take a small ball of the mixture and roll in between your palms. You can make approximately 30 to 35 balls.
- Store it in air tight containers. Will remain for 2 to 3 months.
You can try preparing til laddoos using roasted groundnut and til in a 1:1 ratio.You can add a handful of roasted desiccated coconut too to bring variations.
You can make puran poli or pineapple parippu payasam as a new variety in your sweet list.
Go ahead and try this sweet delicacy for your family. You can mention your observations in the comments and improve the recipe.
HAPPY SANKRANTHI !!
Have a great time with family , friends. SAFE kite flying too…….
SIMPLE WAY TO EXTRACT FRESH COCONUT MILK AT HOME
January 7, 2014 by admin
Filed under How to make...for beginners
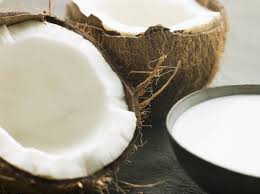 Coconut milk is required for many South Indian dishes. Coconut milk is used for making sweet delicacies like achappam, payasams,ada pradhaman. Coconut milk is lavishly added in appams, stew curry made of egg, chicken, fish or meat. Coconut milk enriches the dish and brings the rich texture to the curry. The gravy thickness is balanced by adding coconut milk to the dish.
In Kerala due to the abundant availability of coconut women prefer to extract fresh coconut milk at home. In the earlier days women used the grinding stone to grind the coconut and extract milk. Thanks to technology we now add coconut to the grinder and with the press of the button we can grind the coconut and extract milk. You can follow this simple way to extract fresh coconut milk at home and enjoy the taste.
Bachelors have one step ahead , they have now shifted to purchase coconut milk powder and add in curries as per the consistency required for the recipe thin / thick.
Whatever the situation may be I enjoy the taste of fresh coconut milk in the dishes and sweets. To avoid surprises like power cut etc…I first extract coconut milk and then start the preparation.
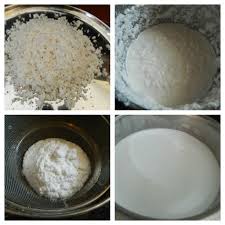 Coconut milk is extracted in 3 stages. The coconut milk is classifies as 1st milk- Onnam paal, 2nd milk- Randam paal, 3rd milk – Munnam paal. The difference basically is that the 1st milk is the thickest of all. It is the cream of the entire coconut you have extracted. The 2nd milk is a little thinner. It is added in curries and dishes as a replacement of water. The basic ingredients i.e vegetables / meat are basically cooked in this milk. The third milk will have a pale color. It is the final rinse of coconut milk. Do not waste this milk, can be extracted in little amount. 3rd milk is used to rinse the grinder in which masalas have been grinded, jaggery is boiled for sweet dishes.
You can chop the coconut pieces and shred in the grinder prior to grinding for coconut milk extraction. Recommended to use warm water in winter for grinding the coconut. I prefer using lukewarm water all round the year.
Let us understand the simple way to extract fresh Coconut milk at home:
Ingredients :
Fresh coconut: 2 cups (grated)
Water: 3 cups (lukewarm temp.)
Accessories: Grinder, Fine mesh filter or muslin cloth for filtering, 3 utensils for storage of milk extracted.
Procedure for extracting fresh Coconut milk at home:
Method:
- Add grated coconut and 1 cup of lukewarm water in the grinder. Grind to a fine paste. Empty into a filter and extract milk. Keep this aside carefully.
- For 2nd milk add 1.5 cup of lukewarm water to the coconut shreds. Grind it for 2 minutes. Filter the coconut milk. Keep the second milk aside.
- The final rinse is with ½ glass water. Grind for a minute and filter the shreds. You will get a pale colored water. This is useful to simmer vegetables or meat.
This was not a complicated task. Keep all the accessories close by and start the grinding. Enjoy the freshness of coconut milk and your family will appreciate the effort for natural and homemade coconut milk. The sweet dishes and stew curry will taste different. Go ahead and definitely give a try. There are no preservatives.The dishes look royal and totally different.
You can store this in the refrigerator for 3 days .It will till stay fresh.
 Most recipes mention thick or thin coconut milk. Thick coconut milk is the 1st milk that is added always at the end of the cooking prior to putting off the flame. The precaution taken is because if the 1st coconut milk boils in the curry, the gravy has a split appearance similar to split milk.
Just to update, in the preparation of rose cookies / achappam, the coconut milk is added in reverse order. 1st milk is added first, then second milk and last 3rd milk. This is because the base is mixed first and fried later. The water addition for coconut milk extraction will be in lesser quantities as base consistency has to be adjusted to get crispy and shaped achappams.
I’ve shared my experiences. If you have any further tips for improving the procedure do let us know.
Learn How to Prepare Basic Garam Masala at Home
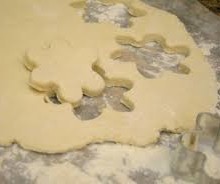
HOMEMADE BISCUITS
December 30, 2013 by admin
Filed under Snacks & Salads
 Biscuits are loved by kids and elders too,if you give them home made ones there is no turning back. This is an easy snack and very soft therefore edible by little ones who have developed tooth.
I usually prepare homemade biscuits when we are expecting guests and there is no stock of any snack to be served. You can use various molds to shape out the biscuit. At times I invert cups ,bottle cap of various sizes is also a good alternative.
The ingredients are always available at home. In the initial days when baking oven was not available I used the same ingredients to fry a tin of biscuits. These can be stored for a week’s time. Idea snack during Christmas too.
When you fry the biscuits at home, the aroma will spread across and your neighbors will also be curious to know from which kitchen this smell is coming.
Ingredients:
Maida (All Purpose four): 250 gms
Sugar: 125 gms
Egg: 2 nos
Butter or ghee: 100 gms
Cardamom (Elaichi) : 5 to 6 nos
Baking powder: ½ tspn
Milk : ½ cup
Cooking oil: 2 cups
Procedure for making Homemade Biscuits:
Method:
- To make homemade biscuits there is some prework involved.
- Sieve maida and baking powder together and keep aside. The next step is to powder sugar in a grinder , transfer the sugar powder to a mixing bowl.
- Keep aside ¼ cup of maida, this will be required for rolling the dough and cutting shapes at a later stage.
- Beat eggs to a fluffy texture in the same grinder
- I prefer to use butter in this snack as the final output is very soft. Ensure butter is at room temperature.
- Powder cardamom. Take away the peels. You can add this into boiling tea and enjoy cardamom tea.
- Add butter to the mixing bowl containing sugar powder. Mix well. Add beaten eggs to the base and continue mixing. When there are no lumps, add the maida powder sieved along with baking powder. Add cardamom powder. Knead the dough thoroughly to make a ball.
- If the dough is very hard, add milk little by little such that it forms a smooth ball. Let the dough remain for 15 to 20 minutes.
- Make small balls of the dough and spread on the stone similar to a chapathi. Use maida for patting the dough such that it does not stick and roll out to 1/2 inch thickness.
- Now cut into shapes you desire. Place the shapes on a flat plate.
- Heat oil in a flat based kadai / pan. When hot add the cut shapes in it.
- Maintain flame at medium flame such that the biscuits does not get a deep color. Once light brown turn the side with a spatula.
- When done drain the biscuits onto a napkin to remove any oil that is present. Your homemade biscuits are ready to serve.
- When cool you can store it into air tight containers . This will lasts for a week’s time.
Note: You can make salted biscuits for a change with the same ingredient by excluding sugar and adding ½ tspn salt to the recipe.
You can bake the homemade biscuits in an oven similar to baking a cake. Set the time as per your experience. Share the timings and temperature for the benefit of other readers too.
Read and enjoy making these popular recipes:
RED CHILLI CHUTNEY FOR MASALA DOSA
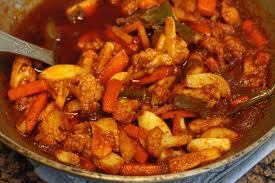
MIXED VEGETABLE CURRY
December 13, 2013 by admin
Filed under Curries, Curries, Rice & Chutney Varieties
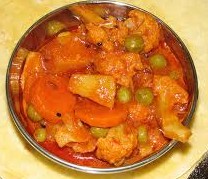 Mixed Vegetable curry is an ideal choice for vegetarians and for people following lent . I usually prepare this mixed veg curry on the days the vegetables are few at home i.e the day prior to market .
We have vegetable markets near our homes called Rythu bazaar . These vegetable markets are basically promoted such that the farmers can bring their products and sell at their price without mediators. They will get correct pricing and the customer is not levied high too. The vegetables are fresh and sold in bulk quantities . You need to purchase 250 gms at a minimum. Rythu bazaars have become a common place to meet all colony people and share news.
Coming back to the preparation of mixed vegetable curry. This is a simple dish with regular ingredients. The uniqueness of this dish is the taste of each vegetable that gets combined as a whole. I cook this in the AMC dish which retains each vegetables taste and aroma too while cooking. Water is not required for cooking.
Ingredients :
Capsicum : 1 no (diced into 1 inch cubes)
Beans: 4 nos (cut into 1 inch length)
Potato:1 no. ( diced into 1 inch cubes)
Carrot: 1 no (cut into 1 inch length)
Tomato:1 no.(cut into small pieces)
Cauli flower:2 to 3 small florets
Green peas:1/2 cup
Onion: 1 medium size(cut into small pieces)
Green chilly:1 no.(slit length wise)
Vegetable oil: 4 tspn
Chilli powder: 1 tspn
Coriander powder: 1 tspn
Turmeric powder: ¼ tspn
Salt: ¾ tspn
Ginger-garlic paste: ½ tspn
Garam masala powder: ¼ tspn
Coriander leaves: few sprigs(for garnishing)
Ingredients for Seasoning:
Mustard – 1/2 tsp
Curry leaves : 1 stem
Procedure for Mixed Vegetable Curry:
Method:
- Wash all vegetables. Cut them into small pieces after water is drained.
- Heat oil in a kadai and add mustard. When it splutters add curry leaves.
- Add green chilly and onions. When onions have become tender add potato, carrot, cauli flower, beans. Sauté it for a minute and close the lid of the kadai. Reduce the flame.
- After 3 to 4 minutes add capsicum and green peas, turmeric powder and salt. Mix well and close the lid.
Closing the lid and cooking the vegetables at low fame will enable cooking with steam. The water in the vegetables with the help of steam will make the vegetables tender and soft.
- Add ginger garlic paste and tomato to it. Mix all the contents thoroughly.
- After around 3 mins you will notice the sizzling of vegetables in the hot kadai. Now add the chilli powder, coriander powder and garam masala to the base. Sauté and close the lid.
- After 5 mins of low heat cooking the curry is ready to serve. Garnish with coriander leaves in the serving container.
- If you require the curry to be wet with a little gravy, add ½ glass of boiled water and allow the curry to boil for 2 minutes prior to serving.
Mixed Vegetable curry is a popular side dish at our home. The curry can be can be prepared with the available vegetables. Brinjal, cucumber, bottle gourd can be included as per your choice. You can include or exclude vegetables as per availability. Mixed Vegetable curry is ideal with phulka, chapathi and puris too. My son loves to take it in his lunch box and his friends have appreciated the taste.
You need to give a try at this side dish and let us know if you enjoyed the taste. Best of luck!!
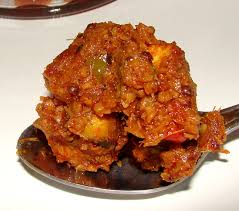
FISH PICKLE/ MEEN ACHAR
Winter is getting stronger and during this time we yearn to have hot and spicy food. Pickles is an evergreen item on the table that cannot be missed at our home. Our family enjoy pickle and papad, fryums, vadiyalu etc.
In my previous posts I mentioned about the preparation of Mixed Vegetable pickle, also mentioning the various types of pickles we indulge in.
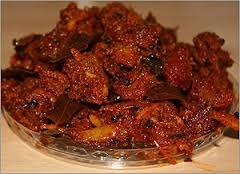 Fish pickle brings up several memories…my mama’s passion in cooking, how we used to empty the bottles within a few days. The kitchen used to be filled with the aroma of frying fish and the seasoning. I didn’t want my children to miss out on these special delicacies and have made it a point to master the recipe.
The first 2 to 3 times the pickle did not match the standard taste, but it has improved in the next few attempts. You can include Fish pickle in your special treat for Christmas.
Fish selection is utmost important . Fish pickle can be made with tuna(choora), sardine(mathi-chaala), butter fish(modha), seer fish(ney meen), prawns (chemeen),Anchovy (Netholi) and Pomphret(Avoli). Do not attempt fish pickle with mackerel (aiyla). Butter fish, Prawns, Tuna and Seer fish are the best options for making Fish pickle at our home.
I used lime juice in the last rinse while washing the fish to remove the strong smell and will help cook better. I prefer using Kashmiri Chilli powder for pickles-kadumanga as the pickle is not spicy, yet the appearance will be hot and spicy.
Ingredients:
Fish: ½ kg (cut into small pieces)
Lime: ½ piece(squeeze in the final rinse of fish wash)
Vegetable oil: 1 cup to fry the fish pieces
Ingredients for Marinating fish:
Red chilli powder- 1.5 tsp ( I use Kashmiri Chilli powder –Eastern Brand)
Turmeric / Haldi powder: ¼ tsp
Pepper powder: ½ tsp
Salt: ¾ tsp or as per taste
Time required for marination: 30 mins
Ingredients for fish pickle gravy:
Green chilly : 3 small( slit into halves)
Red chilli powder- 3.5 tsp ( Kashmiri Chilli powder –Eastern Brand)
Turmeric / Haldi powder: ¼ tsp
Pepper powder: ½ tsp
Ginger: 2 tsp (sliced into thin pieces)
Garlic pods: 4 tsp (sliced into thin pieces)
Salt: ¾ tsp
White Vinegar: ½ cup(boil and cool to room temp)
Vegetable oil: ¼ cup
Curry leaves: 2 stems( cut into small pieces)
Mustard : ½ tsp
Fenugreek / Methi seeds: ½ tsp
Ingredients for powdering:
Mustard : ½ tsp
Cumin seeds / Jeera: ½ tsp
Fenugreek / Methi seeds: ½ tsp
Roast on low flame and powder coarsely.
Procedure for Fish pickle / Meen Achar:
Method:
- Cut fish into small pieces and wash the pieces. Drain water completely.
- In a separate vessel add chilli powder, pepper powder, haldi powder and salt. Mix well and then toss the fish pieces in the vessel, mix all the fish pieces . Let it remain for 30 minutes.
- Heat oil in a kadai, fry fish pieces till they are crisp. Maintain medium flame while frying the fish pieces. This will ensure moisture in the fish is taken off and the pickle can be retained for longer time.
- In another kadai heat oil and add mustard seeds. When it crackle add methi seeds and curry leaves.
- Immediately add chopped ginger and garlic. Keep stirring until they turn brown in color. Lower the flame.
- Add chilli powder, pepper powder, haldi powder and salt. Stir this till the raw smell goes away. Mix the powders to avoid getting burnt at the base.
- Add white vinegar to the powders and mix thoroughly. Add the fried fish pieces and mix the entire masala.
- Add the roasted powders-mustard, jeera and methi seeds. Mix the fish pickle and transfer contents into a clean bottle.
- If handled with care and refrigerated between servings you can retain fish pickle / meen achar upto 9 months.
 Great combination with hot rice, chutney and curd curry too. My children do enjoy with rotis, breads too.
Give a try to your culinary skills and make this Christmas feast an enjoyable one with your favorite wine, fried rice ,chicken dishes and cutlet. Share with family and friends…
HOME MADE GINGER WINE
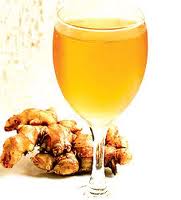 Ginger wine is popular and is served to all the family members and friends who visit our homes during Christmas time. A very simple and healthy recipe and can be done a fortnight prior to Christmas time.
Christmas reminds us of the Christmas tree, shining colorful stars, carols, nativity scenes, twinkling lights, decorations, foodies and of course the special home made wine.
A clear indication that the mass is gearing up for Christmas. Women folk start planning for soaking dry fruits in rum or brandy in the last week of November. I wanted to share this ginger recipe to make sure you can have a surprise menu for your family.
Ginger wine has a smooth and moist taste and therefore a popular choice by all. Ginger wine has some wonderful health benefits. Ginger is not only a spice that adds flavor, it is also used as a remedy for many sicknesses and disorders since ages.
Ginger has long been known to increase sexual desire. It also increases blood circulation and therefore during winter days it can be served as a health tonic in small measures.
Drinking a glass of ginger wine when you are stricken with cold, will get you back on your feet in good health quickly. Ginger is an ideal home remedy. Ginger relaxes the body so that the white blood cells can do their job in repairing the damaged cells; it also blocks the hormone that induces fever, headaches and body cramps.
Ingredients:
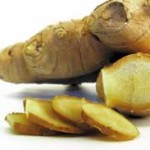 Ginger – 125 gms (finely chopped)
Sugar: 750 gms
Water : 1 litre ( boiled and brought to room temperature)
Yeast : ¼ tspn
Dry red chillies: 2 nos
Citric Acid: 10 gms
Caramelized sugar(optional)
Procedure for Ginger Wine:
Method:
- Clean the ginger. Chop ginger into fine pieces.
- Boil the chopped ginger along with sugar, broken red chillies and water for 5 to 8 minutes. Let it cool.
- Strain the contents .Add yeast and citric acid to the mixture. Stir well till all the crystals are dissolved.
- Transfer to air tight containers or you can use the ceramic jar popularly known as barani.
- The wine is ready for use after 3 days of storage. Hey! you will agree that this was a simple home made ginger wine recipe.
Note: All the storage bottles should be clean and dry prior to transferring the wine for bottling. Fill upto 2/3 of bottle quantity. Leave gap on the top side of the bottle. A safety measure for long term storage.
You can use caramelized sugar to enhance the color of the wine. We like it plain at our home. In case you plan to add caramelized sugar follow this procedure.
For caramelizing heat 3 tspns of sugar in a flat kadai. When it melts on a low flame and start burning add ½ glass of water and mix all the blackened sugar. Filter and add this into the mixture prior to bottling.
Label the bottle with the details of content, date of preparation and best before date. Keep the bottles in a dark and cool place. Best use within 12 months of preparation.
A very simple recipe, yet your timeliness will be appreciated by all who taste the ginger wine. Let this ginger wine be a surprise to all family members too.
This can be made into Christmas gifts to your dear ones. This wine is made at home and is a healthy drink. There are no side effects.
Go ahead and surprise your family with this special drink.
Must read for festive season: Hyderabad Mutton Biryani or you prefer Vegetable Biryani
CRUNCHY MIXED VEGETABLE PICKLE
November 21, 2013 by admin
Filed under Curries, Rice & Chutney Varieties, Pickles
Pickles are a favorite combination with meals. Our family enjoys pickle and therefore we make pickle seasonal wise all round the year. Fresh pickles are in great demand. The oily, hot reddish color and the unique flavors of masala and spices makes it a favorite one.
In winters the urge to eat pickles and spicy stuff is high. The taste buds signals for hot, spicy, at times sweet items too. To fulfill needs of all family members I decided to make mixed vegetable pickle this week.
The pickles made seasonal wise at home are: Mango pickle, Lime pickle, Tomato pickle, Amla pickle-Usirikkai, small amla-Gooseberry pickle, Drumstick pickle, Wild lime-Vellanaranga pickle,…the list will continue…. In addition to these we make non-veg pickles like Fish pickle, Mutton pickle, Beef pickle, Prawn pickle, etc
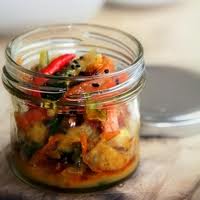 Mixed Vegetable Pickle is the spicy, tangy and crunchy pickle made with the fresh Indian vegetables. A great combination with rice- dal, curd rice and parathas. When soaked in vinegar it leaves the vegetable fresh and retains the crunchy texture.
Mixed Vegetable pickle can be made any time of the year. This is an instant variety and stays good if placed in the refrigerator between servings. It can be stored upto 3 months if handled properly.
Ingredients :
Carrots : 2 nos (equal to ½ cup when chopped)
Beans: 6 nos (equal to ¼ cup when chopped)
Cluster beans: 6 nos (equal to ¼ cup when chopped)
Bitter gourd: ½ piece (equal to ½ cup when chopped)
Beetroot: ¼ piece (equal to ¼ cup when chopped)
Cauli Flower: 3 mini florets (equal to ½ cup when chopped)
Lime : 2 nos ( cut in 1 inch size)
Ginger : 4 inch piece (chop finely)
Green chilly : 3 nos (slit length wise)
Vinegar: ½ cup
I include 5 to 6 Garlic pods (split length wise), this is optional. You can add other vegetables like radish, gherkins (kovakai) as per your choice. Increase masala as per the quantity of vegetables.
Ingredients for Masala:
Red chilli powder- 2 table spoons
Turmeric powder: ½ tspn
Salt: 1.5 tspn
Oil – 1/2 cup
White Vinegar: ¼ cup
Ingredients for Seasoning:
Mustard – 1/2 tsp
Curry leaves : 1 stem
Asafoetida (Hing) : 1/2 tsp
Procedure for Mixed Vegetable Pickle:
 Method:
- Peel external layer of carrot, beetroot, radish. Wash all the vegetables. Drain them completely. Leave it for an hour to dry.
- Chop all vegetable in small pieces. Remove bitter gourd seeds and lime seeds while chopping.
- In a vessel mix all the chopped vegetables- quantity approximately 4.5 cups. Add salt, turmeric powder, chilli powder. Mix well and keep aside for 3 to 4 hours.
- Heat oil in a kadai/pan. When hot add mustard seeds. When the mustard seeds crackle, lower flame add curry leaves and hing. Transfer this hot oil to the vessel containing mixed vegetables.
- Do not mix it immediately. Let the vegetables remain in contact with hot oil till you add the next ingredient- vinegar.
- In the same kadai add vinegar immediately and allow it to boil. Put off flame after 3 minutes of boiling. When cool add this to the mixed vegetable vessel.
- Mix all the contents thoroughly and bottle it.
- The multi color combination looks great. Try this pickle and let us know your feedback. I’m sure your family will enjoy this pickle made at home.
This pickle can be consumed after a day’s time. The bottle should be dry and free of moisture. Place the bottle in the refrigerator always. Use a fresh, dry spoon to dispense the pickle. Remember handling is important for the pickles shelf life.
This crunchy mixed vegetable pickle is an instant variety, typically south Indian preparation and can be stored upto 3 months if handled with care.
SIMPLE WAY TO PREPARE FRESH MOONG GRAM SPROUTS AT HOME
 Sprouts have always been a popular nutritional food for many diet conscious people around the globe. Sprouts are a powerhouse of nutrition. Sprouts contain abundant enzymes, protein, chlorophyll, vitamins, minerals and amino acids. They also contain high level of antioxidants. Sprouts top the list of “health food”. Moreover they are high in fiber and low in calories. So even those who are looking for a way to lose weight can include sprouts in their diet.
Today I’m going to share the recipe for an easy and quick way to prepare fresh moong gram sprouts at home. You do not need any sprouting jar or any special gadgets to make sprouts at home. Homemade sprouts are fresher and tastier than the store purchased ones. Actually I avoid the store ones as I’m not sure about the water they use for preparing sprouts.
As people are becoming conscious about health and diet in particular you can use the method suggested to make sprouts at home. You can consume sprouts fresh- direct form, include in salads, in sandwiches too. Do not cook the sprouts as it loses the nutritional values.
I was not sure how to make sprouts at home. I had to learn the process to complete my sons school project. My son was thrilled when we sprouted moong gram at home for his school project. He went around showing his grandparents, neighbors and friends as if he had performed some magic trick. He did not hesitate to eat a few as he had participated in the sprout preparation. Initially I used to add fresh grated coconut and spread little sugar. Later on, I added grated carrot and salt.
We sprout beans once or twice a week. Even little quantity yields high proteins and nutrition.Sprouted beans is good for diabetic patients.
Fresh Moong gram sprouts Recipe:
Yields: 3 cups
Time required:
Soaking time: 7 to 8 hrs
Standing time: 18 to 24 hrs
Ingredients :
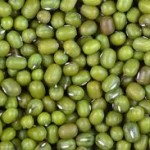 Whole Moong gram (Green gram) : 1 cup
Water: to soak
Procedure for Fresh Moong gram sprouts:
Method:
- Dispense the moong gram and check for any stones.
- Wash the moong gram twice and soak in 3.5 cups of water for 7 to 8 hrs.
- You will see that the moong gram has swollen and become plumpy and full.
- Drain the water and wash again. Ensure there is no water.
- Now transfer the moong gram into a wet muslin cloth. Tie the edges together and hang it in on a rod. Check the cloth in between, if you observe the cloth is dry sprinkle water over the cloth to make it damp.
- After app. 18 hrs open the muslin cloth and check the length of sprouts. If it is small keep it for another 6 hrs atleast.
By now you will see the sprouts popping out from the cloth. You can also know the length of the sprout that has emerged.
In Summers the germination is quick within 20 hrs and in cold weather it takes nearly 24 hrs for the sprouts to emerge with required length.
We at home enjoy longer sprouts. If you want to avoid muslin cloth, you can opt this simple method.
- After you drain the soaked moong gram, transfer into a casserole or hot pack. Drain all water. Leave it for 12 to 16 hrs untouched.
- You will be happy to see the white sprouts that have elongated from the gram.
You can store sprouts in refrigerator for 1or 2 days and plan use when required.
The soaking time and standing time for Chana (chick peas) and black chana is higher. The soaking time will be 10 to 12 hrs and the standing time will be 24 to 30 hrs.
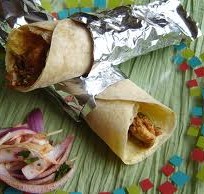
CHICKEN ROLLS (CHICKEN FRANKIES)
October 22, 2013 by admin
Filed under Snacks & Salads
 Chicken rolls are popularly known as Chicken Kathi rolls in India. This is a famous street snack sold at food outlets. Chicken rolls are in huge demand at busy commercial places where the vendors can make a whole lot of money with the sales. Chicken roll are also referred to as Chicken Frankies. This is a quick and filling snack, enjoyed by all. In this recipe we have used boneless chicken filling ,you can select from a wide range of stuffings. You can complement the filling with meat, vegetables, beef, paneer, mushrooms and make the dish taste different everytime. You can create a lot of variations and make the dish tasty.
You can prepare this dish at home and make your snack time an enjoyable one.
Makes – 8 rolls
Ingredients for the filling:
Chicken ( boneless) : 500 gms
Onions: 3 tsp(finely chopped)
Ginger: 1 tsp( finely chopped)
Garlic: 1 tsp( finely chopped) Optional: 1.5 tsp ginger- garlic paste
Tomatoes: ½ cup (finely chopped)
Turmeric powder: ¼ tsp
Red Chilli powder: ½ tsp
Coriander powder: ½ tsp
Cumin powder: ¼ tsp (roast and powder)
Chaat masala: ¾ tsp
Oil: 2 tbsp
Salt: to taste
Ingredients for the dough:
Wheat powder/Atta : 1 cup
All purpose Flour /Maida:1/2 cup
Salt: ½ tsp
Egg: 1
Oil: 1 tbsp
Warm water: ¼ cup
Oil required for applying on the rotis
Egg: 4 nos ( Beat them nicely with 2 pinches of pepper and a pinch of salt).
Ingredients for garnish:
Onions: 1 no., finely sliced
Green chilly: 1 no., finely chopped
Coriander leaves / Kothmir -1 bunch, finely chopped
Lemon -2 nos. diced
Mint chutney or Kothmir Chutney (optional)
Procedure for Chicken rolls (Chicken Frankies):
Method:
- Cut boneless chicken into small pieces. Wash with ½ piece of lime and drain excess water. This will remove blood smell.
- In a kadai / pan add oil. When it become hot add onions . After sauting for 2-3 mins add ginger and garlic. Adding salt at this stage will help onions to cook faster.
- When the onion is cooked add tomatoes. Reduce the flame to medium. Cook till the mixture becomes a lump and starts leaving oil.
- Add all the spices : Turmeric powder, Red Chilli powder , Coriander powder , Garam Masala powder , Cumin powder and Chaat masala.
- Saute the powders and the mixture to avoid catching at the base of the kadai.
- Add the chicken pieces to the mixture and mix thoroughly.
- After 2 to 3 mins you will observe chicken pieces changing color. Reduce the flame completely. Place a lid such that the chicken pieces cooks with steam. Mix frequently to prevent chicken pieces getting burnt.
- Check if the chicken is cooked with a spoon. The pieces will get cut easily when cooked.
- Remove the lid of the pan and dry any excess liquid that is present in the kadai.
- When dry put off the flame. Check for the taste. Your filling is ready.
Now to the next task of preparing rotis for the Chicken Frankies.
- Combine Wheat flour and Maida with salt and oil. Add 1 egg to the mixture and knead well.
- Add water carefully while kneading the dough. The consistency of the dough should be a little softer than Chapati dough. Knead for 4 to 5 minutes.
- Heat a flat tawa for the rotis.
- Divide the dough into eight equal parts. Flatten the ball between palms.
- Dip the ball into a bowl containing maida and roll the dough with the pin. The rotis should be thin and bigger than a chapathi size. Keep dusting the dough with maida to ensure it does not stick to the pin when you press .
- Now lift the roti and place on the hot tawa. Lower the flame to medium. When you observe bubbles surfacing, flip the roti.
- Pour about 2 to 3 spoons of beaten egg on one side of the roti. Smear the egg thoroughly on the roti.
- Now the other side also roti color changes .Flip the roti. Spread few drops of oil on the exterior side of the roti such that the egg side cooks gently.
- With a spatula , loosen the Egg side from the tawa. Apply oil on the top side. Flip once and allow the plain side to cook for a minute and take the roti off the tawa.
- Make other rotis in the same manner.
Now it is time to assemble the chicken frankies together.
- Heat the chicken such that it is warm. Add all the garnish ingredients and mix well. Divide into equal portions required for the number of rotis.
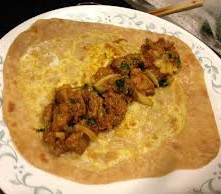
- Spread the filling on the egg side of the roti. On one end of the roti place the filling and roll the roti. Place some mint chutney or kothmir chutney on the roti. Roll the roti to form a tight roll.
- Wrap the chicken frankies with foil to keep warm while serving . If you are serving immediately place a toothpick to avoid unwrapping of roti.
- Chicken rolls are ready to serve.
Do not get boggled with the length of the recipe. It will take not more than 45 mins to 1 hour of your time. Go ahead and surprise your family with this special snack.
You can experiment the rolls with vegetarian ingredients or add cheese for the children to make it less spicy.
My mouth is watering….umhh…hope you enjoy this family surprise recipe.
HOTEL MASALA DOSA RECIPE
October 1, 2013 by admin
Filed under Breakfast recipes
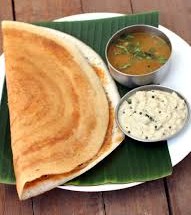 My family loves dosa and specially the masala dosa served at hotels. Many a times I go to veg restaurants only to have masala dosa. I love the crispiness and the taste of dosas. Many of you may be willing to experiment and surprise your family . The ingredients are not new but the proportion is very important to get that crispy texture.
My kids always ask why the masala dosa made at home does not get match this colour and crispiness. I was keen to adapt this preparation and went ahead to master this dosa variety.
As today is October 01, – Elders day. I’ve dedicated this recipe to all the elders at home and in our neighborhood. Happy Elders day…. Let us take this moment to remember all the dedication they had in our upbringing, to place us where we are.
Serves – 6
Ingredients:
Par Boiled rice / Puzhungal ari: 2 cups
Raw rice / Regular cooking rice: ½ cup
Urad dhal (split black gram): ½ cup
Toovar shal (split red gram: ½ tbsp
Chana dhal ( split Bengal gram) : ½ tbsp
Fenugreek (methi): 1 tsp
Sugar: 1tsp
Salt: 1 tbsp
Procedure for Hotel Masala Dosa Recipe:
Method: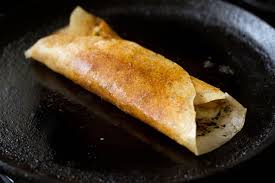
- Soak rice, dhals, fenugreek in water for app. 4 hrs. Soak them together ,ensure there is enough water in the container.
- Wash and drain all water. In a mixie ,grind them into a smooth batter. Add little water while grinding to ensure smoothness.
- Transfer the batter into a large vessel to avoid dripping on fermentation. Add salt to the batter.
- Fermentation process will take app. 6 to 8 hrs.
- Prior to making dosa mix the batter well, add sugar to the batter. Mix batter thoroughly.
- Heat the dosa tava / pan. When hot sprinkle few drops of water .The water will sizzle and evaporate indicating the dosa pan is sufficiently hot for the dosa process.
- With the help of a sliced onion or spoon spread the oil on the dosa tava.
- Pour two spoonful of batter on the tava and uniformly spread into a large circle. Pour oil on the sides of the dosa.
- Slowly flip the dosa on the other side. After a few seconds reverse on the first side.
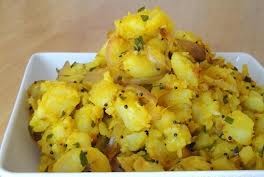
- Dosa is ready. Add 1 large tbsp of masala aloo sabji in the middle of the dosa.
- Fold it from 2 sides. You can opt for triangular shapes or cone shaped dosa.
- Few people like to spread red chilli chutney over the dosa. It is purely personal choice.
- Children may find it too hot.
- Referring to the hotel masala dosa recipe it is served plain with only aloo sabji.
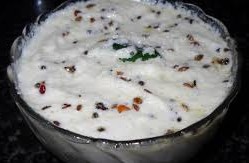
- The dosa is served hot along with coconut chutney and sambhar.
My mouth is watering….umhh…hope you enjoy this family surprise recipe..
You can definitely be innovative and creative in the dosa preparation. Over fermentation will make the dosa batter taste sour. If you want to reserve batter for the next day, do not add salt and sugar. Add salt and sugar prior to making the dosa.
Remember this dosa is best when eaten hot. Hotel masala dosa is golden brown and crispy, you can enjoy eating hot straight from the pan.


